
 MY CART
How to Create Liability Accounts in QuickBooks Online
How to Create Liability Accounts in QuickBooks Online: Video
This video lesson, titled “How to Create Liability Accounts in QuickBooks Online,” shows you how to create liability accounts in QuickBooks Online. This video lesson is from our complete QuickBooks Online tutorial, titled “Mastering QuickBooks Online Made Easy.”
Overview:
How to Create a Liability Account in QuickBooks Online:
You use liability accounts in QuickBooks Online to record debt, accounts payable, loans, lines of credit, taxes due, and other amounts you owe to others. To create a liability account in QuickBooks Online, click the “Settings” button in the QuickBooks Online toolbar and then click the “Chart of accounts” link under the “Your Company” heading in the menu that appears to open the “Chart of accounts” page. Then click the “New account” button in the upper-right corner of the page to open a “New account” pane at the right side of the window.
Enter the Account Name and Select the Liability Account Type and Detail Type:
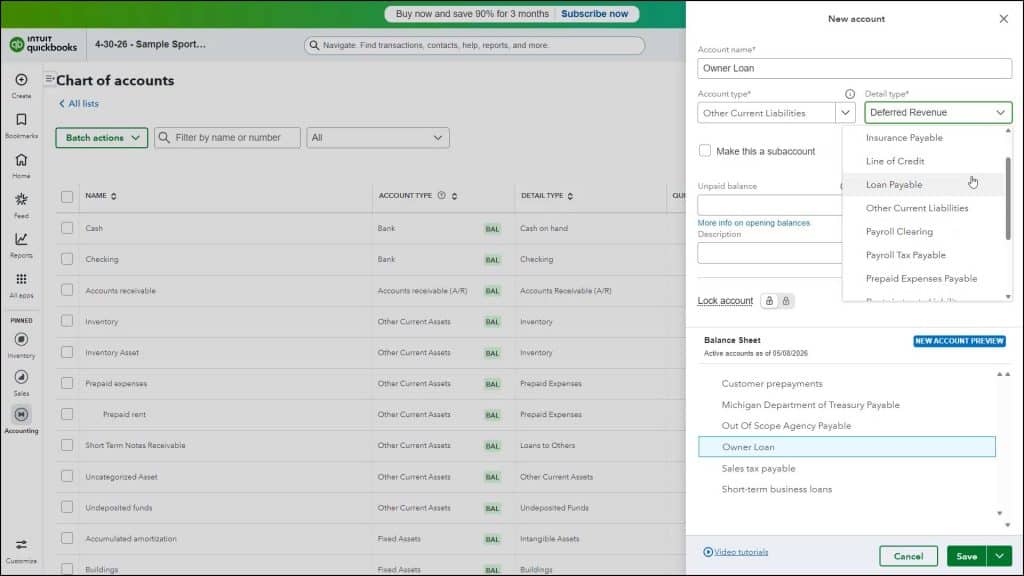
Type the name of the liability account into the “Account name” field. You can enter an account number, if enabled, into the “Account number” field. To create an account to track company debts or obligations to pay within one year, select “Other Current Liabilities” from the “Account type” drop-down and then select the specific type of short-term liability from the “Detail type” drop-down. This drop-down contains commonly used choices like “Insurance Payable,” “Line of Credit,” and “Loan Payable,” to name a few.
Alternatively, to create an account to track company debts or obligations with a repayment date greater than one year, select “Long Term Liabilities” from the “Account type” drop-down and then select the specific type of long-term liability from the “Detail type” drop-down. This drop-down contains the “Notes Payable,” “Other Long Term Liabilities,” or “Shareholder Notes Payable” choices.
If Needed, Enter the Unpaid Balance:
If needed, to enter the beginning balance for existing, outstanding loans, enter the account’s balance as of the selected date into the “Unpaid balance” field and then select the date for which to enter the account’s balance from the “As of” drop-down. Alternatively, if recording a new loan, don’t record an opening balance, as you must enter the transactions that show the assets received for the debt or obligation amount incurred, for accurate accounting.
Enter the Account Description and Save the Account:
To enter an account description, type it into the “Description” field. To save the account, click the “Save” button in the lower-right corner of the “New account” pane.