 MY CART
How to Navigate Folders in File Explorer in Windows 11: Video Lesson
This video lesson, titled “How to Navigate Folders in Windows 11 Using File Explorer: A Windows 11 Training Tutorial,” shows you how to navigate folders in File Explorer in Windows 11. This video lesson is from our complete Windows tutorial, titled “Mastering Windows Online Made Easy.”
Overview:
How to Navigate Using the Main Pane of File Explorer:
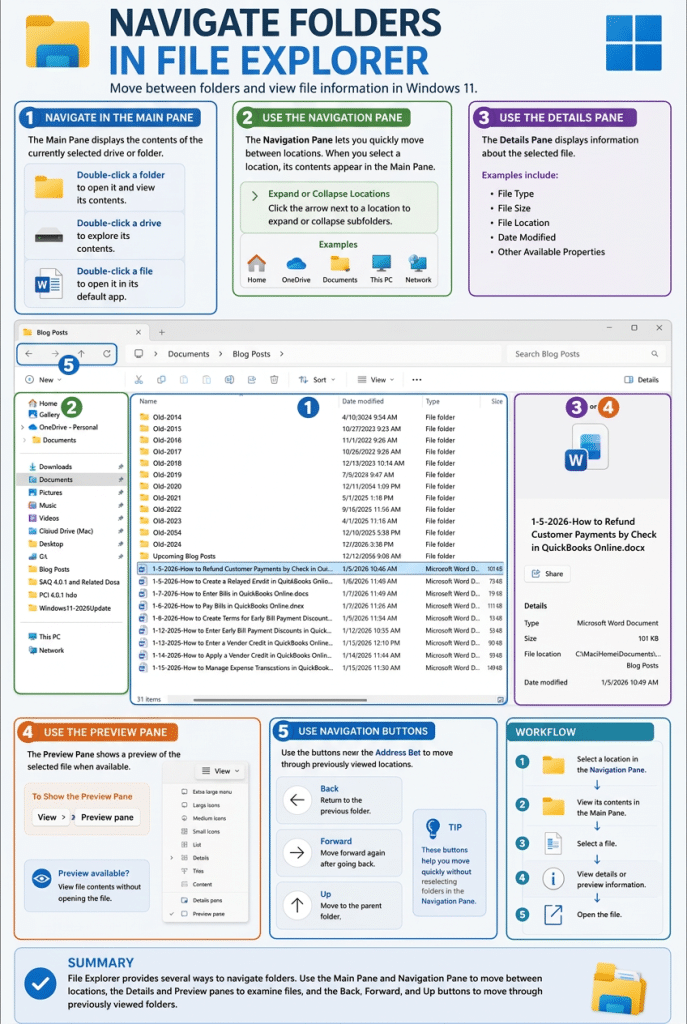
File Explorer in Windows 11 lets you navigate through the files and folders your device can access. The main pane at the right side of the File Explorer window displays the contents of the currently selected drive or folder. This is the primary area where you view and interact with your files and folders.
How to Open a Drive, Folder or File in the Main Pane:
To open a drive or folder in the main pane, double-click it. When you open a drive or folder, File Explorer displays its contents in the same pane. You can repeat this process to move through different locations and explore your files and folders. If you double-click a file instead, Windows attempts to open it using the default app for that file type.
How to Navigate Using the Navigation Pane in File Explorer:
You can also use the Navigation pane at the left side of the File Explorer window to move between locations. When you click a location in the Navigation pane, its contents appear in the main pane at the right. The Navigation pane shows a hierarchical structure of folders and includes arrows next to items that contain subfolders. To expand or collapse a location, click the arrow next to its name.
How to Use an Alternate Method to Open a File in the Main Pane:
To open a file using a different method, right-click the file in the main pane and then click the “Open” command in the menu that appears. Windows then attempts to open the file using the appropriate app for that file type. If Windows does not know which app to use, it displays a dialog box that lets you choose a program for opening the file.
How to Use the Details Pane in File Explorer:
To show additional information about a selected file, you can use the details pane. To select this pane, click the “View” button in the command bar and then click the “Details pane” command in the menu that appears. The button at the far-right end of the command bar then changes to the “Details” button, which you can click to show or hide the details pane.
When the details pane is visible, information about the selected file appears at the right side of the File Explorer window. This information can include details like the file type, size, file location, date modified, and other available properties. To hide the details pane, click the “Details” button at the far-right end of the command bar again.
How to Use the Preview Pane in File Explorer:
You can also use the same general method to show a preview pane instead of the details pane. To do this, click the “View” button in the command bar and then click the “Preview pane” command in the menu that appears. The button at the far-right end of the command bar then changes to the “Preview” button, which you can click to show or hide the preview pane.
The preview pane shows a preview of the selected file when a preview is available. This can be useful when looking at files like pictures or documents without opening them in a separate app. To hide the preview pane, click the “Preview” button at the far-right end of the command bar again.
How to Use the Back, Forward, and Up Buttons to Navigate File Explorer:
If you navigate to a folder and need to return to a previous location, you can use the navigation buttons near the Address bar. Click the Back button to return to the previous folder you viewed and click the Forward button to move forward again after going back. To move up one level in the folder hierarchy, click the Up button to display the parent folder of the current location.