 MY CART
How to Burn a CD or DVD in Windows 11: Video Lesson
This video lesson, titled “How to Burn a CD or DVD in Windows 11: A Windows 11 Training Tutorial,” shows you how to burn a CD or DVD in File Explorer in Windows 11. This video lesson is from our complete Windows tutorial, titled “Mastering Windows Made Easy.”
Overview:
Understand the Type of CD or DVD You Want to Create:
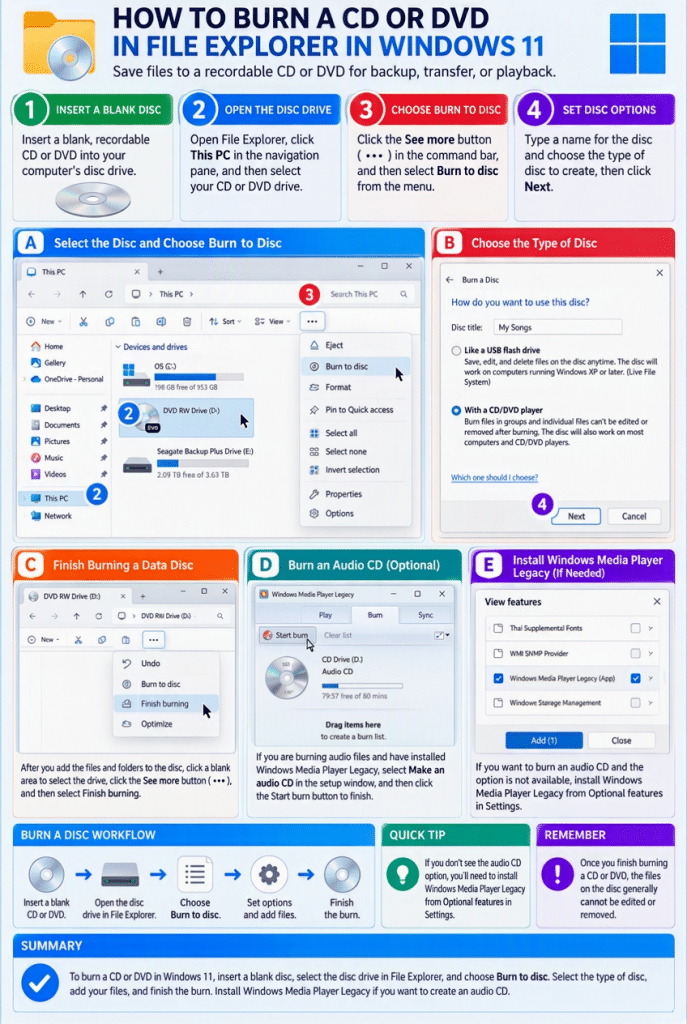
Many computers have a CD or DVD drive that can create recordable CDs or DVDs so you can save content from your computer onto removable media for transfer. If you want to create a standard audio CD that will play in most CD players, Windows Media Player Legacy must be installed. If it is not installed, the option to create an audio CD will not appear during the burn process.
How to Install Windows Media Player Legacy in Windows 11 to Burn Audio CDs:
If you need to install Windows Media Player Legacy from the Optional Features settings in Windows 11 before continuing, open the “Settings” app, select “System,” select “Optional features” and then click the “View features” button. In the “View features” window, click the “See available features” link to show the available features to install. Then select the “Windows Media Player Legacy (App)” checkbox and click the “Add” button to install it.
How to Burn a CD or DVD Using File Explorer in Windows 11:
To burn a CD or DVD using File Explorer in Windows 11, you must first insert a blank, recordable CD or DVD into the corresponding drive in your computer. After you do that, then open a File Explorer window. Then click to select “This PC” in the Navigation pane. Next, click to select your CD or DVD drive in the main pane of the File Explorer window. Finally, click the “See more” button in the command bar and select the “Burn to disc” command from the menu.
After selecting the “Burn to disc ” command, the “Burn a disc” window appears. Type a name for the disc into the “Disc title” field. Then select the type of disc to create by choosing one of the available options.
Select the Type of Disc to Burn:
You can select the “Like a USB flash drive” option to format the disc so it behaves like a removable USB flash drive to which you can add and remove files. This option allows you to copy files to the disc and delete files you no longer need over time, but it may not work on older computers or most CD/DVD players.
Alternatively, you can select the “With a CD/DVD player” option to create a standard recordable disc. This type of disc is finalized and can be read by most computers and disc players. After making your selection, click the “Next” button to continue.
How to Finish if You Selected the “Like a USB Flash Drive” Option:
If you selected the “Like a USB flash drive” option, then Windows immediately formats the disc. After the formatting is complete, then the disc opens in a File Explorer window, where you can use it like any other folder. You can copy files to the disc and delete them when they are no longer needed.
Alternatively, How to Continue if You Selected the “With a CD/DVD Player” Option:
Alternatively, if you selected the “With a CD/DVD player” option, then an empty File Explorer window appears where you then add the files and folders to burn to the disc. To finish burning the selected files, first click into a blank area in the main pane of the File Explorer window to ensure you have the entire CD or DVD drive selected and have not selected any specific file within it that is waiting to be burned. Otherwise, the next command you need to select will not appear. So, when that is done, then click the “See more” button in the command bar and then click the “Finish burning” command in the menu that appears. This action opens the “Burn to Disc” wizard.
In the “Burn to Disc” wizard, the “Disc title” field displays the name you previously entered. Select the desired recording speed from the “Recording speed” drop-down list. If desired, check the “Close the wizard after the files have been burned” checkbox so the wizard closes automatically after completion. Click the “Next” button to begin burning the files to the disc.
Optionally, How to Finish Burning an Audio CD if You Installed the Windows Media Player Legacy App:
If you are burning audio files only, like mp3s or mp4s, to a CD and you have installed the Windows Media Player Legacy app, then an additional screen appears, asking you to select whether you want to “Make an audio CD,” which works with standard audio CD players, or “Make a data CD,” which works for computers and only some CD players. Select your desired choice and click “Next” to continue. If you selected the “Make an audio CD” option, then the Windows Media Player Legacy app opens, and you can click the “Start burn” button to burn the CD and finish.
Alternatively, How to Finish Burning a Standard Data Disc:
Alternatively, if you selected the “Make a data CD” option or do not see the optional screen because you do not have the Windows Media Player Legacy app installed, then Windows burns the data to disc, as usual. After the process is complete, the wizard then either closes automatically or displays a final screen which gives you the option to burn the same files to another disc. If needed, click the “Finish” button to close the wizard.