Add Bullets and Numbering in OneNote – Instructions
Add Bullets and Numbering in OneNote: Video Lesson
This video lesson, titled “Bullets and Numbering,” shows how to add bullets and numbering in OneNote. This video lesson on how to add bullets and numbering in OneNote is from our complete OneNote training, titled “Mastering OneNote Made Easy v.2016-2013.”
Add Bullets and Numbering in OneNote: Overview
You can add bullets and numbering in OneNote to automatically apply simple bullets and numbering to the lists as you type. You can also type a list, select it, and then apply bullets or numbering afterward. It is also possible to change the appearance of the bullets and numbers you use.
One way to add bullets and numbering in OneNote is to apply them as you type. You can start a bulleted list in OneNote by typing an asterisk (*) at the beginning of the first item in your list. Then press the “Spacebar” key. When you press the “Spacebar” on your keyboard, the asterisk turns into a bullet point. Then type the first line of the list. When you press the “Enter” key to move to the next line, it continues the bulleted list. To discontinue the bulleting, press the “Enter” key again when finished with the list.
You can also add bullets and numbering in OneNote to create a numbered list as you type. To do this, type an Arabic or Roman numeral, followed by either a period, dash, or parenthesis. Then press the “Spacebar” key to add a space. As with the bulleting, when you press the “Spacebar” key, the list is automatically converted into a numbered list. When you press the “Enter” key to move to the next line, the numbering continues. As with the automatic bulleting, you can press the “Enter” key on your keyboard again to finish the numbered list.
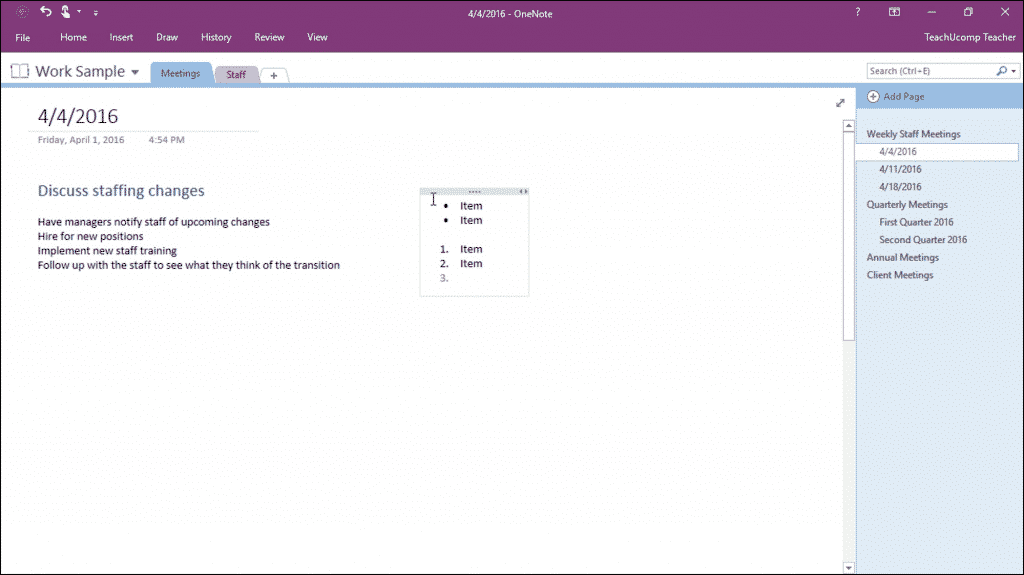
Add Bullets and Numbering in OneNote – Instructions: A picture of a user numbering a list as they type in OneNote.
Another common way to add bullets and numbering in OneNote is to start by typing your list, first. Then click and drag over the line items in the list to select the text you want to make a bulleted or numbered list. Next, click the “Home” tab in the Ribbon and look in the “Basic Text” button group. Here, you can click either the “Bullets” or “Numbering” buttons to apply the last styles used. You can also click the drop-down arrows next to either button. Then select the desired format of bullets or numbering to apply from the drop-down menu of choices.
One advantage of using numbering in OneNote is that you don’t have to manually number your lists. Also, if you make a change such as deleting a line, OneNote automatically corrects the list numbering.
Add Bullets and Numbering in OneNote: Instructions
- To create a bulleted list as you type, type an asterisk (*) at the beginning of the first item in a list.
- Then press the “Spacebar” key on the keyboard.
- After pressing the “Spacebar” key on the keyboard, the asterisk turns into a bullet point.
- To continue the bulleted list, type the first line of a list.
- Then press the “Enter” key to move to the next line.
- To discontinue the bulleting, press the “Enter” key again, when finished.
- To create a numbered list as you type, type an Arabic or Roman numeral followed by either a period, dash, or parenthesis.
- Then press the “Spacebar” key on the keyboard to create a space.
- After pressing the “Spacebar” key, the list is automatically converted into a numbered list.
- To continue the numbered list, type the first line of the list.
- Then press the “Enter” key to move to the next line.
- To discontinue the numbering, press the “Enter” key again, when finished.
- To add bullets and numbering in OneNote to an existing list, type the list, first.
- Click and drag over the line items in the list to select the text to turn into a bulleted or numbered list.
- Click the “Home” tab in the Ribbon and then look in the “Basic Text” button group.
- Then click either the “Bullets” or “Numbering” buttons to apply the last styles used.
- Alternatively, click the drop-down arrows next to either button.
- Then select the desired format of bullets or numbering to apply from the drop-down menu of choices.
