Bank Rules in QuickBooks Online
Bank Rules in QuickBooks Online: Video
This video lesson, titled “How to Create and Manage Rules in QuickBooks Online,” shows you how to use bank rules to either exclude imported transactions or assign information to imported bank transactions in QuickBooks Online. This video lesson is from our complete QuickBooks Online tutorial, titled “Mastering QuickBooks Online Made Easy.”
Overview:
Bank rules in QuickBooks Online help automatically categorize imported bank account and credit card account transactions. To open the “Rules” page in QuickBooks Online to create and manage bank rules, click the “Rules” link under the “Accounting” app in the “All apps” bar.
How to View and Prioritize Bank Rules:
The first time you open the page, you may need to click the “Go to rules” button to view the rules. Any existing bank rules appear in the “Rules” page. QuickBooks Online only applies one rule per transaction, and you prioritize the rules. To prioritize rules in this list, click and drag the handle at the far-left end of any rule up or down in the list of rules and then release it when the rule is in the desired position.
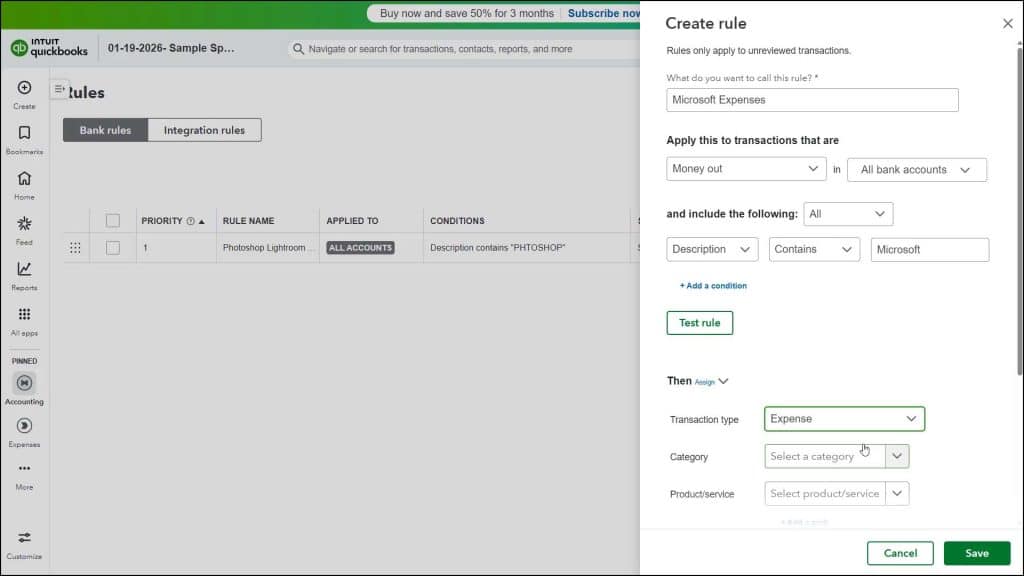
How to Create a New Bank Rule in QuickBooks Online:
To create a new rule, click the “New rule” button in the upper-right corner of the page to open a “Create rule” pane at the right side of the window. Type the rule’s name into the “What do you want to call this rule?” field.
Select Whether to Apply the Rule to Money In or Money Out of Selected Accounts:
To choose whether to apply this rule to money coming in or going out of the company, select a choice from the “Apply this to transactions that are” drop-down. To choose to which accounts to track the money in or out, select your choices from the adjacent “in” accounts drop-down.
Select When to Apply the Rule’s Criteria:
Then decide when to apply the rule to the money going in or coming out of the selected accounts by creating additional filtering criteria. To apply the rule if it matches all the following criteria, choose “All” from the “and include the following” drop-down. To apply the rule if it matches any of the following criteria, choose “Any” from this same drop-down, instead.
Create the Rule’s Criteria:
To create a criterion, use the next two drop-downs and the adjacent field to select a field to compare, select a comparison operator, and then type the field comparison value. To add more criteria, click the “+ Add a condition” link and then repeat this step to add as many criteria as needed for the rule.
Choose to Either Exclude or Assign Values to Transactions Matching the Criteria:
If a transaction matches any or all the criteria you set, you then need to choose how to categorize the transaction in the “Then assign” section. Alternatively, to exclude matching transactions, click the drop-down next to the word “Assign” and select “Exclude,” instead. You can then click the “Save” button to finish saving the rule.
However, if you leave it set at the “Assign” value, you must first select the type of transaction as which to categorize it by selecting a choice from the “Transaction type” drop-down. Then, depending on your “Transaction Type” selection, you must enter at least one value into the fields that appear for your selected transaction type.
For the “Transfer” transaction type, there is an “Account” drop-down. For the “Credit card payment” type, there is a “Credit card” or “Bank account” and “Payee” drop-down. For all other transaction types, there are “Category,” “Product/service” (for “Money Out”), “Payee,” and “Customer” (for “Money Out”) drop-downs and fields within which you can select or enter the value or values with which to categorize the matching transaction.
If Needed, to Split Matching Transactions to Multiple Accounts:
If needed, to add a split account categorization, click the adjacent “Add a split” link in the list of fields to show a “Split by” section. Use the drop-down under the “Split by” label to split it by amount or percent. Then, for each “Split detail” section, type a percentage or amount, select a “Category” account, and optional “Class,” if enabled. You can click the “Add a line” link under the “Split detail” sections to add a new section, if needed. To delete a section, click the trash can icon to the right of the section.
If Needed, to Assign More Data:
To assign more data, like optional classes, locations, or memo field values, click the “+ Assign more” link under the primary categorization fields to expand this section and show the “Class” and “Location” fields, if enabled, and the “Replace bank memo” field. To append text to the bank memo instead of replacing it, if needed, check the “Also keep existing bank memo” checkbox. You can then enter any values to assign in these fields, as needed. You can click the “Clear” link that appears here to clear the additional fields and collapse them again, if needed.
Choose Whether to Automatically or Manually Confirm Matching Transactions:
To automatically confirm the transactions to which this rule applies, ensure the “Auto-add” toggle switch under the “Automatically confirm transactions this rule applies to” section is set to the “On” position. To instead manually confirm transactions to which this rule applies, switch it to the “Off” position.
Test and Save the New Bank Rule:
To test the rule, click the “Test rule” button towards the upper section of this pane. To save the rule into the “Rules” list, when finished, click the “Save” button in the lower-right corner of the “Create rule” pane. Alternatively, to cancel the rule, click the “Cancel” button.
How to Edit or Delete a Bank Rule in QuickBooks Online:
To edit a rule, click the “Edit” link under the “Actions” column in its row in the “Rules” page to reopen the rule’s pane, where you can then edit it and save your changes. To delete a rule, click the drop-down under its “Actions” column and then click the “Delete” link. Then click the “Yes” or “No” button in the “Delete this rule?” window that opens to confirm or cancel the deletion.
How to Copy or Disable and Enable a Bank Rule in QuickBooks Online:
To copy a rule to use as the basis for another rule, click the drop-down under its “Actions” column and then click the “Copy” link. Then edit the copy of the rule in the rule’s pane that opens and save your changes. To temporarily disable a rule, click the drop-down under its “Actions” column and then click the “Disable” link. The value under its “Status” column should then switch to “Disabled.” To enable a disabled rule, click the drop-down under its “Actions” column and then click the “Enable” link.


