TeachUcomp, Inc.

 MY CART
  • VIDEO COURSES
    • All-Access Subscriptions
    • Business Licensing
    • Course List
      • Accounting
      • Adobe
        • Acrobat
        • Lightroom Classic
        • Photoshop
        • Photoshop Elements
      • Crystal Reports
      • Employment Skills
        • Interview Skills
        • Resume Skills
      • For Lawyers
        • Excel for Lawyers
        • Outlook for Lawyers
        • QuickBooks for Lawyers
        • Word for Lawyers
      • HTML
      • JavaScript
      • Microsoft Office
        • Access
        • Excel
        • Microsoft Office Suite
        • OneNote
        • Outlook
        • Outlook on the Web
        • PowerPoint
        • Publisher
        • Word
      • Microsoft Project
      • Microsoft Teams
      • QuickBooks Online
      • QuickBooks Pro
      • Sage
        • Peachtree
        • Sage 50
      • SQL
      • Windows
    • My Courses
    • Video Course Options
  • SUBSCRIPTIONS
  • MANUALS
    • Adobe
      • Acrobat
      • Lightroom Classic
      • Photoshop
      • Photoshop Elements
    • Crystal Reports
    • For Lawyers
      • Excel for Lawyers
      • Outlook for Lawyers
      • QuickBooks for Lawyers
      • Word for Lawyers
    • HTML
    • JavaScript
    • Microsoft Office
      • Access
      • Excel
      • OneNote
      • Outlook
      • Outlook on the Web
      • PowerPoint
      • Publisher
      • Word
    • Microsoft Project
    • Microsoft Teams
    • QuickBooks Online
    • QuickBooks Pro
    • Sage
      • Peachtree
      • Sage 50
    • SQL
    • Windows
  • BOOKS
    • QuickBooks Online
  • REFERENCE CARDS
    • Adobe
      • Acrobat
      • Lightroom Classic
      • Photoshop
      • Photoshop Elements 2026
      • Photoshop Elements 2025
      • Photoshop Elements 2024
      • Photoshop Elements 2023
      • Photoshop Elements 2022
      • Photoshop Elements 2021
      • Photoshop Elements 2020
      • Photoshop Elements 2019
      • Photoshop Elements 2018
      • Photoshop Elements 15
    • Chrome OS
      • Chrome OS Keyboard Shortcuts
    • FreshBooks
    • Google
      • Google Classroom for Teachers
      • Google Docs
      • Google Drive
      • Google Forms
      • Google Sheets
      • Google Slides
    • macOS
      • macOS Keyboard Shortcuts
      • macOS Tahoe
    • Microsoft Office
      • Excel Formulas and Functions
      • Excel Keyboard Shortcuts
      • Excel Tables PivotTables and Charts
      • Microsoft 365
        • Access for Microsoft 365
        • Excel for Microsoft 365
        • Microsoft Office 365
        • Outlook for Microsoft 365 Classic Edition
        • Outlook for Microsoft 365 (New Outlook)
        • PowerPoint for Microsoft 365
        • Publisher for Microsoft 365
        • Word for Microsoft 365
      • Microsoft Office 2021
        • Access 2021
        • Excel 2021
        • Microsoft Office 2021
        • OneNote for Windows 10
        • Outlook 2021
        • PowerPoint 2021
        • Publisher 2021
        • Word 2021
      • Microsoft Office 2019
        • Access 2019
        • Excel 2019
        • Microsoft Office 2019
        • Outlook 2019
        • PowerPoint 2019
        • Publisher 2019
        • Word 2019
      • Microsoft Office 2016
        • Access 2016
        • Excel 2016
        • Microsoft Office 2016
        • OneNote 2016
        • Outlook 2016
        • PowerPoint 2016
        • Publisher 2016
        • Word 2016
      • Microsoft Office 2013
        • Excel 2013
        • Microsoft Office 2013
        • OneNote 2013
        • Outlook 2013
        • PowerPoint 2013
        • Word 2013
      • Microsoft Office for iPad
        • Microsoft Office for iPad
      • Word Keyboard Shortcuts
    • Microsoft Teams
    • QuickBooks Online
    • QuickBooks Pro
      • QuickBooks Pro 2024
      • QuickBooks Pro 2023
      • QuickBooks Pro 2022
      • QuickBooks Pro 2021
      • QuickBooks Pro 2020
      • QuickBooks Pro 2019
      • QuickBooks Pro 2018
      • QuickBooks Pro 2017
      • QuickBooks Pro 2016
      • QuickBooks Pro 2015
      • QuickBooks Pro 2014
    • Sage 50 Accounting
    • SQL
    • Windows
      • Windows 11
      • Windows 11 and 10 Keyboard Shortcuts
      • Windows 10
  • STICKERS
    • Chrome OS
    • macOS
    • Microsoft Office
      • Word and Excel (Mac)
      • Word and Excel (PC/Windows)
    • QuickBooks Desktop
      • QuickBooks Desktop (PC/Windows) 2024
      • QuickBooks Desktop (PC/Windows) 2023
      • QuickBooks Desktop (PC/Windows) 2022-2015
    • QuickBooks Online
    • Windows
  • SUPPORT
    • Company
      • About Us
      • Blog
      • Contact Us
      • Our History
      • Our Philosophy
        • Customer Service
        • Mission
      • Policies
      • Testimonials
    • FAQ
      • Contact Us
    • Help
    • Lost Password
    • Register a Product
  • LOGIN
    • Manage My Account
    • Member Login
    • My Courses
Shop Now

Change Image Size in Photoshop

by Joseph Brownell / Monday, March 18 2024 / Published in Latest, Photoshop

How to Change Image Size in Photoshop:

          This video lesson, titled “Learn How to Change the Image Size and Resolution in Adobe Photoshop: A Training Tutorial,” shows you how to change image size in Photoshop and also change image resolution in Photoshop. This video lesson is from our complete Photoshop tutorial, titled “Mastering Photoshop Made Easy.”

Overview:

            All images must appear as pixels onscreen when using a computer display. So, before you can manipulate the images, you must learn how pixels are displayed and measured within computer displays. When an image appears on a monitor, it is rendered according to the pixel dimensions of the graphic and the display settings and size of the monitor.

            The image’s pixel dimensions are the width and height of the image in pixels. The number of pixels displayed in an image is measured in pixels (dots) per inch or pixels (dots) per centimeter. This is also called the ppi or dpi. Generally, the higher the ppi or dpi, the higher the image quality.

            The digital size of an image, usually measured in kilobytes, megabytes, or gigabytes, is proportional to the pixel dimensions of an image. Images with a higher ppi/dpi have a higher resolution and produce greater detail when printed, but they may also print more slowly and take more disk space for storage. Photoshop supports a maximum pixel dimension of 300,000 x 300,000 pixels per image.

How to Change the Size of an Image in Photoshop:

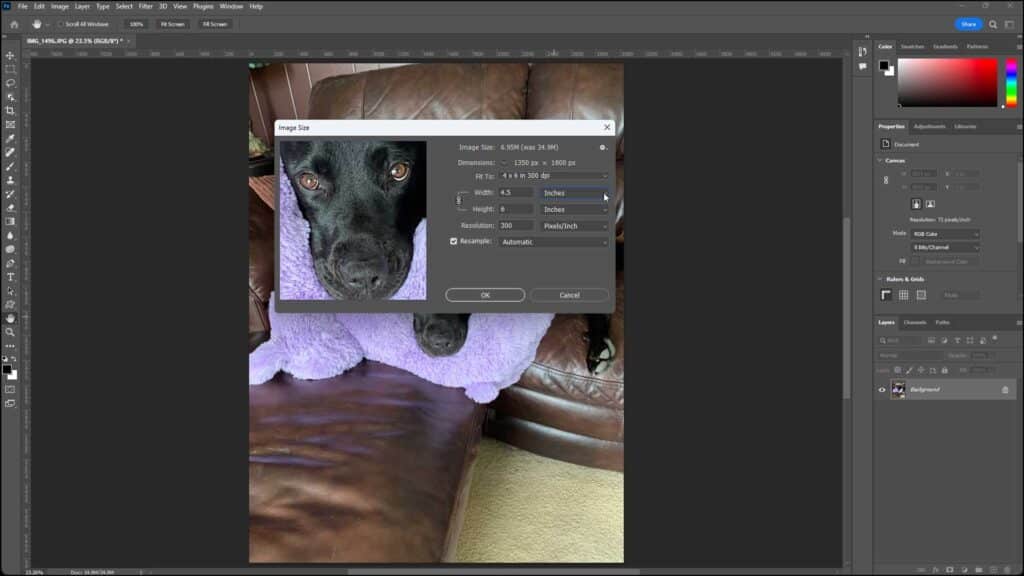
            To change the size of an image in Photoshop, select “Image| Image Size…” from the Menu Bar to open the “Image Size” dialog box. The current digital size of the image appears next to the “Image Size” label. Its current pixel dimensions appear in the “Dimensions” section. To show the image’s dimensions using a different metric, click the drop-down arrow next to the “Dimensions” label and select the desired metric from the drop-down menu to see the measurements of the image for that metric appear, instead. To show pixel measurements, select the “Pixels” choice from this drop-down menu.

A picture showing how to change the size of an image in Photoshop using the “Image Size” dialog box.

Size Options:

            To resize the image to fit a selected preset, choose the desired image size preset from the “Fit To” drop-down. Alternatively, to manually specify dimensions and a resolution which you can save as a preset, if desired, enter number values for the width and height into the “Width” and “Height” fields and then use their adjacent drop-downs to select the units of measurement for those values. To disable proportionally scaling the width and height values together, if needed, click the chain-link icon to the left of the height and width dimensions to toggle it off.

Resolution Options:

            To change the resolution of the image, or ppi/dpi, enter the desired resolution number value into the “Resolution” field and then select the unit of measurement for the resolution value from the adjacent drop-down. To resample the image when resizing it, check the “Resample” checkbox. Then use the adjacent drop-down to select the interpolation method of resampling to apply. If you do not resample an image when resizing it, you instead change its resolution.

            To not change its resolution, you resample the image to add or remove pixels using a selected interpolation method. When resampling an image, if you increase the image size, you add new pixels to the image. Photoshop adds the new pixels based on the color values of existing pixels in the image. You can generally resample down and not lose image quality. However, resampling up, or adding pixels, often results in an image that is a bit blurry.

Interpolation Options:

            For the methods of interpolation that you can select from the drop-down, selecting the “Automatic” choice lets Photoshop use the interpolation method it thinks is best based on the data in the image. The other interpolation methods listed in this drop-down show the situation in which you may want to try using them within parentheses at the ends of their names.

            If one interpolation method doesn’t produce the desired effect, you can try using another, if needed. For example, if you find that enlarging an image using the “Preserve Details (enlargement)” interpolation method produces undesirable results, you can undo your changes and then try it again using the “Preserve Details 2.0” interpolation method. Also, note that the “Bilinear” interpolation method, which lacks a helpful description, adds pixels to an image by averaging the color values of surrounding pixels to produce medium-quality results.

How to Scale Styles and Finish Resizing the Image:

            To scale any styles applied to the image when resizing, click the “Set additional Image Size options” button, which looks like a cog icon, in the upper-right corner of the “Image Size” dialog box. Ensure there is a checkmark in front of the “Scale Styles” command in the menu that appears. If not, click it to select it to enable that resizing option.

            To finish and resize your image in Photoshop after setting the “Image Size” options, click the “OK” button in the “Image Size” dialog box. Alternatively, to cancel the resizing, click the “Cancel” button.

Tagged under: course, help, how to change the image size in photoshop, how-to, image, image dimensions, image size, image size in photoshop, images, instructions, interpolation methods, learn, lesson, overview, photos, photoshop, pixels, resolution, scale styles, teach, training, tutorial, video, width

About Joseph Brownell

Joseph Brownell is founder and Vice President of TeachUcomp, Inc. He is the author of dozens of titles across the TeachUcomp, Inc. product line.
Sale! One Year Online Entire Library $29. Click here to see the deals.


Photoshop Quick Reference Guide. Buy Now.
 

Categories

  • GET SOCIAL

© 2001-2026 Copyright TeachUcomp, Inc. All rights reserved.

TOP
SALE! $29 All-Access 4 Days 16 Hours 15 Minutes 51 Seconds      $199 $29 Entire Library!
See Deal