Customize the Start Menu in Windows 10 – Tutorial
Customize the Start Menu in Windows 10: Video Lesson
This video lesson, titled “Customizing the Start Menu in Windows 10,” shows you how to customize the Start Menu in Windows 10. This video lesson on how to customize the Start Menu in Windows 10 is from our complete Windows 10 training, “Mastering Windows Made Easy v.10.”
Customize the Start Menu in Windows 10: Overview
You can customize the Start menu in Windows 10 in many ways. You can control the placement and grouping of the live tiles shown at the right side of the Start menu, as well as name the tile groupings you create. You can also control the appearance of many of the individual live tiles themselves within the Start menu. In this lesson, you will learn how to customize the Start menu in Windows 10.
All of the software or apps that are installed on the computer create program icons within the “All apps” list that you can access by clicking the “All apps” link at the left side of the Start menu. You can add a “live tile” icon to the right side of the Start menu for easier access to any of these program icons. To do this click the “All apps” link at the left side of the Start menu and then find the icon for the app or program within the list. After you find the icon for the program you want to add to the Start menu, right-click the icon. From the pop-up menu that appears, select the “Pin to Start” command to add a live tile for that program to the right side of the Start menu in the next available tile position within the most recently created tile group.
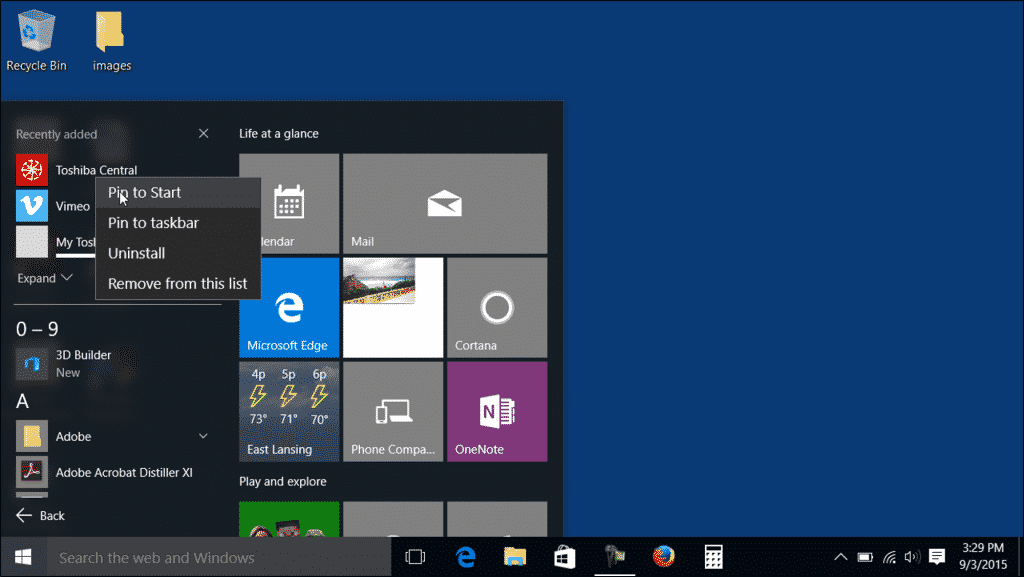
Customize the Start Menu in Windows 10 – Tutorial: A picture of a user adding a tile to the Start Menu in Windows 10.
You can remove a live tile from the Start menu by right-clicking the live tile you want to remove, shown in the right side of the Start menu. Then click the “Unpin from Start” command within the pop-up menu that appears to remove the live tile from its tile grouping within the Start menu.
You can arrange the live tiles within the Start menu by clicking and dragging them to the desired location and then releasing them when they are in the desired position within a tile group. Tiles are aligned within their tile groups left to right and then top to bottom. However, the number of tiles that you can place next to each other from left to right and top to bottom within a group will vary, based on the size of the tiles themselves. You can create new tile groups by clicking and dragging a live tile above or below an existing live tile group, or to the far right side of the Start menu if it is expanded, until you see a new, thin horizontal bar appear. At that point, release the live tile to create a new tile grouping.
You can name the live tile groupings you create so you can easily tell what apps are located within a group. For example, you could create a “Microsoft Office” live tile grouping for your Microsoft Office application tiles within the Start menu. After creating a tile group, you can name the group by clicking or tapping the space where the live tile group name would, or does, appear. Then type the name that you want to give to the live tile group into the box that appears. Press the “Enter” key on your keyboard when finished naming the group. To rename an existing live tile group after clicking the live tile’s group name, click the small “x” that appears at the right end of the group name that you want to clear. Type a new name and then press “Enter” on your keyboard to apply the new name.
You can also move entire live tile groups around to reorganize their position within the Start menu. To do this, hover over the space where the live tile group name appears. You should then see a double-horizontal line set appear at the right end of the live tile group’s name. Click and drag the double-horizontal line set to move the entire live tile group, and then release the group when it is in the desired position to reorder the tile groups in your Start menu.
You can also customize the appearance and other available settings of the individual live tiles within the Start menu. To do this, right-click any live tile to display its customization options within a pop-up menu. You can then click any command shown within this pop-up menu to change the desired setting. The commands will vary, depending upon the live tile you selected. However, common commands include “Resize” and “Turn live tile on/off.” If you do not want to make any changes to the selected live tile, click into the blank area in the Start menu to hide the pop-up menu.
Customize the Start Menu in Windows 10: Instructions
- To add a “live tile” icon to the right side of the Start menu, click the “All apps” link at the left side of the Start menu and then find the icon for the app or program to add within the list.
- After you find the icon for the program you want to add to the Start menu, right-click the icon.
- In the pop-up menu that appears, select the “Pin to Start” command to add a live tile for that program to the right side of the Start menu in the next available tile position within the most recently created tile group.
- To remove a live tile from the Start menu, right-click the live tile to remove at the right side of the Start menu.
- Click the “Unpin from Start” command within the pop-up menu that appears.
- To arrange the live tiles within the Start menu, click and drag them to the desired location within a tile group and then release them.
- Tiles are aligned within their tile groups left to right and then top to bottom. However, the number of tiles that you can place next to each other from left to right and top to bottom within a group will vary, based on the size of the tiles themselves.
- To create new tile groups, click and drag a live tile above or below an existing live tile group, or to the far right side of the Start menu if it is expanded, until you see a new, thin horizontal bar appear.
- At that point, release the live tile to create a new tile grouping.
- To name a live tile group, click or tap the space where the live tile group name would, or does, appear.
- Type the name you want to give to the live tile group into the box that appears.
- Press the “Enter” key on your keyboard when finished naming the group.
- To rename an existing live tile group after clicking the live tile’s group name, click the small “x” that appears at the right end of the group name that you want to clear.
- Type a new name and then press “Enter” on your keyboard to apply the new name.
- To move an entire live tile group, hover over the space where the live tile group name appears.
- You should then see a double-horizontal line set appear at the right end of the live tile group’s name.
- Click and drag the double-horizontal line set to move the entire live tile group, and then release the group when it is in the desired position to reorder the tile groups in your Start menu.
- To customize the appearance and other available settings of the individual live tiles within the Start menu, right-click any live tile to display its customization options within a pop-up menu.
- Then click any command shown within this pop-up menu to change the desired setting. The commands will vary, depending upon the live tile you selected. However, common commands include “Resize” and “Turn live tile on/off.”
- If you do not want to make any changes to the selected live tile, click into the blank area in the Start menu to hide the pop-up menu.
