How to Adjust the White Balance in Camera Raw in Photoshop: Video
This video lesson, titled “Learn How to Adjust the White Balance in Camera Raw in Adobe Photoshop: A Training Tutorial,” shows how to adjust the white balance in Camera Raw in Photoshop. This video lesson is from our complete Photoshop tutorial, titled “Mastering Photoshop Made Easy.”
Overview:
This lesson shows different ways to adjust the white balance in Camera Raw in Photoshop. Often, the first correction to make after opening a camera raw file in Photoshop is to set its correct white balance. The white balance of a camera raw image is recorded by the camera as metadata when the image is taken.
This metadata is read by Photoshop when you open the camera raw image and often results in the correct color temperature for the image. However, you can adjust the white balance for images that display a color cast due to an imbalance in the white balance. There are three ways to adjust the white balance in an image.
How to Use the White Balance Tool in Camera Raw in Photoshop:
The easiest way to automatically adjust the white balance in the Camera Raw dialog box in Photoshop is to use the White Balance Tool. To use the White Balance Tool in the Camera Raw dialog box in Photoshop, click the “Edit” button in the toolbar of the Camera Raw dialog box, if needed, to show the Edit panel to its left. If needed, then click the “Basic” tab in the Edit panel to expand it and show its settings. Then click the “White Balance Tool” button in the expanded “Basic” tab of the Edit panel to change your pointer into the White Balance Tool.
Then find a neutral gray area in the image. If a neutral gray area is not available, you can also find a white area. However, make sure the white area is not specular white. This means you should try to select a white object in the photo, versus a source of white that is from light or a reflection of light. After finding the gray area or white area, click it with your pointer to automatically correct the image’s white balance. To turn off the White Balance Tool after correcting the white balance, click the “White Balance Tool” button in the expanded “Basic” tab of the Edit panel again.
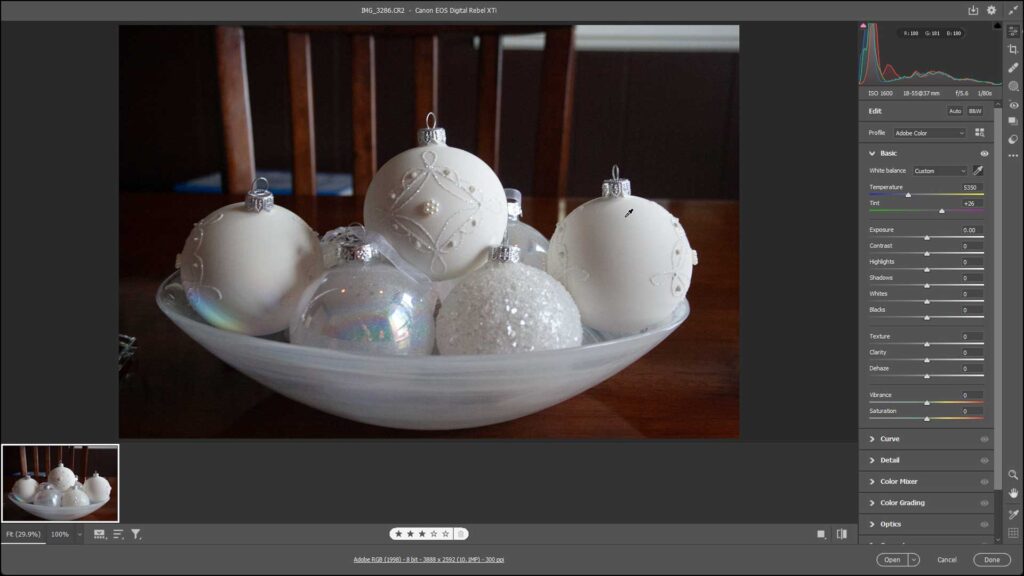
A picture showing how to adjust the white balance in Camera Raw in Photoshop by using the White Balance Tool.
How to Adjust the White Balance by Using a Preset in Camera Raw in Photoshop:
Alternatively, to adjust the white balance in a camera raw image by using a white balance preset, select a preset white balance level from the “White Balance” drop-down in the expanded “Basic” tab of the Edit panel after clicking the “Edit” button in the toolbar of the Camera Raw dialog box. The default setting, “As Shot,” shows the white levels using the camera raw photo’s metadata. This is often the same white balance as selecting the “Auto” preset, too.
How to Manually Adjust the White Balance in Camera Raw in Photoshop:
Alternatively, to manually adjust the white balance in a camera raw image in Photoshop if the available automatic methods do not correctly adjust the white balance, use the adjacent “Temperature” and “Tint” sliders on the “Basic” tab in the Edit panel to adjust the temperature and tint of the image. If preferred, you can also enter temperature and tint values into the adjacent value fields for each slider.
The “Temperature” slider uses the Kelvin color temperature scale. You can adjust the “Temperature” slider to the left to add more blue to an image that contains too much yellow. Conversely, you can slide the same slider to the right to add more yellow to an image with a blue color cast. This corrects the color temperature of the light used when the photo was taken.
The “Tint” slider adjusts the white balance to correct magenta or green color casts in an image. You can move the slider to the left, using negative values, to add more green to the image. Conversely, sliding the same slider to the right, using positive values, adds more magenta to the image.
Instructions on How to Set the White Balance in a Camera Raw Photo in Photoshop:
- To use the White Balance Tool in the Camera Raw dialog box in Photoshop to adjust the white balance in a photo, click the “Edit” button in the toolbar of the Camera Raw dialog box, if needed, to show the Edit panel to its left.
- If needed, then click the “Basic” tab in the Edit panel to expand it and show its settings.
- Then click the “White Balance Tool” button in the expanded “Basic” tab of the Edit panel to change your pointer into the White Balance Tool.
- Then find a neutral gray area in the image. If a neutral gray area is not available, you can also find a white area. However, make sure the white area is not specular white, which is white from light or a reflection of light.
- After finding the gray area or white area, click it with your pointer to automatically correct the image’s white balance.
- To turn off the White Balance Tool after correcting the white balance, click the “White Balance Tool” button in the expanded “Basic” tab of the Edit panel again.
- Alternatively, to adjust the white balance in a camera raw image by using a white balance preset, select a preset white balance level from the “White Balance” drop-down in the expanded “Basic” tab of the Edit panel after clicking the “Edit” button in the toolbar of the Camera Raw dialog box.
- Alternatively, to manually adjust the white balance in a camera raw image in Photoshop, use the adjacent “Temperature” and “Tint” sliders on the “Basic” tab in the Edit panel to adjust the temperature and tint of the image.
- If preferred, you can also enter temperature and tint values into the adjacent value fields for each slider.