How to Create Sales Orders in QuickBooks Online Plus
How to Create Sales Orders in QuickBooks Online Plus: Video
This video lesson, titled “How to Create Sales Orders in QuickBooks Online Plus,” shows how to manually create sales orders in QuickBooks Online Plus and manage your company’s sales orders. This video lesson is from our complete QuickBooks Online tutorial, titled “Mastering QuickBooks Online Made Easy.”
Overview:
If you connect external sales channels to QuickBooks Online, the external orders import as sales orders in QuickBooks Online. Separately, you can also manually create sales orders in QuickBooks Online Plus or higher. Manually created sales orders in QuickBooks Online are like invoices; however, sales orders do not affect inventory item “Quantity on hand” levels, or amounts in accounts receivable, unless they are converted into an invoice in QuickBooks Online.
However, inventory item quantities for sales orders do appear in the product details for the inventory items in the “Products & services” list and do affect the “Available Quantity” of those inventory items. You can also add columns for “Qty on SO” and “Avail Qty” to the “Products & services” list to easily see these numbers, if needed.
How to View Sales Orders in QuickBooks Online:
To view sales orders in QuickBooks Online, click the “Sales orders” link under the “Sales & Get Paid” app in the “All apps” bar. The “Sales orders” page shows any sales orders for your company in a list. It shows columns for “Order No.” “Order date,” “Customer,” “Channel,” “Order total,” “Order status,” “Payment status,” “Fulfillment status,” and “Actions.”
How to Filters the Sales Orders List:
To filter the list of sales orders in QuickBooks Online, click the “Filter” drop-down above the sales orders list in the “Sales orders” page, select the desired filtering criteria in the drop-down menu that appears, and then click the “Apply” button. The current filters then appear to the right of the “Filter” drop-down. To clear an individual filter, click the “X” button at its right end. Alternatively, to clear all filters, click the “Filter” drop-down and then click the “Reset” button, and then the “Apply” button.
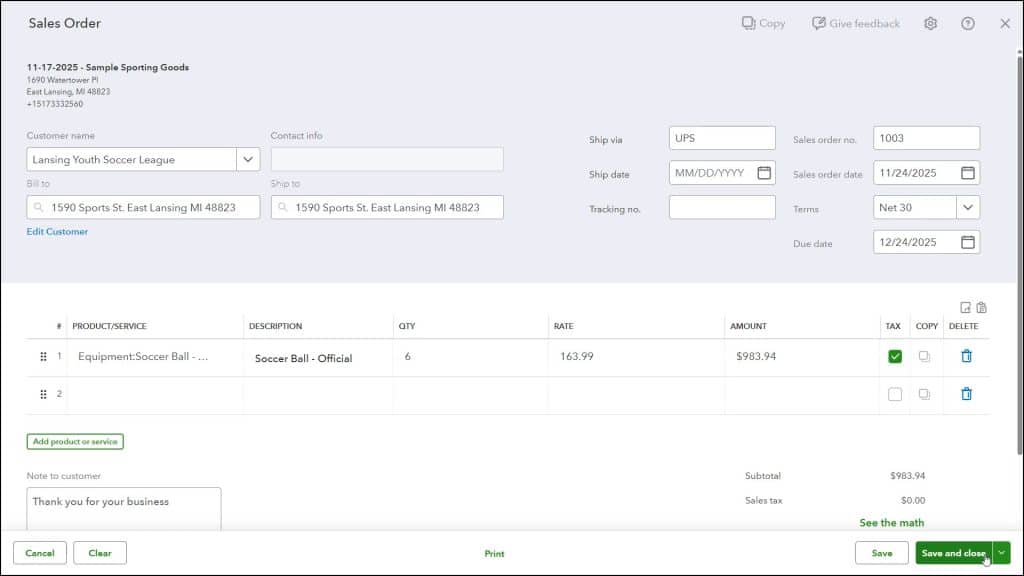
How to Create a New Sales Order in QuickBooks Online Plus:
To manually create a new sales order in QuickBooks Online Plus, either click the “Create sales orders” button in the center of the “Sales orders” page if you haven’t created any sales orders yet or click the “Create new” button in the upper-right corner of the “Sales orders” page if you have already created sales orders to open a “Sales Order” window.
In the “Sales Order” window, enter the customer and product information, just as when creating an invoice, which we already covered in the earlier lesson titled “Creating an Invoice.” To save the sales order or save the sales order and then create a new sales order, close the window, or print it, either click the “Save” button or click or select a choice from the “Save and new / Save and close / Print” drop-down button in the window’s lower-right corner.
Alternatively, to cancel creating the sales order, click the “Cancel” button in the toolbar. To clear the sales order to re-enter its information, click the “Clear” button. To print the sales order, click the “Print” button in the toolbar.
How to Perform Actions on Sales Orders:
To perform actions on sales orders manually created in QuickBooks Online Plus, click the displayed action or select a different action from the drop-down in the desired sales order’s “Actions” column. To edit the sales order in the “Sales Order” window again, click the “Edit” command.
To convert the sales order into an invoice in QuickBooks Online, select the “Convert to invoice” command. To cancel the sales order, select the “Cancel order” command. To mark the sales order as shipped, select the “Mark as shipped” command.
To close the sales order, select the “Close order” command. To email the sales order, select the “Email” command. To print the sales order, select the “Print” command. To delete the sales order, select the “Delete” command.


