How to Customize Management Reports in QuickBooks Online
How to Customize Management Reports in QuickBooks Online: Video
This video lesson, titled “How to Customize Management Reports in QuickBooks Online,” shows you how to customize the management reports in QuickBooks Online. This video lesson is from our complete QuickBooks Online tutorial, titled “Mastering QuickBooks Online Made Easy.”
Overview:
To customize a management report in QuickBooks Online, hover over the “Reports” button in the Navigation Bar and then click the “Management reports” link in the menu that appears to open the “Management reports” page. Alternatively, click the “Management reports” link in the “Reports & analytics” bar if that bar already appears onscreen to open the same page.
Create a Copy of a Management Report to Edit or Create a New Management Report:
To duplicate an existing management report to use as the basis for a new management report, click the drop-down in the “Action” column of the desired management report to use as the basis for a new custom management report and then select the “Duplicate” command to create a copy of it. To then customize the new copy of the management report, click the drop-down in its “Action” column and select the “Edit” command to open the “Edit management report” window.
Alternatively, to create a new management report from scratch in QuickBooks Online, click the “+ Management report” button in the upper-right corner of the “Management reports” list to immediately open the “Create management report” window. Note that the customization options are the same between the “Edit management report” and “Create management report” windows; they just have different titles.
Name the Custom Management Report and Set Its Default Report Period:
To name or rename the management report, type a name into the “Management report name” field in the upper-left corner of this window. To set its default reporting period, select a choice from the “Report period” drop-down in the upper-right corner of the window.
Customize the Management Report’s Sections:
Icons for the different sections of the management report template appear in a list at the left side of this window. The default sections are “Cover page,” “Table of contents,” “Preliminary pages,” “Reports and charts” and “End notes.” To show the customization settings for a section, click its icon at the left side of the window to show them in the area to the right. The toolbar at the bottom of the window contains buttons for managing the custom management report.
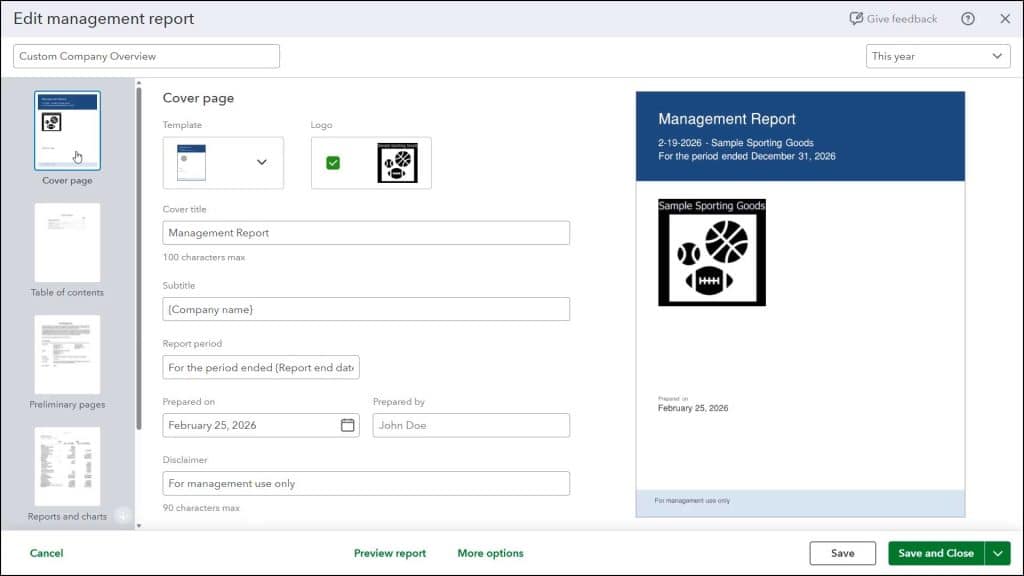
Customize the Cover Page, If Needed:
To customize the management report’s cover page in QuickBooks Online, click the “Cover page” icon at the left side of the window to show its settings to the right. To choose a cover page style, click the “Template” drop-down and select a style from its menu. The currently selected company logo, as set in the “Settings” window, appears to the right in the “Logo” area. To hide the logo in the report, uncheck its checkbox. Note that the changes you make appear in the preview at the window’s far-right side.
To change the text on the cover page, edit the desired values in the “Cover title,” “Subtitle,” “Report period,” “Prepared on,” “Prepared by,” and “Disclaimer” fields. To hide a cover field’s text content from the report, delete the field’s content.
Customize the Table of Contents, If Needed:
To customize the management report’s table of contents in QuickBooks Online, click the “Table of contents” icon at the left side of the window to show its settings to the right. To hide the table of contents from the management report, hover over its section icon and then click the “eyeball” symbol that appears to place a strikethrough across it. To show it again, click the same icon to remove the strikethrough. To change the title of the table of contents, change the value in its “Title” field to the right. The names of any reports added to the “Reports and charts” section appear as entries in the “Preview” section to the right.
Customize the Preliminary Pages, If Needed:
To customize the management report’s preliminary pages, click the “Preliminary pages” icon at the left side of the window to show its settings to the right. To hide the preliminary pages from the management report, hover over its section icon and then click the “eyeball” symbol that appears to place a strikethrough across it. To show the section again, click the same icon to remove the strikethrough.
To change a preliminary page’s title and content, type it into the “Page title” and “Page content” fields to the right. To edit page content, apply formatting, or insert company data fields, use the toolbar buttons at the top of the “Page content” field. Preliminary pages often contain additional information about the reports or the company.
To add additional preliminary pages to a management report, click the “Add new page” link at the bottom of the current page and then repeat the process of adding a page title and page content to it. To delete a page you added, click the trashcan icon in its upper-right corner.
Customize the Reports and Charts, If Needed:
To change the reports and charts contained within the management report, click the “Reports and charts” icon at the left side of the window to show its settings to the right. To hide the reports and charts from the management report, hover over its section icon and then click the “eyeball” symbol that appears to place a strikethrough across it. To show the section again, click the same icon to remove the strikethrough.
To remove an existing report from the reports list, click the trashcan icon at the right end of the report in the reports list. Alternatively, to edit the report’s details, click the report’s row or click the pencil icon towards the report row’s right end to expand the row and show the report’s details. Alternatively, to add a new report row to the bottom of the report list and expand it to show its details, click the “Add” button in the upper-right corner of the reports and charts list and then select the “Report” choice.
To change which report appears in the expanded report row, select a report from the “Report” drop-down. To change the selected report’s title or reporting period, type a new title into the “Report title” field or select a new period from the “Report period” drop-down.
If available, to compare the selected period to the previous year or period, check the “Compare previous year” and/or “Compare previous period” checkboxes, as needed. Any reports within this report list appear as entries in the “Table of contents” pages, if you choose to show the table of contents in the management report.
Customize the End Notes, If Needed:
To customize the management report’s end notes, click the “End notes” icon at the left side of the window to show its settings to the right. End notes often include a closing page with a breakdown of subaccounts. To hide the end notes from the management report, hover over its section icon and then click the “eyeball” symbol that appears to place a strikethrough across it. To show the section again, click the same icon to remove the strikethrough.
To edit the end notes page’s title or its contents, change its “Page title” or “Page content” fields to the right. To edit page content, apply formatting, or insert company data fields, use the toolbar buttons at the top of the “Page content” field. To also include a breakdown of subaccounts, check the “Include breakdown of sub-accounts” checkbox. Doing this then creates a schedule that lists any sub-accounts for line items in your reports when you preview the report.
Save the Changes to the Management Report:
To save your changes to the management report, click the “Save” button in the toolbar at the bottom of the window. Alternatively, to cancel your changes, click the “Cancel” button in the toolbar. To preview or print the management report, click the “Preview report” button in the toolbar to open the report in a “Print or Save as PDF” window. Then print or download the report in this window, as usual.
If Needed, Change Advanced Options for the Management Report:
To show advanced management report options, click the “More options” button in the toolbar to open a small window. To change the “{Company name}” or “{Report end date}” field values if you inserted either variable into this report and want it to differ from its default value, type the desired values into the fields next to the “{Company name}” and “{Report end date}” labels in the “Fields” section.
To add custom information to the header and/or footer of the management report pages, type the text into the “Header” and/or “Footer” field. To insert a variable at your insertion marker’s location in either field when editing it, click the “Fields” button at the right end of the “Header” or “Footer” field when editing it and then select the variable to insert from the drop-down menu. To show only non-zero rows and columns in the report, check the “Show only non-zero rows and columns” checkbox. To save these options and close the window, click the “OK” button in this window, when finished.
Save, Print, or Export the Custom Management Report:
To save your changes and close the window, click the “Save and Close” drop-down button in the toolbar. Alternatively, to duplicate, email, or export the management report, click the drop-down on the “Save and Close” button and then select either the “Save As,” “Send,” “Export as PDF,” or “Export as DOCX” command. These commands correspond to the commands you can select from the management report’s “Action” column’s drop-down in the list of management reports in the “Management reports” page. To save a duplicate copy of the report, select the “Save As” command. To email the report, select the “Send” command. To save the report as a PDF, choose the “Export as PDF” command. To save the report as a Word document, choose the “Export as DOCX” command.


