How to Handle Bounced Checks in QuickBooks Online
How to Handle Bounced Checks in QuickBooks Online: Video
This video lesson, titled “How to Handle Bounced Checks in QuickBooks Online,” shows you how to handle a bounced check from a customer in QuickBooks Online. This video lesson is from our complete QuickBooks Online tutorial, titled “Mastering QuickBooks Online Made Easy.”
Overview:
Sometimes a customer’s check may be returned for non-sufficient funds (NSF). There are three slightly different ways to record a bounced check in QuickBooks Online Plus. You can record a bounced check in QuickBooks Online if you use a bank feed for the account by editing the bounced check transaction in your bank feed to note the bounced check expense.
Alternatively, if you don’t use bank feeds, you can manually record an expense or journal entry to record the bounced check expense. Doing either lets you record a bounced check from a customer originally invoiced using accounts receivable. For example, you can do this to record a bounced check received from a customer payment for an invoice in the “Receive Payment” window.
Generally, to record a bounced check in QuickBooks Online, you need to perform the following tasks. First, you want to show the customer’s check was removed from your bank account and show any bank fees you were charged as a result. You also want to change the status of the original invoice the customer tried to pay back to “Open,” to show it remains unpaid.
Optionally, you then want to charge the customer for the bank fees and/or inconvenience of handling the bounced check. Finally, you need to send a statement to the customer seeking payment for the original, unpaid invoice and any resultant fees for the bounced check.
Record the Bounced Check Expense (Withdrawal) from the Account:
First, to record a bounced check in QuickBooks Online if you have connected a bank feed and the bounced check appears in the bank feed, categorize the bounced check withdrawal to accounts receivable, which you’ll later use to reopen the invoice. Doing this creates an expense, which accounts for the deducted money.
Alternatively, if you don’t use a bank feed in QuickBooks Online, then you can manually enter either an expense or a journal entry to account for the bounced check expense. However, you only perform one of these three actions to account for the bounced check expense.
How to Record the Bounced Check in an Account with a Connected Bank Feed:
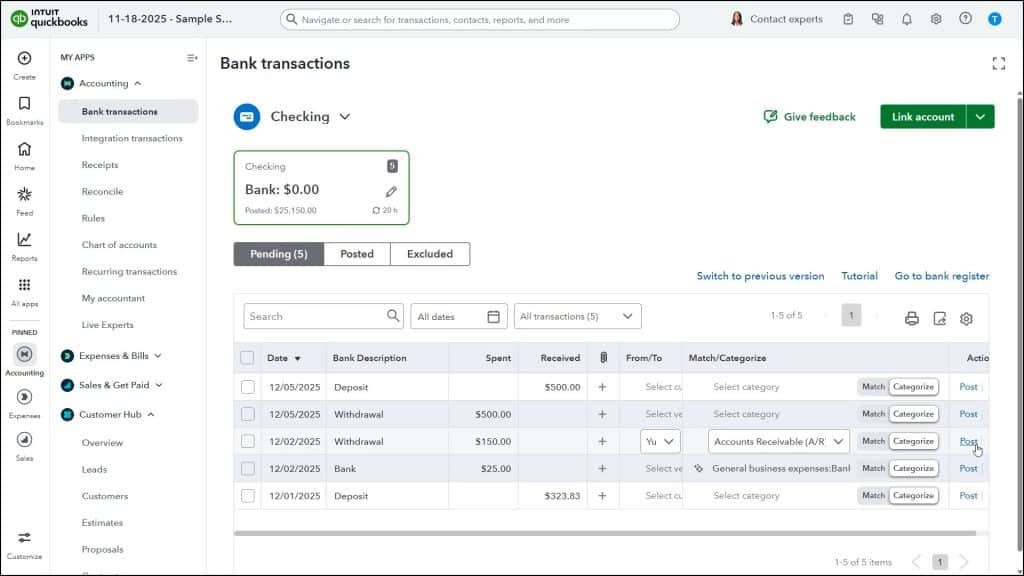
To recategorize the bounced check withdrawal if you use a bank feed in QuickBooks Online, select the “Bank transactions” command under the “Accounting” app in the “All apps” bar.
In the bounced check withdrawal’s transaction row, select the “Categorize” button under the “Match/Categorize” column. Then select the customer whose payment bounced from the “From/To” drop-down. Then select the “Accounts Receivable” account from the “Match/Categorize” drop-down. Finally, click the “Post” link. Doing this offsets the unpaid invoice.
Alternatively, How to Record the Bounced Check by Creating an Expense:
Alternatively, to manually record an expense for a bounced check in QuickBooks Online if you don’t have a bank feed connected, hover over the “+ Create” button in the Navigation Bar and then click the “Expense” link under the “Vendors” heading in the drop-down menu to open the “Expense” window. Select the customer that bounced the check from the “Payee” drop-down. Select the account the bounced check’s funds were supposed to go into from the “Payment account” drop-down. Enter the date the original check bounced into the “Payment Date” field. Type “NSF” or something similar into the “Ref no.” field.
In the first row of the “Category details” line item list, select “Accounts Receivable (A/R)” or the specific accounts receivable account you used from the “Category” drop-down. Type “NSF check” or something like that into the “Description” field. Then enter the amount of the bounced check into the “Amount” column in this row. You must then select the name of the customer who bounced the check from the “Customer” drop-down in this row. Then click the “Save and close” button in the toolbar at the bottom of the screen to save the expense and close the page.
Alternatively, How to Record the Bounced Check by Creating a Journal Entry:
Alternatively, to manually create a journal entry to negate the bounced check instead of an expense, hover over the “+ Create” button in the Navigation Bar and then click the “Journal entry” link under the “Other” heading to open the “Journal Entry” page. Enter the date the check bounced into the “Journal date” field. On the first line of the journal entry, select “Accounts Receivable (A/R)” or the specific accounts receivable account you used from the “Account” drop-down. Enter the amount of the bounced check into the “Debits” column in that row. Enter the reason for the journal entry, like “Bounced check,” into the “Description” field. You must then select the name of the customer that bounced the check from the “Name” column.
On the second line, select the account the bounced check’s funds were supposed to go into from the “Payment account” drop-down. Ensure the amount shown in the “Credits” column for the second line matches the amount shown under the “Debits” column for the first line to ensure accurate double-entry. Then click the “Save and close” choice from the drop-down button in the toolbar at the bottom of the window to save the journal entry and close the window.
Edit the Customer’s Bounced Check Payment to Reopen the Invoice:
After recording the cost of the bounced check to you, using one of the preceding methods in QuickBooks Online, to then remove the bounced check payment from the original invoice to mark it as being unpaid, select the “Customers” command under the “Customer Hub” app in the “All apps” bar. Then click to select the customer whose payment bounced in the list to show their transactions. In the transactions list, find the payment containing the bounced check and select its “Edit” link to open it for editing. If needed, then select the “payment made” link.
Next, uncheck the checkbox of the invoice to which the bounced check was originally applied, if needed. Then check the bounced check expense or journal entry, which you may have just recorded, to apply it to that, instead. Finally, click either “Record” or “Record and close” to save the editing changes to the transaction. Click the “Yes” button if a prompt appears to tell you that this transaction is linked to others. This step links the bounced check deposit to the bounced check expense and marks the original invoice as unpaid.
Optionally, Create a New Invoice for Your Bounced Check Fees:
If available to you in your jurisdiction, you may also want to create a separate invoice for the bank service charges you paid. Note that you should NOT edit the original invoice! Before you create a new, separate invoice for the bounced check fees, you must already have, or create, a service item to recoup the fees paid to the bank. If this is the first time handling a bounced check, then you may need to create one. If not, then this item may already exist in your “Products & services” list, and you should check to make sure one exists. You only need to create it once and can then use it for all bounced checks you receive later. Also, if you do not know the rules for your location, first check with your accountant to ensure you can collect bounced check fees.
How to Create a Service Item to Collect Bounced Check Fees, if Needed:
If you need to create the new service item to collect bounced check fees, click the “Settings” button in the QuickBooks Online toolbar and then click the “Products and services” link under the “Lists” heading in the drop-down menu to open the “Products & services” page.
Click the “New” button in the upper-right corner of the page and select the “Service” choice to create a new service in the product/service information pane. In the “Name” field in the “Basic info” section, enter a name, like “Bounced Check Fee.” Use the “Income Account” drop-down in the “Sales” section to select an income or expense account used to track bounced check fees you collect from customers. You can select the “Bank Charges & Fees” expense account or click the “+ Add new” option to create a new account, as needed. Then select “Nontaxable” from the “Sales tax category” drop-down. Then click “Save and close” to save it and close the pane.
How to Create the New Invoice for the Bounced Check Fees, if Needed:
To create a separate invoice for the bank fees, hover over the “+ Create” button in the Navigation Bar and then click the “Invoice” link under the “Customers” heading. Select the customer that bounced the check from the “Customer” drop-down. Enter the date the check bounced in the “Invoice Date” field.
Then, if legally allowed and if desired, select the “Bounced Check Fee” item from the “Product/Service” drop-down in the first row of the line item area. Then enter the amount of the charge from your bank, or the maximum amount you are legally allowed to charge, if applicable, into the “Amount” column for this line.
In the lower-left corner of the invoice, type whatever message you want to display to this customer in a statement, should you choose to send a statement for the invoices to pay, into the “Memo on statement” field. Then click the “Save and close” button to save the invoice and close the window.
Record the Bounced Check Fees from Your Bank:
If you use bank feeds in QuickBooks Online, you can categorize the bank service fee for the bounced check as an expense when it appears in the bank feed. Alternatively, to manually record the bank service fee you paid for the bounced check as an expense if you don’t use bank feeds in QuickBooks Online, hover over the “+ Create” button in the Navigation Bar and then click the “Expense” link under the “Vendors” heading to open the “Expense” window. Select your bank from the “Payee” drop-down. Select the bank account from which your bank withdrew the funds from the “Payment account” drop-down.
Enter the date the check bounced into the “Payment date” field. Type something like “NSF fee” into the “Ref no.” field to reference the type of expense. Select your “Bank Charges & Fees” expense account or whichever expense account you use to track your bank fees from the “Category” column in the “Category details” line item list. Then enter the amount you were charged by the bank for the bounced check into the “Amount” column. Click the “Save and close” button in the toolbar to then save it and close the window.
Send a Billing Statement to the Customer for Their Open Invoice(s):
Next, send a billing statement to the customer to collect payment for the open invoices on their account. A billing statement summarizes and consolidates the information for the invoices they owe. To create a statement for the individual customer who bounced the check, click the “Customers” link under the “Customer Hub” app in the “All apps” bar to open the “Customers” page.
Find the name of the customer to whom to send the statement in the Customers list. Then click the drop-down arrow in the “Action” column within their row and select the “Create Statement” link in the menu that appears to open the “Create Statements” window.
Depending on your preference, choose either the “Balance Forward” or “Open Item (Last 365 days)” choice from the “Statement type” drop-down. Select the dates to show in the statement, depending on your choice. Then check the checkbox to the left of the customer’s name to select them.
To preview the statement, click the “Print or Preview” button in the toolbar at the bottom of the window to examine the statement in a PDF preview window. You can then click the “Print” icon within the preview window to print a copy of the statement. Then click the “Close” button to close the PDF Preview window, when finished, if needed.
Alternatively, if you communicate via email with this customer, you can select the “Save and send” choice from the drop-down button in the “Create Statements” window to send an electronic copy of the statement to the customer immediately.
Finally, after the customer remits payment for the invoices in this billing statement, follow your normal procedures to accept payment on the invoice or invoices you created, as usual.


