 MY CART
How to Use Libraries in File Explorer in Windows 11: Video Lesson
This video lesson, titled “How to Manage Libraries in Windows 11: A Windows 11 Training Tutorial,” shows you how to use Libraries in File Explorer in Windows 11 to view the contents of multiple folders in a single window. This video lesson is from our complete Windows tutorial, titled “Mastering Windows Made Easy.”
Overview:
What Are Libraries within File Explorer in Windows 11?
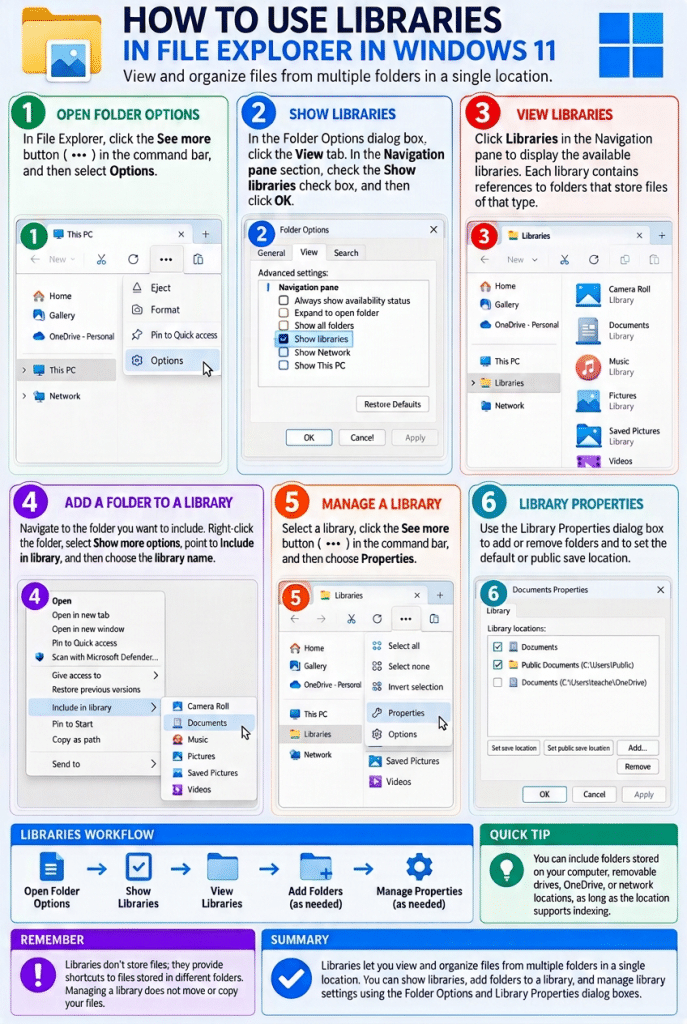
Libraries are collections of folders that contain files of a similar type. The default libraries in Windows 11 include “Camera Roll,” “Documents,” “Music,” “Pictures,” “Saved Pictures,” and “Videos.” Libraries allow you to view and organize files from multiple folders in a single location without moving the files themselves.
How to Show or Hide Libraries in File Explorer in Windows 11:
Libraries are hidden by default in Windows 11. To show libraries in File Explorer, open a File Explorer window and then click the “See more” button in the command bar. In the menu that appears, click the “Options” command to open the “Folder Options” dialog box.
In the “Folder Options” dialog box, click the “View” tab. Then scroll to the bottom of the “Advanced settings” list and locate the “Navigation pane” section. Check the “Show libraries” checkbox, and then click the “OK” button to apply the change and display libraries in the Navigation pane. To hide the libraries again, repeat the same process and uncheck the “Show libraries” checkbox.
How to View the Contents of a Library in Windows 11:
After libraries are enabled, click “Libraries” in the Navigation pane to display them in the main pane. Each library contains references to folders that store files of that type on your computer. This allows you to open a library and view files from multiple locations in a single window.
How to Add Folders to a Library in Windows 11:
You can add additional folders to a library to include their contents. Subfolders within an included folder are automatically part of the library, so you do not need to add them separately. You can add folders stored on your computer, on removable drives, in OneDrive, or on a network location, as long as the location supports indexing.
To add a folder to a library, navigate to the folder in File Explorer so it appears in the main pane. Then right-click the folder and select the “Show more options” command to open the full context menu. Point to the “Include in library” command, and then click the name of the library to which you want to add the folder.
How to Access a Library’s Properties in Windows 11 to Manage a Library:
You can also manage the contents and settings of a library. To do this, select a library in the main pane, then click the “See more” button in the command bar and choose the “Properties” command. This opens a “Library Properties” dialog box that shows the folders included in the library.
How to Remove a Folder from a Library or Add a New Folder to the Library:
To remove a folder from the library, click the folder name in the list and then click the “Remove” button. To add a new folder, click the “Add…” button and use the dialog box that appears to select the folder to include. Click the “Include folder” button to add it to the library.
How to Change the Default Save Location Folders for a Library:
Each library also has a default save location and a public save location. The default save location is where files are saved when you use that library under your user account. The public save location is used when files are saved by other users who have access to shared content on the computer.
To change these locations, right-click a folder listed in the library and select either the “Set as default save location” or “Set as public save location” command. When you finish managing the library settings, click the “OK” button to apply your changes.