Video Lesson on How to Use the Crop Tool in Camera Raw in Photoshop:
This video lesson, titled “Learn How to Use the Crop and Rotate Tools in Camera Raw in Adobe Photoshop: A Training Tutorial,” shows how to use the Crop Tool in camera raw in Photoshop and also how to rotate these photos. This video lesson is from our complete Photoshop tutorial, titled “Mastering Photoshop Made Easy.”
Overview:
To access the cropping and rotating tools in the “Camera Raw” dialog box in Photoshop, click the “Crop” button in the toolbar at the right side of the “Camera Raw” dialog box. Selecting this button automatically activates the Crop Tool, by default. Additionally, the “Crop” tab and “Rotate & Flip” tab appear in the panel to the left of the toolbar, which provide additional settings.
How to Use the Crop Tool in Camera Raw in Photoshop:
To use the Crop Tool to remove unwanted parts of the image when the Crop Tool is activated, first decide whether to draw an unconstrained bounding box or a constrained bounding box for the area to crop. A bounding box is the area you keep within the image when you crop the image. You remove image areas outside the bounding box.
By default, the bounding box applied when you first activate the Crop Tool is set to select the entire image. You can see bounding box resizing handles appear at the corners and sides of the image in the “Camera Raw” dialog box. A constrained bounding box always applies a bounding box that uses a fixed aspect ratio you select for its height and width. An unconstrained bounding box lets you freely adjust the height to width aspect ratio of the bounding box.
How to Select a Constrained or Unconstrained Bounding Box for Cropping:
To lock or unlock the aspect ratio when changing the size of the bounding box, click the “Constrain Aspect Ratio” button in the “Crop” tab in the panel to the left of the toolbar to toggle its lock icon on or off. If the icon looks locked, you apply the selected aspect ratio to the bounding box when changing its size. If the icon looks unlocked, you can freely change its aspect ratio when changing the size of the bounding box.
Optionally, to select the aspect ratio to apply to the bounding box, select a desired numeric ratio from the “Preset” drop-down. Alternatively, to specify a custom numeric ratio, select the “Custom Ratio…” command from the drop-down to open the “Custom Ratio” dialog box. Then enter the height to width crop ratio to use in the two fields in this dialog box, from left to right, and click the “OK” button.
How to Set the Size of the Crop Area Bounding Box:
To set the size of the bounding box for the crop after choosing your desired aspect ratio settings, hover your mouse pointer over the bounding box resizing handle that corresponds to the direction in which to resize the bounding box until the mouse pointer icon turn into a straight, double-pointed arrow. Then click and drag at that point inward or outward to change the size of the bounding box and release the mouse when it is at the desired location. Note that you cannot extend the bounding box past the content of the image. Repeat this, as needed, until you have a bounding box of the desired size.
If needed, to flip the height and width aspect ratio values, which changes the size of the bounding box, click the “Rotate Aspect Ratio” button in the “Crop” tab in the panel to the left of the toolbar. Alternatively, to reset the size of the current bounding box, click the “Reset Crop” button in the upper-right corner of the “Crop” tab in the panel to the left of the toolbar or press the “Esc” key on your keyboard.
How to Decide Which Content to Crop:
To reposition the image content within the current bounding box, click and drag in the image to move its desired content into the desired area within the bounding box. To rotate the image content within the bounding box, place your pointer slightly outside the bounding box until your mouse pointer turns into a bent, double-pointed arrow. Then click and drag in either direction shown by the double-pointed arrow to rotate the bounding box.
Alternatively, to rotate the image, use the “Angle” slider on the “Crop” tab or type a positive or negative degree, up to 45, into its adjacent field. To constrain the crop to the image, check the “Constrain to Image” checkbox.
Alternatively, to use the Straighten Tool to straighten an image, click the “Straighten Tool” button to the right of the “Angle” slider in the “Crop” tab in the panel to the left of the toolbar. Then click and drag a straight line across the image either horizontally or vertically, as desired. When you release the mouse button, the horizontal or vertical sides of the image are aligned to the angle of the line you drew. This also often changes the size of the bounding box to fit within the image content.
How to Rotate or Flip the Photos While Cropping:
To rotate or flip the image, click one of the buttons in the “Rotate & Flip” tab in the panel to the left of the toolbar after selecting the “Crop” button in the toolbar. The buttons, from left to right, are “Rotate image counterclockwise,” “Rotate image clockwise,” “Flip image horizontally,” and “Flip image vertically.”
How to Finish Cropping the Photo in Camera Raw:
To apply the crop after setting its bounding box and positioning the image content within it, press the “Enter” key on your keyboard. Alternatively, to cancel the crop, click the “Reset Crop” button in the upper-right corner of the “Crop” tab or press the “Esc” key on your keyboard.
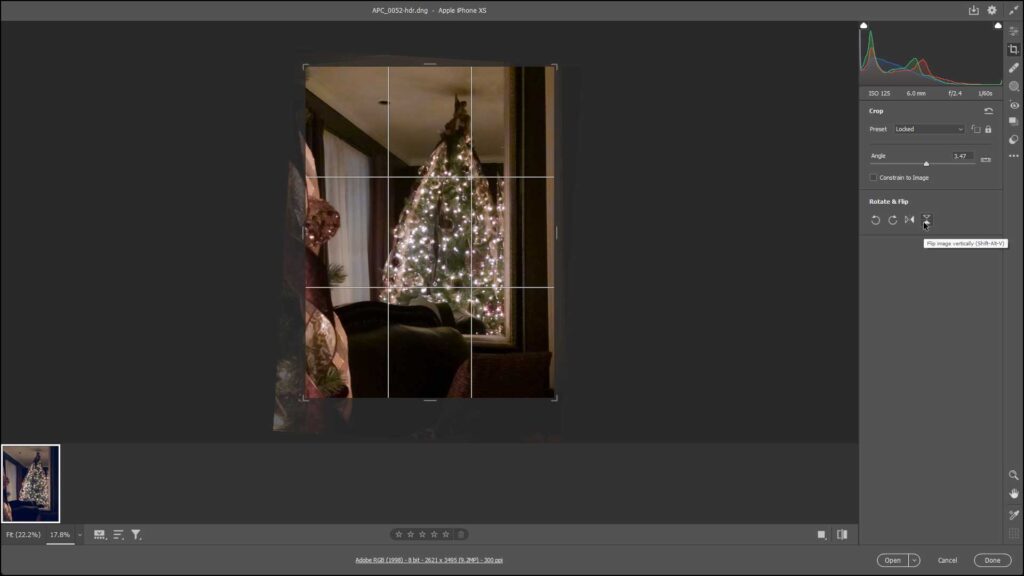
A picture showing how to use the Crop Tool in Camera Raw in Photoshop.
Instructions on How to Use the Crop Tool in Camera Raw in Photoshop:
- To enable the Crop Tool in Camera Raw in Photoshop, click the “Crop” button in the toolbar at the right side of the “Camera Raw” dialog box.
- To lock or unlock the aspect ratio when changing the size of the bounding box, click the “Constrain Aspect Ratio” button in the “Crop” tab in the panel to the left of the toolbar to toggle its lock icon on or off.
- Optionally, to select an aspect ratio to apply to the bounding box, select a ratio from the “Preset” drop-down or select the “Custom Ratio…” command to open the “Custom Ratio” dialog box to then enter the height to width crop ratio to use in the two fields in this dialog box, from left to right, and click the “OK” button.
- To then set the size of the bounding box, hover your mouse pointer over the bounding box resizing handle corresponding to the direction in which to resize the bounding box until the mouse pointer icon turn into a straight, double-pointed arrow.
- Then click and drag inward or outward to change the size of the bounding box and release when it is at the desired location.
- Repeat, as needed, to create a bounding box of the desired size.
- If needed, to flip the height and width aspect ratio values, click the “Rotate Aspect Ratio” button in the “Crop” tab in the panel to the left of the toolbar.
- Alternatively, to reset the bounding box, click the “Reset Crop” button in the upper-right corner of the “Crop” tab in the panel or press the “Esc” key on your keyboard.
- To reposition the image content in the current bounding box, click and drag the image to move its desired content into the desired area in the bounding box.
- To rotate the image content in the bounding box, place your pointer slightly outside the bounding box until the pointer turns into a bent, double-pointed arrow.
- Then click and drag in either direction shown by the double-pointed arrow to rotate it.
- Alternatively, to rotate the image, use the “Angle” slider on the “Crop” tab or type a positive or negative degree, up to 45, into its adjacent field.
- To constrain the crop to the image, check the “Constrain to Image” checkbox.
- Alternatively, to use the Straighten Tool to straighten an image, click the “Straighten Tool” button to the right of the “Angle” slider in the “Crop” tab in the panel to the left of the toolbar.
- Then click and drag a straight line across the image either horizontally or vertically and release to align the horizontal or vertical sides of the image to the angle of the line. This also often changes the size of the bounding box to fit within the image content.
- To rotate or flip the image, click one of the four buttons in the “Rotate & Flip” tab in the panel to the left of the toolbar when the “Crop” button is selected in the toolbar.
- To apply the crop, press the “Enter” key on your keyboard.