Inactivate Items in QuickBooks Online
How to Inactivate Items in QuickBooks Online: Video
This video lesson, titled “How to Inactivate and Reactivate List Items in QuickBooks Online,” shows you how to inactivate items in QuickBooks Online. It also shows you how to reactivate inactive list items. This video lesson is from our complete QuickBooks Online tutorial, titled “Mastering QuickBooks Online Made Easy.”
Inactivating and Reactivating List Items in QuickBooks Online: Overview
When you inactivate items in QuickBooks Online, you stop them from appearing in the lists of your company file, but you keep their information. You can later reactivate inactive items to use them again, if needed. You can inactivate items in most lists in QuickBooks Online.
You should only inactivate items, like accounts, customers, or vendors, that have a zero (0) account balance. If you inactivate an item with a balance, QuickBooks must then make an adjusting entry for the existing balance to ensure accurate account balances. In these cases, it is often better to assign the existing transactions for the item to the correct other item (for example, assigning existing transactions in an account to the correct account or assigning bills from a vendor record to the correct vendor record) and then return to inactivate the item when it finally has a zero balance.
How to Inactivate an Item in QuickBooks Online:
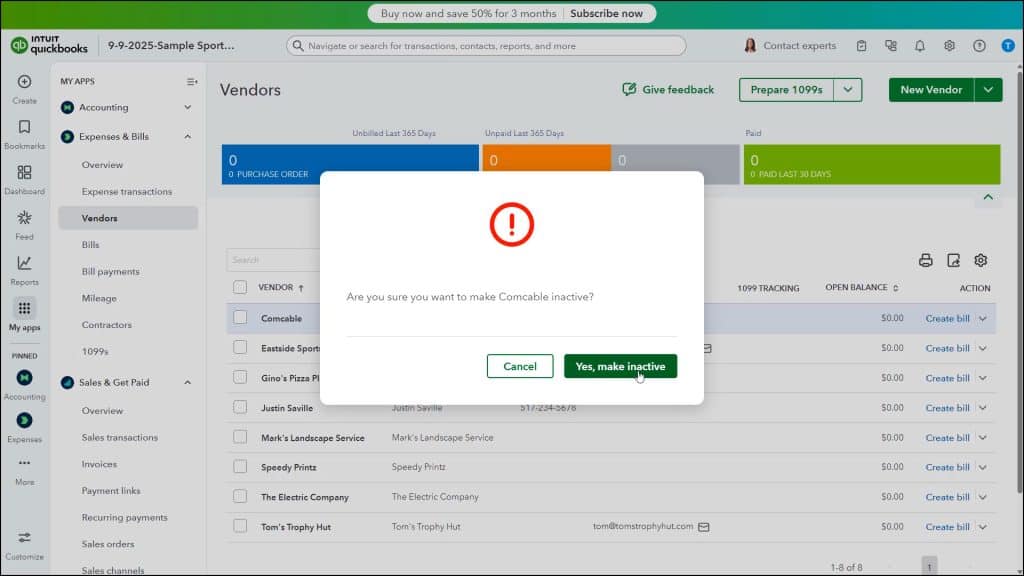
To inactivate an item in QuickBooks Online, open the item’s associated page to view the corresponding list of items. Then find the record to inactivate in the list. In the “Action” column for that item’s row, click the “Make inactive” link in the drop-down menu. A popup window then appears to confirm you want to make the item inactive. Click the “Yes” response to continue or click the “Keep active” or “Cancel” response to close the window and cancel the inactivation.
If you attempt to inactivate an item without a zero balance, QuickBooks Online warns you that it needs to enter one or more adjustment entries before inactivating the item. If you still want to continue, click “Yes” to confirm and create the adjusting entries. Otherwise, click “No” to cancel inactivating the item.
How to Reactivate an Inactive Item in a List (Excluding Products and Services):
To reactivate most inactive items except for “Products and services,” click the “Settings” button above the item’s list and check the “Include inactive” checkbox in the drop-down menu to show the inactive items in the list. To reactivate an inactive item in the list after it appears, click the “Make active” link in the “Action” column of the inactivated item. This reactivates the item, and you can use it again.
How to Reactivate an Inactive Item in the Products and Services List:
To reactivate an inactive product or service, click the “Settings” button and then click the “Products and services” link under the “Lists” heading in the drop-down menu to open the “Products & services” list. In the upper-left corner of the list, click the “Filter” drop-down button. Then click the “Status” drop-down in the drop-down menu and select the “Inactive” choice. Then click the “Apply” button in the drop-down menu to show only your inactive products and services in the list below.
Then click the “Make active” link in the “Action” column of the row for the item to reactivate. You can then click the “Clear filter” link next to the “Filter” button in the upper-left corner of the list to show all your active products and services again.


