Insert Audio and Videos into OneNote Pages- Tutorial
Insert Audio and Videos into OneNote Pages: Video Lesson
This video lesson, titled “Adding Audio and Video Files,” shows how to insert audio and videos into OneNote pages. This video is from our complete OneNote training, titled “Mastering OneNote Made Easy v.2016-2013.”
Insert Audio and Videos into OneNote Pages: Overview
OneNote lets you insert audio and videos into OneNote pages. The process to insert audio and videos into OneNote pages is the same. First, open the page and click in the area where you want to insert the file. Then click the “Insert” tab in the Ribbon. Then click the “File Attachment” button to launch the “Choose a file or set of files to insert” dialog box.
Navigate and click on the file you want to insert to select it and then click the “Insert” button. Then click the “Attach File” button in the “Insert File” dialog box that appears. Doing this inserts an icon representing the file into the page where your cursor was blinking. The icon is an object on the page and you can click and drag the icon to move it to a different location.
Most audio and video files that are not fully compatible with OneNote will be inserted as object attachments. These files will open within the external application used to play them when they are double-clicked. These file types cannot be played back within OneNote.
However, whenever you insert audio and videos into OneNote pages that are fully compatible audio or video file types, such as “.wmv” or “.wma” files (for “Windows Media file with Video and/or Audio) or some MP3 files with the appropriate encoding, a “Playback” tab within an “Audio & Video” contextual tab will appear in the Ribbon.
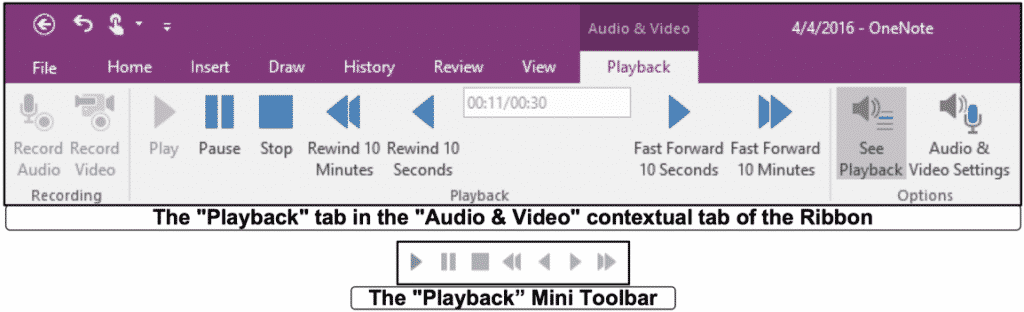
Insert Audio and Videos into OneNote Pages- Tutorial: Pictures of the “Playback” tab in the “Audio & Video” contextual tab in the Ribbon of OneNote 2016 and the “Playback” Mini Toolbar.
Clicking the “Playback” tab reveals three button groups used to control fully-compatible audio and video files in OneNote. These are the “Recording,” “Playback” and “Options” button groups. Let’s examine the “Playback” button group.
The buttons in the “Playback” button group control the playback of the file. The “Recording Time” field tells you how long the file is. You have buttons to “Play,” “Pause,” “Stop,” and buttons to both rewind and fast forward. However, you don’t have to use the Ribbon to access those buttons. If you select a fully compatible media file in a page, a mini-toolbar appears with the same buttons. This gives you easy access to the same playback features.
Now let’s look at the “Options” button group on the “Playback” tab in the Ribbon. One interesting feature of OneNote is that you can take notes when you are playing back recordings. You can even take notes if you are recording on the fly. Either way, OneNote remembers where in the time code you took those notes. To see any linked notes made while recording or playing a recording, toggle the “See Playback” button in the “Options” button group “on” to highlight those notes. This is a toggle button that you can click to toggle the highlighting on or off.
Insert Audio and Videos into OneNote Pages: Instructions
- To insert audio and videos into OneNote pages, navigate to the page in OneNote into which you wish to add the file.
- Then click the “Insert” tab in the Ribbon and then click the “File Attachment” button.
- In the “Choose a file or set of files to insert” dialog box, navigate to and select the audio or video file.
- Then click the “Insert” button.
- To reposition the audio or video file after you have inserted it, click, drag and release the object to move it to a new location.
- Most audio and video files that are not fully compatible with OneNote are inserted as object attachments. When double-clicked, these files open within the external application that plays them by default.
- To play a selected fully-compatible file, like a WMV video or WMA audio file you inserted, select the object and click the “Playback” contextual tab that appears in the Ribbon.
- You can then click the buttons in the “Playback” group to play, pause, stop, fast forward or rewind the recording.
- If you select a fully compatible media file, a mini-toolbar appears with the same buttons.
- To see any linked notes made while recording or playing a recording, toggle the “See Playback” button in the “Options” button group “on.”
- To toggle the “See Playback” button on or off, click the “See Playback” button.
