Sales Settings in QuickBooks Online
How to Customize the Sales Settings in QuickBooks Online: Video
This video lesson, titled “How to Customize the Sales Settings in QuickBooks Online,” shows you how to customize the Sales settings for a company file in QuickBooks Online. This video lesson is from our complete QuickBooks Online tutorial, titled “Mastering QuickBooks Online Made Easy.”
Overview:
To customize your company’s sales settings in QuickBooks Online, click the “Settings” button in the QuickBooks Online toolbar. Then click the “Account and settings” link under the “Your Company” heading in the menu to open the “Account and Settings” window. Then click the “Sales” company settings category link in the menu at the left side of the window to show the individual settings in that category to the right.
The “Sales” settings category contains the “Sales form content,” “Invoice payments,” “Financing,” “Products and services,” “Late fees,” “Progress Invoicing,” “Messages,” “Reminders,” “Post-invoice/Feedback survey,” “Online delivery” and “Statements” sections. To edit the individual settings in a section, click anywhere in a section to activate its settings.
Sales Form Content settings:
To choose the default settings for sales forms in QuickBooks Online, click into the “Sales form content” section to activate its settings. To set the default due date for invoices you send, select a choice from the “Preferred invoice terms” drop-down or select the “Add new” choice in the drop-down menu to open a “Terms” window that lets you name new terms, select a due date option, enter the number of days or specific day, and then click the “Save” button to create and save the new due date terms.
To set the default delivery method for sales forms, select a choice from the “Preferred delivery method” drop-down. To enable shipping fields in sales forms, click the “Shipping” toggle switch to set it to the “On” position. When enabled, it adds the fields “Date,” “Tracking number,” “Destination” and “Subtotal” to sales forms.
The “Custom fields” setting provides a “Custom Fields” link you can click to open the “Custom Fields” list to add them to sales forms. We’ll discuss adding custom fields to forms in a separate lesson. However, if you click the link to add custom fields, you’ll need to return to the “Sales form content” section of the “Sales” category in the “Account and Settings” window to continue reviewing these settings.
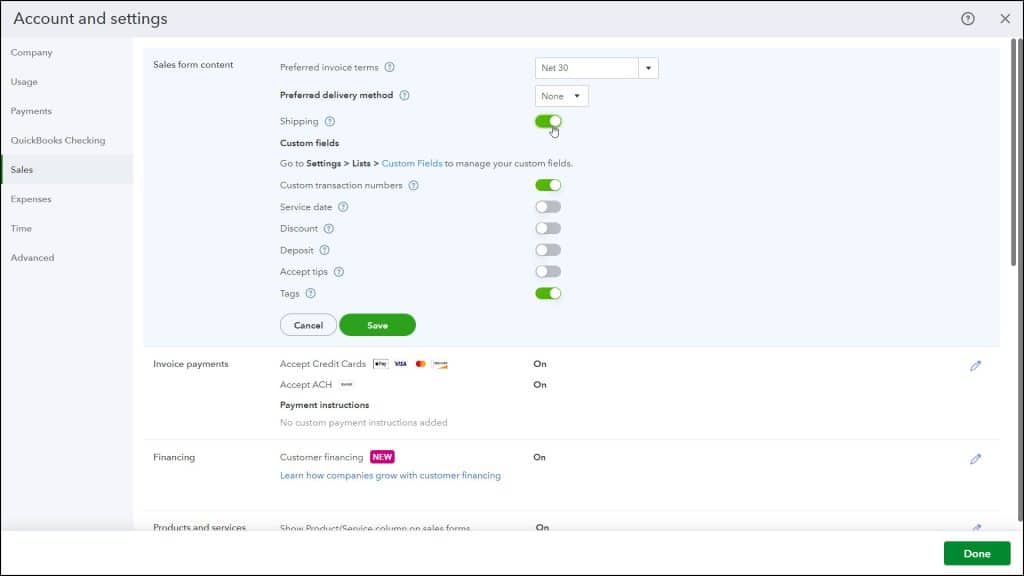
To allow custom transaction numbers in sales forms, like invoice numbers, ensure the “Custom transaction numbers” toggle switch is set to the “On” position. If switched to the “Off” position, QuickBooks automatically assigns invoice numbers, instead. To enable service dates in sales forms, which show when a service was performed, separately from the invoice date, switch the “Service date” toggle switch to the “On” position.
To add a discount field to sales forms, switch the “Discount” toggle switch to the “On” position. To add a deposit field to invoices so you can deduct a deposit from the balance total to show the current amount due, switch the “Deposit” toggle switch to the “On” position.
To add a tips field to sales receipts, switch the “Accept tips” toggle switch to the “On” position. Then choose the correct answer for recording tip income in the message box that appears, if prompted, although you can always change this in the “Advanced” settings later, too. This answer creates either an “Income” account for tips recorded for “Just me” or a liability account from which to pay out tips if you select “My team.” You also need to use an updated sales receipt form to record tipped transactions, which QuickBooks Online will help you set up in the following prompt.
If shown, the “Tags” setting in QuickBooks Online is deprecated and no longer works. To save and apply your changes, click the “Save” button in this section. To cancel the changes, click the “Cancel” button, instead.
Invoice Payments Settings:
To change the settings for accepting customer invoice payments in QuickBooks Online, click the “Invoice payments” section to activate its settings. To accept credit cards for all new invoices, check the “Accept Credit Cards” checkbox. To accept ACH payments for all new invoices, check the “Accept ACH” checkbox. To set payment instructions, enter them into the “Payment instructions” field. To save your changes, click the “Save” button in this section.
The Financing Setting:
To change the settings for customer financing in QuickBooks Online, click into the “Financing” section to enable its setting. To turn customer financing on or off, click the “Customer financing” toggle switch to enable or disable it. To save your changes, then click the “Save” button.
Products and Services Settings:
To change settings for the sales of products and services, click the “Products and services” section. To add a “Product/Service” column to sales forms that lets you pick choices from your list of products and services, ensure the “Show Product/Service column on sales forms” toggle switch is set to the “On” position. To also add a SKU column to sales forms to track sales by SKU if you enable the “Product/Service” column, click the “Show SKU column” toggle switch that then appears to set it to the “On” position.
To enable price rules that let you specify specific discounts on selected products to chosen customers for a specific time, click the “Turn on price rules” toggle switch to set it to the “On” position. To add a “Quantity” and a “Rate” field to sales forms, ensure the “Track quantity and price/rate” toggle switch is set to the “On” position.
To track your remaining product inventory and its costs, ensure the “Track inventory quantity on hand” toggle switch is set to the “On” position. Then select the desired inventory costing method from the “Inventory valuation method” drop-down. Your choices are First In, First Out (FIFO) or Moving Average Cost (MAC). You cannot change the inventory valuation method for a company in QuickBooks Online after selecting a choice and saving it, so if this is important to your company, then please check with your accountant or financial advisor before selecting your choice.
To track inventory for sales channels after setting up a sales channel, ensure the “Track inventory for sales channels” switch is set to the “On” position. To save your changes, click the “Save” button in this section. To cancel the changes, click the “Cancel” button, instead.
Late Fees Settings:
To enable late fees, which are a default charge applied to all overdue invoices for all customers, and which appear as a line under the “Product/Service” column in an invoice, click into the “Late fees” section to enable its settings and then click the “Default charge applied to overdue invoices” toggle switch to set it to the “On” position. Doing this then enables other fields in this section which let you set the default late fee. Also note that you can customize the late fee settings for individual customers within the “Customers” page after enabling late fees.
To set the default late fee settings, select either the “Flat fee” or “Percentage of remaining balance” option button that appears after enabling this setting. If you select “Flat fee,” then enter the flat fee amount into the “Amount” field. Alternatively, if you select “Percentage of remaining balance,” then enter the percentage of the remaining balance to charge as a late fee into the “Percent (%) field. If, in addition to charging the percentage, you also apply an upfront, one-time flat fee, then check the “Apply an upfront, one-time flat fee” checkbox that appears after selecting this option. Then enter the amount of the fee into the adjacent “Amount” field that appears after checking this checkbox.
For all late fee option selections, then use the adjacent “Frequency” drop-down to choose the correct frequency with which to apply the selected type of late fee. To set the grace period, which starts the day after the due date and during which late fees will not accumulate, select a choice from the “Grace period” drop-down. To set the late fee description for invoices, enter that text into the “Appears on invoices as” field.
Also, note there may be limits on amounts you can charge to customers for late fees or finance charges in your jurisdiction and you should ensure you comply with those requirements before charging late fees or finance charges to customers. To save your changes, click the “Save” button in this section. To cancel the changes, click the “Cancel” button, instead.
The Progress Invoicing Setting:
The “Progress Invoicing” section lets you enable progress invoicing, also called “progress billing” or “partial billing,” for invoices. This lets you create multiple invoices from a single estimate for customer jobs which are completed in phases.
To enable progress invoicing in QuickBooks Online, click into the “Progress Invoicing” section to enable its setting and then click the “Create multiple partial invoices from a single estimate” toggle switch is set to the “On” position. To enable progress invoicing to show its details in invoices, you must also update the default invoice template by clicking the “Update” button in the prompt that appears. Alternatively, click “Cancel” to cancel the update if you do not want to use progress invoicing. To save your changes, click the “Save” button in this section. To cancel the changes, click the “Cancel” button, instead.
Messages Settings:
To create a default email message to send for each sales form, click the “Messages” section to activate its settings. To add a greeting, check the “Use greeting” checkbox. To format the greeting, if enabled, then use the two adjacent drop-downs to select its content. Next, select which sales form’s email content to customize by selecting a choice from the “Sales form” drop-down.
For the selected sales form, to use a standard message for the email’s subject and body, click the adjacent “Use standard message” button to add a standard message to the “Email subject line” and “Email message” fields below it. To customize the email’s subject and body, type your own content into the “Email subject line” and “Email message” fields or edit the standard message content.
To send copies of all sales forms to your email, check the “Email me a copy at…” checkbox. For the “Invoice” sales form choice only, to send “Cc” or “Bcc” copies of new invoices you create to email addresses you specify, type the email addresses into the “Copy (Cc) new invoices to address” or “Blind Copy (Bcc) new invoices to address” fields. If you enter multiple email addresses into either field, make sure to separate each email address in the field with a comma.
To set a default message to show on estimates and a default message to show on all other sales forms, select either “Estimate” or “Invoices and other sales forms” from the “Sales form” drop-down towards the bottom of this section to select for which form or forms to enter the message. For the selected sales form or sales forms, then enter the default message to show within it. To save your changes, click the “Save” button in this section. To cancel the changes, click the “Cancel” button, instead.
Reminders Settings:
To create the default email message to send for invoice payment reminders and/or schedule automatic invoice payment reminders, click the “Reminders” section to activate its settings. To set the default mail message for payment reminders, click the arrow at the right end of the “Default email message for invoice reminders” setting to expand this section, if needed. You can also click this same area to collapse it.
To set the invoice reminder email’s subject line, type it into the “Subject line” field. Note that you can type the [Invoice No.] and [Company Name] field placeholders, exactly as they appear, into the email to substitute them with the invoice number or company name when the reminder is sent, if desired. To set a default greeting, check the “Use email greeting” checkbox. Then select the email’s greeting from the two adjacent drop-downs. Then type the reminder’s message into the “Email message” field. To email copies of reminders to yourself, check the “Send a copy to…” checkbox.
To schedule up to three automatic invoice payment reminder emails, click the “Automatic invoice reminders” toggle switch to set it to the “On” position. Note that automatic invoice reminder emails are only sent for new invoices after this setting is enabled. Also, turning them off turns them off for all invoices.
To enable an automatic invoice reminder, click either “Reminder 1,” “Reminder 2,” or “Reminder 3,” to expand that reminder. Then click the toggle switch next to the “Reminder 1,” “Reminder 2,” or “Reminder 3” label to enable that reminder by toggling it to the “On” position. To set the number of days before or after the invoice’s due date at which to send the automatic invoice payment reminder, use the drop-down field to the left of the word “day(s)” at the top of the reminder to select a number or type a number into the field. Then use the drop-down to the right of that to select either “Before” or “After” the “due date.”
Next, complete the rest of the fields for the invoice reminder email, like when you created the default payment reminder email. To add the default payment reminder’s content to these fields, click the “Use default reminder message” link at the bottom of the automatic reminder. You can then edit the content, if needed. Repeat this process for the other one or two automatic email reminders, as desired. To save your changes, click the “Save” button in this section. To cancel the changes, click the “Cancel” button, instead.
Post-invoice/Feedback Survey Settings:
To gather feedback from customers using different types of surveys in QuickBooks Online, click into the “Post-invoice/Feedback survey” section to enable its settings. Then click the toggle switch for the types of surveys you want to send. Each survey has a description and link you can click to see a preview of a sample survey question. To manage the survey delivery frequency, select a choice from the “Manage survey frequency” drop-down. To save these changes, when finished, click the “Save” button in this section. Alternatively, click “Cancel” to cancel the changes.
Online Delivery Settings:
To set email options for all your sales forms, click the “Online delivery” section to activate its settings. To choose the level of sales form detail to show in the email, select either the “Show short summary in email” or “Show full details in email” option.
To select to which sales forms to attach PDF copies of the sales form in the email, check or uncheck the “Invoices” and/or “Credit memo, sales receipt, refund receipt, estimate, receive payment” checkboxes. To set the invoice email’s format, select your desired choice from the “Additional email options for invoices” drop-down. To save your changes, click the “Save” button in this section. To cancel the changes, click the “Cancel” button, instead.
Statements Settings:
To choose how much information appears in customer statements, click the “Statements” section to activate its settings. Select either the “List each transaction as a single line” option to show each unpaid transaction as one line, including things like invoice number and total invoice amount, or select the “List each transaction including all detail lines” option to also include all the unpaid transactions’ detail lines, like products purchased and their amounts.
To include an aging table in the statements that lists the amounts customers owe, broken down by standard aging brackets for the number of days past due, ensure the “Show aging table at bottom of statement” toggle switch is set to the “On” position. To save your changes, click the “Save” button in this section. To cancel the changes, click the “Cancel” button, instead. To close the “Account and Settings” window, click the “Done” button in the lower-right corner or click the “X” button in the upper-right corner.


