Video Lesson:
This video lesson, titled “Learn How to Use Color Grading in Camera Raw in Adobe Photoshop: A Training Tutorial,” shows how to apply a color using the Color Grading panel in Camera Raw in Photoshop. This video lesson is from our complete Photoshop tutorial, titled “Mastering Photoshop Made Easy.”
Overview:
The Color Grading panel in the Camera Raw dialog box in Photoshop lets you apply color either globally or to only selected tonal ranges in a camera raw image. You can apply color using the Color Grading panel to either color or black and white images, depending on the desired effect you want to achieve in the camera raw photo. You can control the hue, saturation, and luminance of the color you apply.
To show the Color Grading panel in the Camera Raw dialog box in Photoshop, click the “Edit” button in the toolbar at the right side of the Camera Raw dialog box, if needed. Then click the “Color Grading” tab in the Edit panel that appears to the left of the toolbar to expand it, if needed.
How to Select the Tonal Range to Adjust Using the Color Grading Panel in Camera Raw in Photoshop:
Then select to which tonal ranges in the camera raw photo to apply a color by clicking the button to the right of the “Adjust” label at the top of the Color Grading panel for the desired tonal range or ranges to show below it. Selecting the “3-Way” button shows three separate color circles for “Midtones,” “Shadows,” and “Highlights.” Selecting either the “Shadows,” “Midtones,” or “Highlights” button shows only the color circle for the selected tonal range. Alternatively, selecting the “Global” button shows one circle for all tonal ranges.
How to Adjust a Selected Tonal Range Using the Color Grading Panel in Camera Raw in Photoshop:
To apply the color to the selected tonal range, click and drag in its color circle to set its hue and saturation values. After setting the desired hue and saturation, then use the “Luminance” slider below the color circle to set the color’s desired luminance value.
If viewing an individual color circle in the Color Grading panel, you can also use sliders to set the desired hue and saturation values by clicking the arrow button towards the lower-right corner of the circle, above the “Luminance” slider, to expand it and show the “Hue” and “Saturation” sliders. You can then use the sliders to set each slider’s value or type a value into its adjacent field. The color you select is then applied to the selected tonal range in the camera raw image.
To adjust how the Color Grading blends and overlaps between tonal ranges, use the “Blending” slider at the bottom of the Color Grading tab or type a value into its adjacent field. Lower values provide more tonal range separation and higher values cause more tonal range overlap. To adjust the Color Grading balance between the lighter and darker colors, use the “Balance” slider or enter a value into its field. Sliding to the left or using negative values emphasizes shadows and sliding right or using positive values emphasizes highlights.
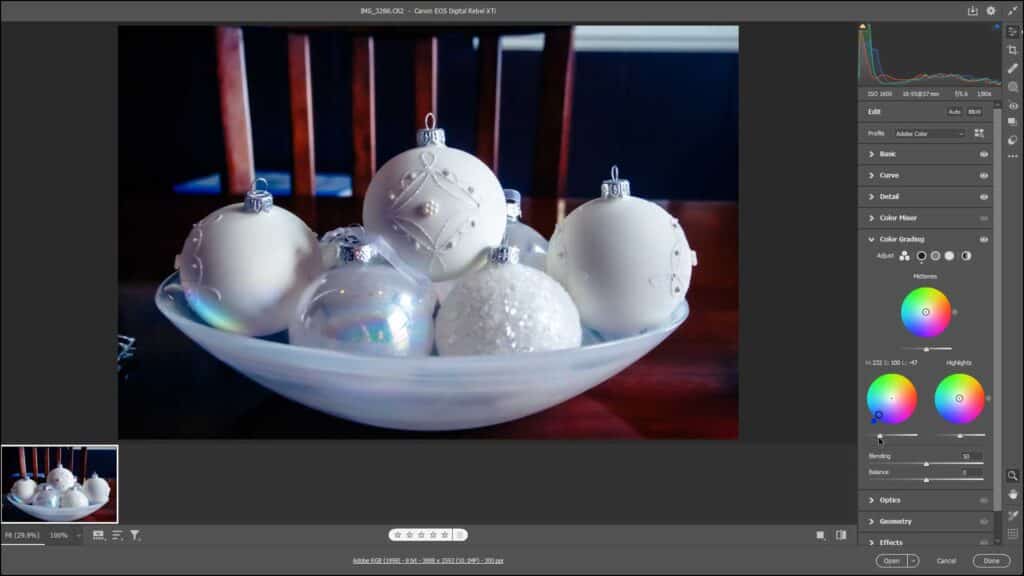
A picture of a user applying a color to a selected tonal range using the Color Grading panel in Camera Raw in Photoshop.
How to Hide Color Grading Adjustments:
To temporarily hide all Color Grading panel adjustments in the preview image after changing these settings, click and hold down on the “eye” icon in the upper-right corner of the “Color Grading” tab in the Edit panel. This temporarily hides the changes in the preview image while you hold down on this icon. Simply release the mouse button to restore the visibility of the changes.
Instructions on How to Use the Color Grading Panel in Camera Raw in Photoshop:
- To show the Color Grading panel in the Camera Raw dialog box in Photoshop, click the “Edit” button in the toolbar at the right side of the Camera Raw dialog box, if needed.
- Then click the “Color Grading” tab in the Edit panel to the left of the toolbar to expand it, if needed.
How to Select the Tonal Range to Adjust Using the Color Grading Panel:
- To select to which tonal ranges in the camera raw photo to apply a color, click the button to the right of the “Adjust” label at the top of the Color Grading panel for the desired tonal range or ranges to show below it.
- Selecting the “3-Way” button shows separate color circles for “Midtones,” “Shadows,” and “Highlights.”
- Selecting either the “Shadows,” “Midtones,” or “Highlights” button shows only the color circle for the selected tonal range.
- Alternatively, selecting the “Global” button shows one circle for all tonal ranges.
Instructions on How to Adjust a Selected Tonal Range Using the Color Grading Panel:
- To apply a color to the selected tonal range, click and drag in its color circle to set its hue and saturation values.
- After setting the desired hue and saturation, then use the “Luminance” slider below the color circle to set the color’s desired luminance value.
- If viewing an individual color circle in the Color Grading panel, you can also use sliders to set the desired hue and saturation values by clicking the arrow button towards the lower-right corner of the circle, above the “Luminance” slider, to expand it and show the “Hue” and “Saturation” sliders.
- You can then use the sliders to set each slider’s value or type a value into its adjacent field.
- The color you select is then applied to the selected tonal range in the camera raw image.
- To adjust how the Color Grading blends and overlaps between tonal ranges, use the “Blending” slider at the bottom of the Color Grading tab or type a value into its adjacent field. Lower values provide more tonal range separation and higher values cause more tonal range overlap.
- To adjust the Color Grading balance between the lighter and darker colors, use the “Balance” slider or enter a value into its field. Sliding to the left or using negative values emphasizes shadows and sliding right or using positive values emphasizes highlights.
Instructions on How to Temporarily Hide Color Grading Adjustments:
- To temporarily hide all Color Grading panel adjustments in the preview image after changing these settings, click and hold down on the “eye” icon in the upper-right corner of the “Color Grading” tab in the Edit panel.
- To restore the visibility of the changes, then release the mouse button.