Create a Discount Line Item in QuickBooks Online
How to Create a Discount Line Item in QuickBooks Online: Video
This video lesson, titled “How to Create a Discount Line Item in QuickBooks Online,” shows you how to create a discount line item in QuickBooks Online. This video lesson is from our complete QuickBooks Online tutorial, titled “Mastering QuickBooks Online Made Easy.”
Overview:
How to Apply a Percentage or Amount Discount to a Total in an Invoice or Sales Receipt:
Sometimes you want to offer discounts to customers in QuickBooks Online. To provide discounts on totals in sales transactions if you enabled a “Discount” field in your sales forms in QuickBooks Online, use the “Discount” toggle switch or drop-down, depending on the sales form, to select either a percentage or value choice and then enter the desired percentage or value into the adjacent field. This lets you apply either a percentage or value discount to the sales form total, either before or after sales tax is calculated, as needed. We’ll discuss this in more detail in later lessons on using the sales forms.
How to Create a Discount Line Item to Apply Line Item Discounts in QuickBooks Online:
Alternatively, to apply a discount to only selected line item amounts in a sales form, then you must first create a discount item to add to sales forms. To create a discount line item in QuickBooks Online, first create a new product by clicking the “Settings” button in the QuickBooks Online toolbar. Then click the “Products and services” link under the “Lists” heading. Then click the “New” button in the upper-right corner of the page and select the “Non-inventory item” choice to open a product/service information pane.
In the “Name” field, type “Discount” or whatever you want to name the discount item. For example, to offer multiple percentage discounts, name the item “Discount” and then type the percentage discount. For example, you could type “Discount- 20%.” This helps organize multiple discounts if using different rates.
Choose Whether the Discount Line Item is Either a Percentage or Flat Amount Discount:
Line items in QuickBooks Online use flat amounts, by default. So, to calculate percentage discounts, you must “trick” the software into calculating a percentage discount by entering the desired percentage as the “Price/rate” and then entering a “Quantity” value equal to the subtotal to discount in the sales form when you later use the discount line item, as we’ll see momentarily.
So, if entering a flat discount amount, just enter the amount to discount as a negative value into the “Price/rate” field in the “Sales” section or leave it blank to enter the amount at the time of sale. Alternatively, if entering a percentage discount, instead enter the discount percentage as a negative decimal amount into the “Price/rate” field. For example, to create a 20% discount, enter “-0.20” as the field’s value.
Set the Line Item’s Income Account to a Contra-Income Account and Set Its Tax Status:
Next, change the “Income account” field to some type of contra-income account, like “Discounts given.” If the discount shouldn’t reduce the taxable subtotal, then select the “Nontaxable” choice from the “Sales tax category” drop-down. If the discount should reduce the taxable subtotal, instead select the “Taxable – standard rate” choice. You can also change this value at the time of sale, if needed, by checking or unchecking the “Tax” checkbox for the discount line item. To finish creating the discount line item, click a “Save” button choice in the lower-right corner of the pane to save the entry.

How to Use a Discount Line Item in an Invoice or Sales Receipt in QuickBooks Online:
To later use the discount line item in a sales form, hover over the “+ Create” button in the Navigation Bar. Then click either the “Invoice” or “Sales Receipt” link under the “Customers” heading to open a new invoice or sales receipt. From the “Customer” drop-down, select the customer for whom to enter the sale. Fill out the upper-portion of the invoice, as usual. Below, in the split-line list, select the product(s) or service(s) to sell and discount from the “Product/Service” column and enter their rates and quantities.
If Using a Percentage Line Item Discount, Note the Subtotal Amount to Discount:
To use a “percentage” discount line item if the only items in the sales form are the items to discount, first note the subtotaled amount of those items. This amount appears in the lower-right corner of the invoice or sales receipt. Alternatively, to add a subtotal amount to the line items in the sales form, click the drop-down part of the button below the line item area and then select “Add Subtotal.”
How to Apply the Line Item Discount:
Next, for a percentage discount only, select the “Discount” line item from the next blank row in the line item area. Then enter the subtotaled amount into the “Qty” column for the “Discount” line item. This ensures QuickBooks Online Plus properly calculates the discount for the items entered. You can now continue entering items into the sales form, as needed.
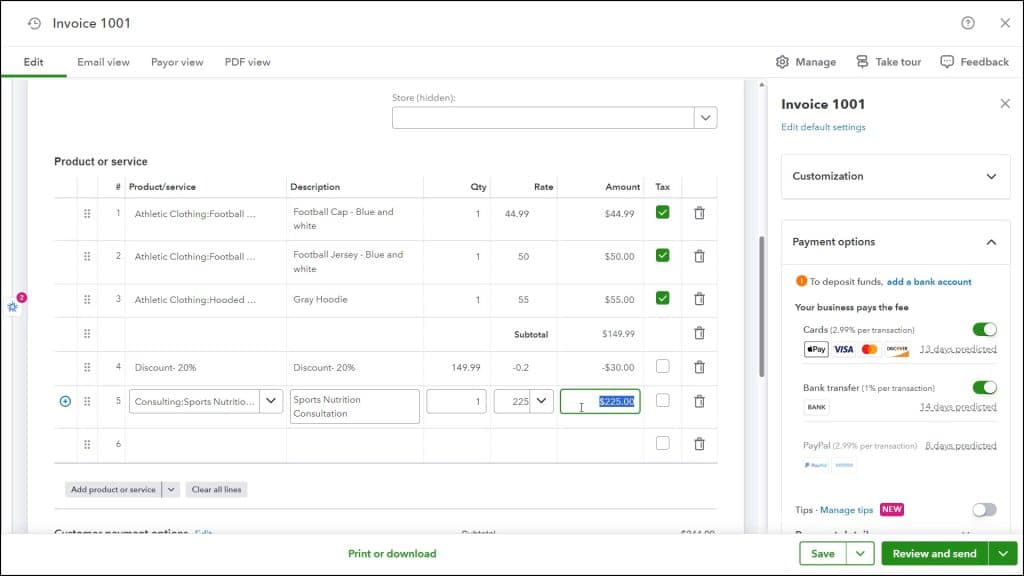
Alternatively, if using a flat amount “Discount,” you can simply select the “Discount” line item whenever you want within the sales form and then enter the flat amount to discount into the “Rate” field as a negative number with a “Qty” of 1.
Double-Check the Sales Tax Collected for Accuracy:
However, after using either type of line item discount, you must then double-check your sales form’s “Sales tax” calculation, as companies using the automatic sales tax based on location may show an incorrect sales tax amount collected when using a “Discount” line item if the “Sales tax category” for the discount line item is incorrect. To change its tax setting, if needed, check or uncheck the discount line item’s “Tax” checkbox in the sales form.
Many times, you simply need to click away from the discount line item to a previous line item to update the sales form’s calculations. Alternatively, if needed, you can override the automatic sales tax in the sales form in the pane that opens after clicking the “See the math” link in the sales form. When finished, choose one of the “Save” options to complete the transaction.


