How to Use Registers in QuickBooks Online
How to Use Registers in QuickBooks Online: Video
This video lesson, titled “How to Use Registers in QuickBooks Online,” shows you how to manage account transactions by using account registers in QuickBooks Online. This video lesson is from our complete QuickBooks Online tutorial, titled “Mastering QuickBooks Online Made Easy.”
Overview:
QuickBooks Online Plus lets you enter, edit, and delete transactions in account registers for balance sheet accounts, except “Accounts Payable,” “Accounts Receivable,” and some types of “Equity” accounts. You must use the associated transaction forms to enter or edit transactions in these account registers. However, most other balance sheet accounts let you add, edit, and delete transactions in their registers.
How to View an Account’s Register in QuickBooks Online:
To view an account’s register, click the “Settings” button in the QuickBooks Online toolbar and then click the “Chart of accounts” link under the “Your Company” heading to open the “Chart of accounts” page. Then click the “View Register” link in the “Action” column for the account whose register you want to view, if available.
How to Quickly Switch Account Registers and View Transactions:
At the top of the account’s “Register” page is a drop-down that contains all your accounts. To quickly switch the account register, select a choice from this drop-down menu. The account register shows all the account’s transactions. By default, these are sorted by date from newest to oldest. The columns shown in an account’s register vary, based on the type of account selected.
How to Sort Transactions in an Account Register:
To sort the transactions by the values in a column, if possible, click the column heading label by which to sort the register’s values. If you do not see a small arrow appear when you hover over the column’s heading label, then you cannot sort by that column heading label’s values.
After clicking a column heading label, a small arrow next to the label in the heading indicates the direction of the sort, either ascending (up) or descending (down). You can click the same column heading label again to change the sort direction. Note that some account columns show two column label values by which you can sort, like the “Ref No./Type” column, which you can sort by either value, like “Ref No.” or “Type,” separately.
How to Filter Transactions in an Account Register:
To filter the account register to only show specific transactions, click the “Filter” drop-down button in the upper-left corner of the transaction list to show a drop-down menu of filtering choices. Use the drop-downs and fields in this drop-down menu to select and/or enter the values by which to filter the account register. For some filtering fields, you can also filter for values greater than (>) or less than (<) a value you specify by typing those symbols before your comparison value. To apply your filter after setting the filtering criteria, click the “Apply” button in this drop-down menu. To reset the values of the filters in this drop-down menu, click the “Reset” button in the drop-down menu.
After applying filters to a register, the filters appear to the right of the “Filter” button. To remove an individual filter, click the “X” button to the right of the filter name. To remove all the filters, click the “Clear filter/View All” link that appears in this same area.
How to Print, Export, or Change the Display Settings of an Account Register:
In the upper-right corner of the transaction list are three buttons for “Print list,” “Export to Excel,” and “Settings.” To open a printer-friendly list page and open your web browser’s “Print” dialog box to print the page, click the “Print list” button. You can close this page after printing it. To download the list as an Excel workbook, click the “Export to Excel” button.
To show the list display options in a drop-down menu, click the “Settings” button. Under the “Columns” heading in the drop-down menu, you can check or uncheck the names of the columns to show or hide them in the list. You can check the checkboxes under the “Other” section for “Show in one line,” which shows each transaction on a single line, and “Paper Ledger Mode,” which shows transactions from oldest to newest and moves the “Add (transaction type)” drop-down link to the bottom of the register. Clicking the “Rows” drop-down in the drop-down menu lets you select the number of transaction rows to show per page in the list.
How to Add a New Transaction to an Account Register:
To add a new transaction to the register, click the “Add (transaction type)” drop-down link or click the drop-down arrow next to the link at either the top or the bottom of the register, depending on your choice in the “Settings” drop-down. If you click the drop-down arrow, then select the type of transaction to create from the drop-down menu.
A new transaction area then appears, where you can enter the transaction details. When finished, click the “Save” button in the lower-right corner of the transaction area to save it and add it to the register. Alternatively, to cancel the transaction, click the “Cancel” button in the lower-right corner of the transaction area.
How to Edit and Delete Transactions in an Account Register:
To edit or delete a transaction, click the transaction to edit or delete in the account register to show the transaction’s fields in the register. To edit it, change the values in the fields and click the “Save” button in the lower-right corner of the transaction to save the changes. Alternatively, click the “Edit” button in the lower-right corner of the transaction to open the associated transaction form where you can make your changes and then save them to edit the transaction.
To delete the selected transaction, click the “Delete” button in the lower-right corner of the transaction. Then confirm or cancel the deletion in the confirmation dialog box that appears. Be careful when deleting transactions from registers to ensure you do not create problems with past account reconciliations by accidentally deleting cleared transactions. To cancel the accounting editing or deleting, click the “Cancel” button in the lower-right corner of the transaction.
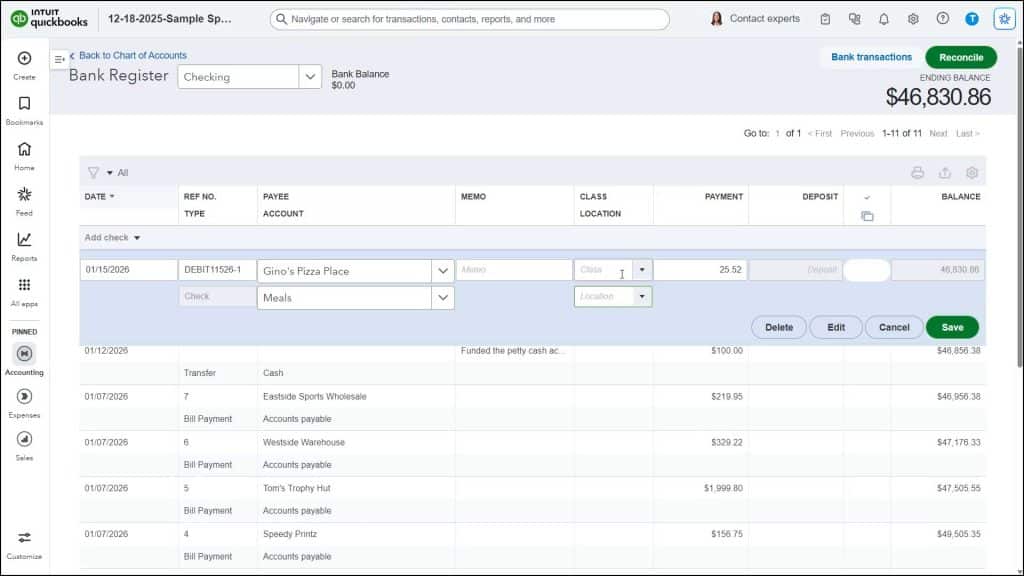
How to Navigate Pages in a Register or Reconcile an Account from the Register:
If the account has multiple pages of transactions, you can click the links in the “Go to:” section at either the top or bottom of the page to scroll through the pages of transactions. The ending balance for the account also appears in the upper-right corner of the “Register” window. To reconcile an account from the account register, you can click the “Reconcile” button in the upper-right corner of the “Register” window to open the “Start Reconciling” window. Reconciling accounts is covered in a later lesson.


