Timesheet Preferences in QuickBooks Time and QuickBooks Online
How to Change Timesheet Preferences in QuickBooks Time and in QuickBooks Online: Video
This video lesson, titled “How to Set Timesheet Preferences for QuickBooks Time in QuickBooks Online,” shows you how to change the Timesheet preferences in QuickBooks Time and QuickBooks Online Plus if you have a subscription to QuickBooks Time or QuickBooks Payroll Premium. This video lesson is from our complete QuickBooks Online tutorial, titled “Mastering QuickBooks Online Made Easy.”
Overview:
If you subscribe to QuickBooks Time with QuickBooks Online Plus, either directly or through a QuickBooks Payroll Premium subscription, Intuit is transitioning many of the settings and workflows you often used to do within QuickBooks Time directly into QuickBooks Online, so you won’t need to sync as often.
Currently though, you can still enter time into QuickBooks Time and then import it to QuickBooks Online, if needed. Before you record timesheet data in QuickBooks Time, you should ensure you set the desired QuickBooks Time timesheet preferences to make sure you record the data you need for QuickBooks Online within your timesheets.
How to Open QuickBooks Time from QuickBooks Online:
To open QuickBooks Time if you have a subscription through QuickBooks Online, click the “Overview” link under the “Time” app in the “All apps” bar. Then click the “Go to classic QuickBooks Time” link in the upper-right corner of the “Overview” page to open a new browser tab for the QuickBooks Time application.
How to Set the Timesheet Preferences in QuickBooks Time:
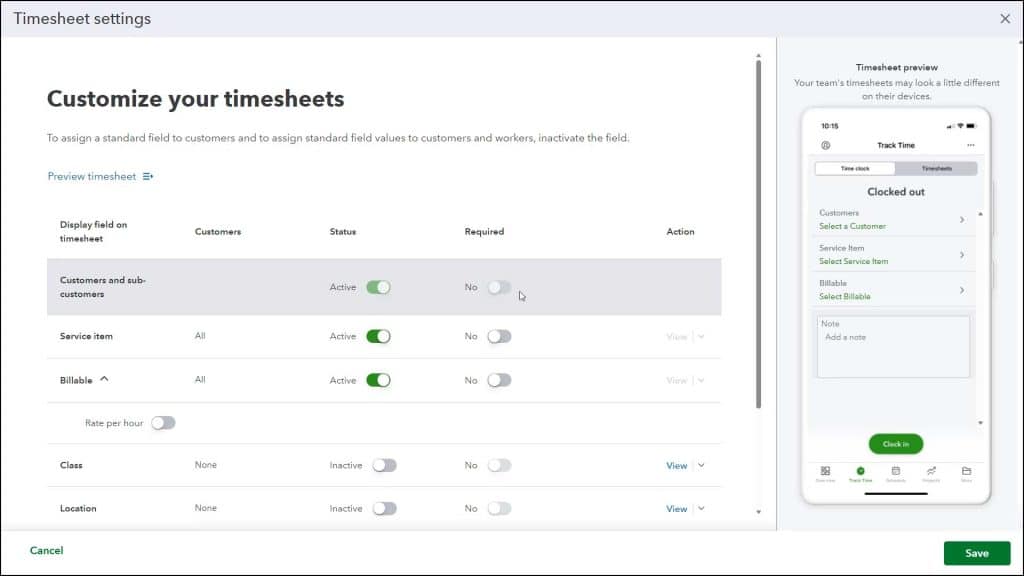
To set your QuickBooks Time timesheet preferences, click the “QuickBooks” or “QuickBooks Payroll” button in the toolbar at the top of the QuickBooks Time window to show a drop-down menu of commands. Then click the “Preferences” command in the drop-down menu to open the “Preferences” window. Note that changes in this window are applied as soon as you make them.
In the “Timesheets Should Show” section, check or uncheck the “Customers & sub-customers,” “Service Items,” “Billable yes/no choice,” and the optional “Class” and “Location” checkboxes to show or hide each feature in the timesheet. Note that the “Class” and “Location” choices only appear if enabled in the QuickBooks company file. To require the billable yes/no choice if you check the “Billable yes/no choice” checkbox, check the “Require Billable yes/no choice” checkbox. To add the billable rate if you check the “Billable yes/no choice” checkbox, check the “Billable Rate” checkbox.
To import contractors as team members, check the “Import contractors as team members” checkbox in the “Other Options” section. To access the payroll item mapping tool if you need to choose which payroll items are used for straight time, overtime, and vacation time, click the “Payroll Item Mapping Tool” button in the “Other Options” section to open a window where you can make these changes and save them to apply them.
To get a notification when a time entry doesn’t sync to QuickBooks, ensure the “Tell me when a time entry doesn’t sync to QuickBooks” checkbox is checked. To close the preferences window when you are finished, click the “X” button in its upper-right corner.
How to Change the Timesheet Settings in QuickBooks Online:
To view the other QuickBooks Time settings, if needed, please review the lesson titled “Customizing Time Settings” in Chapter 2 of this tutorial. Note that the settings for the QuickBooks Time timesheet we just covered correspond to the new “Timesheet fields” section of the “Time” settings in the “Settings” window of QuickBooks Online. You can now change them in either place but note that you must click the “Save” button in the “Timesheet settings” window in QuickBooks Online to save the changes you make to the timesheets there.