 MY CART
How to Manage Printers and Scanners in Windows 11: Video Lesson
This video lesson, titled “How to Manage Printers & Scanners in Windows 11: A Windows 11 Training Tutorial,” shows you how to add and manage printers and scanners in Windows 11. This video lesson is from our complete Windows tutorial, titled “Mastering Windows Made Easy.”
Overview:
How to Manage Printers and Scanners in Windows 11:
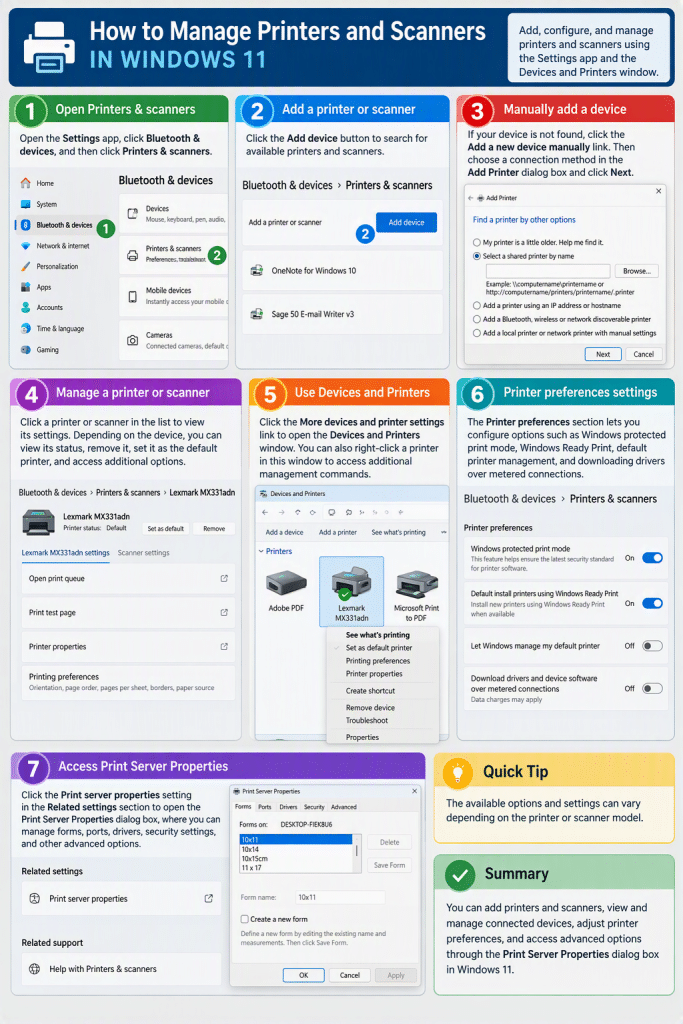
To manage printers and scanners in Windows 11, open the “Settings” app and then click the “Bluetooth & devices” category in the navigation pane. Then click the “Printers & scanners” setting to view the printers and scanners installed on your computer.
The “Printers & scanners” settings page displays the printers and scanners that Windows has detected and configured on your device. We’ll first examine how to add a printer or scanner and then show you how to manage your connected printers and scanners.
How to Add a New Printer or Scanner:
To add a printer or scanner, click the “Add device” button in the “Add a printer or scanner” section. Windows then searches for available printers and scanners that can be connected to your computer. If a device is found, select it and follow any prompts that appear to complete the installation.
How to Manually Add a Printer or Scanner:
If the printer or scanner you want to add is not detected automatically, additional options appear after the search completes. For example, if you use a work or school account, you can click the “Sign in” button to search for printers provided by your organization. You can also click the “Add a new device manually” link that appears to open the “Add Printer” dialog box.
The “Add Printer” dialog box provides additional methods for connecting printers, including searching for older printers, connecting to a shared printer, adding a printer by IP address or hostname, connecting Bluetooth, wireless, or network-discoverable printers, and manually configuring local or network printers. Select the desired option and then click the “Next” button to continue through the printer setup process and complete the printer installation.
How to Manage a Printer or Scanner in Windows 11:
To manage a printer or scanner in the “Printers & scanners” settings page, click its name in the list to open its individual settings page. Depending on the device, you can view its status, remove it, set it as the default printer, and access additional management tools. The available printer-management options vary by device.
How to Use the “Devices and Printers” Control Panel Window to Manage Printers:
Additional printer-management tools are available through the “More devices and printer settings” link, which opens the legacy “Devices and Printers” window in Control Panel. This window displays installed devices and printers and provides commands for adding devices, adding printers, viewing print queues, changing printer preferences, viewing printer properties, and accessing additional printer-management tools.
The “Devices and Printers” window also provides access to the classic printer-management interface that is still commonly used in many business and enterprise environments. If needed, you can right-click a printer within this window to access commands such as viewing the print queue, setting the printer as the default printer, opening printing preferences, viewing printer properties, troubleshooting problems, or removing the device from Windows.
If you open the “Devices and Printers” window, you can close it by clicking the “X” button in its upper-right corner. Separately, if you open one of the other printer tools in the “Settings” window and want to return to the “Printers & scanners” settings, click the “Back” button or use the breadcrumb navigation at the top of the “Settings” window.
How to Change the Printer Preferences Settings in Windows 11:
The “Printer preferences” section in the “Printers & scanners” settings page contains settings that control how Windows manages printers. The “Windows protected print mode” setting helps Windows use modern printer security standards. The “Default install printers using Windows Ready Print” setting defaults newly connected printers to using Windows Ready Print to reduce printer driver installation and improve security.
The “Let Windows manage my default printer” setting determines whether Windows automatically selects your default printer based on usage. To manually manage the default printer yourself, turn this setting off. You can also allow Windows to download printer drivers and device software when using metered internet connections. If this option is enabled, additional data charges may apply depending on your internet service plan.
How to Access the Print Server Properties Dialog Box in Windows 11:
The “Related settings” section contains the “Print server properties” setting. Click this setting to open the “Print Server Properties” dialog box, which provides access to advanced printer and print-server settings. The available tabs let you manage forms, ports, drivers, security settings, and other advanced printing options. After making any desired changes in the dialog box, click the “OK” button to apply them or click the “Cancel” button to close the dialog box without saving changes.