 MY CART
How to Change the Storage Settings in Windows 11: Video Lesson
This video lesson, titled “How to Change the Storage Settings in Windows 11 to Free Disk Space: A Windows 11 Training Tutorial,” shows you how to change the Storage settings in Windows 11. This video lesson is from our complete Windows tutorial, titled “Mastering Windows Made Easy.”
Overview:
How to Open the Storage Settings in Windows 11:
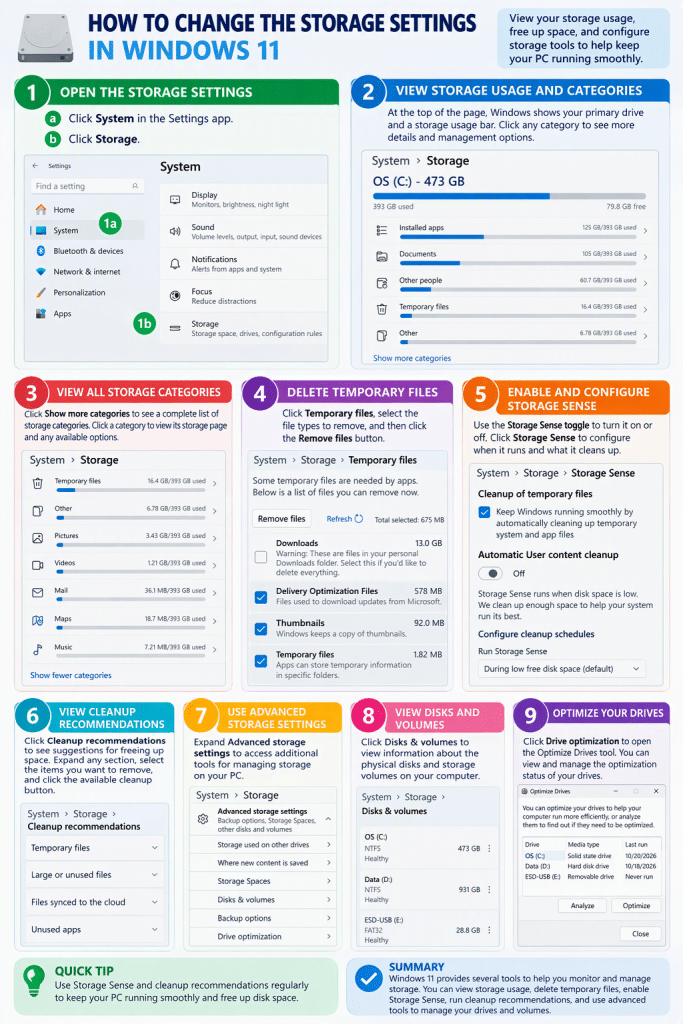
To change the storage settings in Windows 11, open the “Settings” app and then click the “System” category in the navigation pane. Then click the “Storage” setting to view the storage settings for your device.
How to View the Primary Drive’s Storage Space and Storage Categories:
At the top of the page, Windows displays the selected drive and a storage usage graph that shows the used and available storage space on the drive. Below the graph, Windows displays the most common storage categories, such as installed apps, temporary files, documents, and other files. Click any category to view additional information about the storage used by that category and any available management options.
How to View All Storage Categories:
To view all storage categories, click the “Show more categories” link below the category list. Windows then displays additional storage categories and the amount of space used by each. You can click any category in this list to view its storage page and, if available, manage or remove content associated with that category. Some categories simply provide information, while others open related settings pages elsewhere in the “Settings” app.
How to Delete Temporary Files:
One of the most used storage categories is “Temporary files.” Clicking this category opens the “Temporary files” settings page, where you can review and delete temporary files stored on your computer. To remove selected temporary files, check the desired file types and then click the “Remove files” button.
How to Enable and Configure Storage Sense:
The “Storage management” section contains tools that help Windows automatically manage storage space. To turn Storage Sense on or off, use the toggle switch next to the “Storage Sense” setting. To configure Storage Sense, click the “Storage Sense” setting. The Storage Sense settings let Windows automatically remove temporary files, delete older files from the Recycle Bin, remove older files from the Downloads folder, and convert locally stored OneDrive files into online-only files after a specified period of inactivity. You can also choose when Storage Sense runs and manually run it immediately by clicking the “Run Storage Sense now” button.
How to View and Run Cleanup Suggestions to Free Space:
To view storage cleanup suggestions, click the “Cleanup recommendations” setting. Windows analyzes your storage and displays recommendations for freeing space. These recommendations may include temporary files, large or unused files, files synced to the cloud, and unused apps. Expand any section to review the recommended items and select the items you want to remove. Then click the available cleanup button to free the selected storage space.
How to View Advanced Storage Settings:
The “Advanced storage settings” section contains additional storage-management tools. To view these tools, click the “Advanced storage settings” setting to expand the section. The available settings can vary depending on your device and configuration.
How to Manage Storage on Other Drives:
The “Storage used on other drives” setting displays storage information for additional attached drives. The “Where new content is saved” setting lets you choose the default drives used to save apps, documents, music, pictures, videos, maps, and other content. To change a storage location, select the desired drive from the appropriate drop-down list and then apply the change.
How to Create Storage Spaces:
The “Storage Spaces” setting lets you create storage pools and Storage Spaces using multiple drives. Storage Spaces can help improve data availability and simplify storage management across multiple disks. To create a new storage pool, click the “Add” button and then follow the instructions that appear.
How to View and Manage Disks and Volumes:
The “Disks & volumes” setting displays information about the physical disks and storage volumes connected to your computer. You can view properties for individual disks and volumes, create new volumes, and manage existing storage volumes from this page.
How to Manage Backups and Optimize the Drives:
The “Backup options” setting opens the “Windows backup” settings page within the “Accounts” settings category. Because the Windows backup settings are covered elsewhere in this course, they are not discussed here. The “Drive optimization” setting opens the “Optimize Drives” dialog box, which lets you view and manage the optimization status of your drives. When finished, close the “Settings” window by clicking the “Close” button in its upper-right corner.