Adjust Inventory in QuickBooks Desktop Pro- Instructions
Video Lesson on How to Adjust Inventory in QuickBooks Desktop Pro:
The following video lesson, titled “How to Adjust Inventory in Intuit QuickBooks Desktop Pro 2024,” shows how to adjust inventory in QuickBooks Desktop Pro. This video lesson is from our complete QuickBooks tutorial, titled “Mastering QuickBooks Desktop Pro Made Easy v.2023.”
Overview of How to Make an Inventory Adjustment in QuickBooks Desktop Pro:
When you have loss, spoilage, or send out samples of your products, you need to manually adjust inventory in QuickBooks Desktop Pro. To adjust inventory in QuickBooks Desktop Pro, you use the “Adjust Quantity/Value on Hand” window. To view this window, select “Vendors| Inventory Activities| Adjust Quantity/Value on Hand” from the Menu Bar.
First, select the type of inventory adjustment to make from the “Adjustment Type” drop-down menu. You can adjust the “Quantity,” “Total Value,” or both the “Quantity and Total Value.” Then enter the date of the adjustment into the “Adjustment Date” field. Then select the account the adjustment will affect from the “Adjustment Account” drop-down menu.
To the right, enter an adjustment reference number into the “Reference No.” field. You can also assign a “Customer:Job” or “Class” to the transaction, if needed. Enter the reason you needed to adjust inventory in QuickBooks Desktop Pro into the “Memo” field at the bottom of the form.
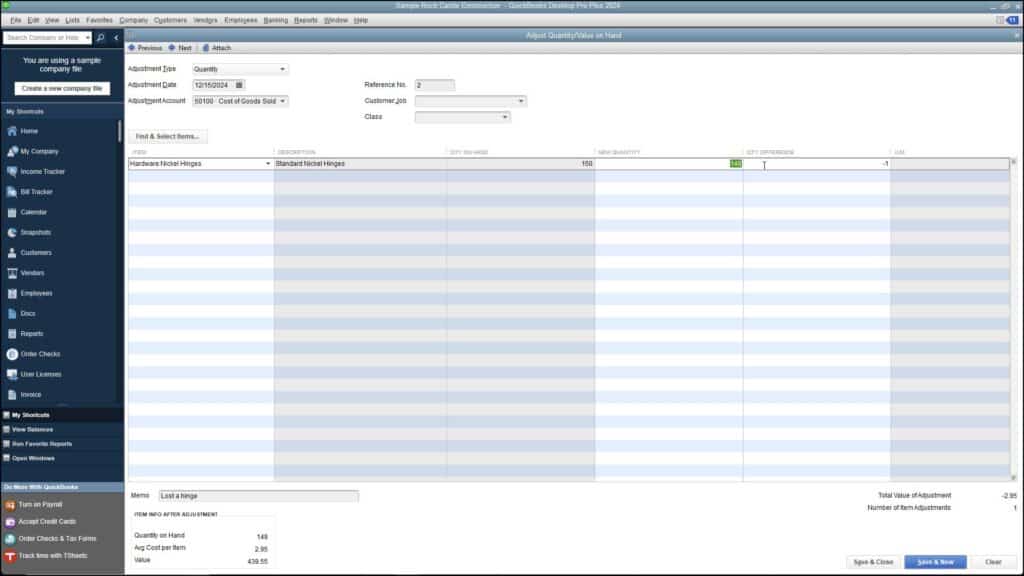
Then click into “Item” column in the first available row. Then select the first item to adjust from the drop-down list. To make a “Quantity” adjustment, either type the “New Quantity” or the “Quantity Difference” into the respective column.
If you enter a loss of items in the “Qty. Difference” column, be sure to enter the difference as a negative number! To make a “Total Value” adjustment, enter the new total value into the “New Value” column. After you adjust inventory in QuickBooks Desktop Pro, click the “Save & Close” button to finish.
Instructions on How to Adjust Inventory in QuickBooks Desktop Pro:
- To adjust inventory in QuickBooks Desktop Pro, select “Vendors| Inventory Activities| Adjust Quantity/Value on Hand” from the Menu Bar to open the “Adjust Quantity/Value on Hand” window.
- Select the type of inventory adjustment to make from the “Adjustment Type” drop-down menu. You can adjust the “Quantity,” “Total Value,” or both the “Quantity and Total Value.”
- Then enter the date of the adjustment into the “Adjustment Date” field.
- Then select the account that the adjustment will affect from the “Adjustment Account” drop-down menu.
- To the right, enter an adjustment reference number into the “Reference No.” field.
- You can also assign a “Customer:Job” or “Class” to the transaction, if needed.
- Enter the reason you needed to adjust inventory in QuickBooks Desktop Pro into the “Memo” field at the bottom of the form.
- Then click into “Item” column in the first available row.
- Then select the first item to adjust from the drop-down list that appears.
- To make a “Quantity” adjustment, either type the “New Quantity” or the “Quantity Difference” into the respective column.
- If you enter a loss of items in the “Qty Difference” column, be sure to enter the difference as a negative number!
- To make a “Total Value” adjustment, enter the new total value into the “New Value” column.
- After you adjust inventory in QuickBooks Desktop Pro, click the “Save & Close” button to finish.