How to Change Custom Form Content Settings in QuickBooks Online
How to Change Custom Form Content Settings in QuickBooks Online: Video
This video lesson, titled “How to Change the Custom Form Content Settings in QuickBooks Online,” shows you how to change custom form Content settings in QuickBooks Online. This video lesson is from our complete QuickBooks Online tutorial, titled “Mastering QuickBooks Online Made Easy.”
Overview:
To change a custom form’s content in the form customization window of QuickBooks Online, click the “Content” tab at the top of the window. The “Content” tab lets you edit the form’s header, activity section, and footer by clicking the white pencil icons in the respective sections of the form’s preview at the right side of the window. Alternatively, you can just click the sections themselves to access the same settings. After clicking a section, its settings then appear to the left.
How to Edit a Custom Form’s Header Content:
To edit the header, click the top section at the right to view its settings to the left. To add or remove fields, check or uncheck the checkboxes under the “Header,” “Form,” “Display,” and “Custom fields” sections. To add fields to a section that do not currently appear, click the “+ (field name)” link in that section, where “field name” is the name of the type of information to show, to then add a checkbox and label field for that information into that section. To change the display of the label for many fields you add, type your desired label into the adjacent field to the right of the field’s checkbox. To remove a field, uncheck its checkbox.
How to Edit the Custom Form’s Activity Table:
To edit the activity section, click the middle section in the area to the right to show its settings to the left. The activity section shows the items selected in the form within an activity table. For invoices, you can check the “Show on invoice” checkbox under the “Account summary” section to show an account summary in the invoice.
For all forms, the “Activity table” section lists the columns to show. To add or remove columns from the activity table, check or uncheck the column names. To enable or disable additional settings for some types of columns, check or uncheck the associated sub-checkboxes, if they appear, as desired.
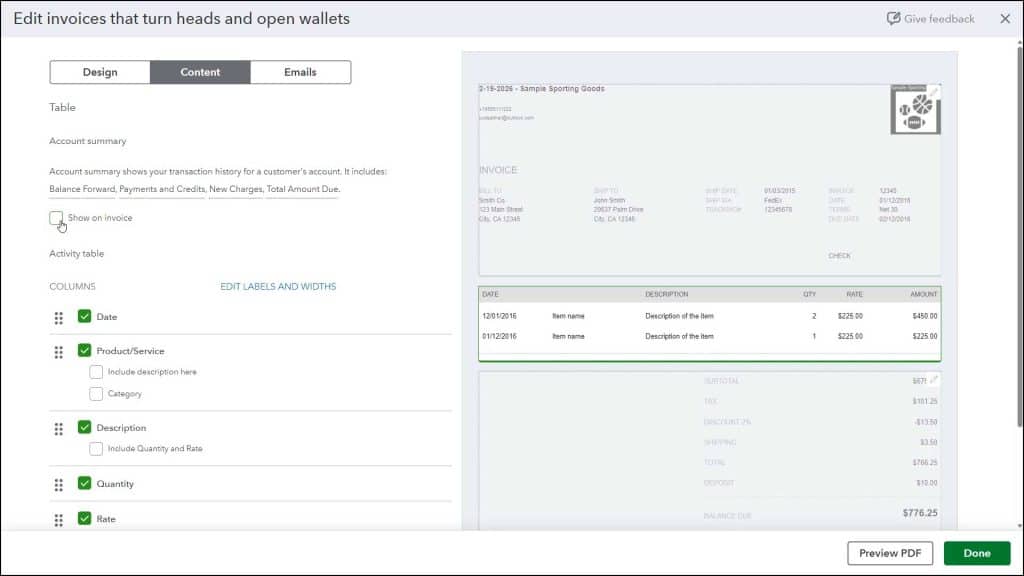
To change the order of the columns in the table, click and drag the icon to the left of the column name up or down in the list and then release it when it is in the desired position. The order the columns appear from top to bottom is the order they appear in the activity table from left to right.
To edit the column labels and column widths, click the “Edit Labels and Widths” link to show fields and sliders to the right of the column names. To edit a column’s label, change the value in the field that appears to the right of the column name. To adjust its width, click and drag the slider to the right of the label field to the left or right to make the column width narrower or wider. Your changes appear in the form preview to the right.
How to Change Advanced Activity Table Options:
To show advanced activity options, click the “Show more activity options” link at the bottom of this section to show checkboxes for additional, activity-related form settings. To then enable or disable any activity options available for your form type, check or uncheck these additional checkboxes, as needed. For some checkbox options, additional options may also appear if they are enabled, where you may then need to make additional selections from drop-downs or check or uncheck related options, too, as needed.
For all forms, you can enable the “Group activity by” and “Collapse activity rows” options to apply grouping and combining of activity items, as was discussed in depth in the earlier lesson titled “Grouping and Subtotaling Items in Invoices” in the “Basic Sales” chapter. For the “Invoice” form, there are also options for “Show progress on line items (email only),” “Show markup on billable expenses,” “Show billable time (This setting applies to all form styles),” and if billable time is enabled, “Include employee name” and “Include hours and rate.” To show progress invoicing in an invoice regardless of how it is sent, select the “Airy new” template design choice back on the “Design” tab and then check the “Show progress on line items” checkbox that then appears here.
How to Change the Custom Form’s Footer Content:
To change the footer section, click the bottom section of the form preview at the right side of the form customization window to view its settings to the left. Under the “Display” section, you can check the checkboxes for “Discount,” “Deposit,” and/or “Estimate summary (email and web only)” to show those fields in the form.
Like the progress invoicing, note that if you select the “Airy new” template choice back on the “Design” tab, then the estimate summary appears regardless of how the form is sent if you check the “Estimate summary” checkbox. Also, note that enabling the discount and/or deposit enables them in all sales forms. However, also note the “Deposit” and “Estimate summary” checkboxes are not available when customizing an “Estimate” or “Sales receipt,” as they would make no sense in those forms.
To add a message to the customer, type the message into the large field under the “Message to customer on (form type)” label and drop-down. You can set the font size for the message by using the adjacent drop-down field. To add additional footer text, type it into the field under the “Add footer text” label. Then set the font size and text alignment using the two drop-downs to the right.


