How to Change Custom Form Design Settings in QuickBooks Online
How to Change Custom Form Design Settings in QuickBooks Online: Video
This video lesson, titled “How to Change the Custom Form Design Settings in QuickBooks Online,” shows you how to change custom form Design settings in QuickBooks Online. This video lesson is from our complete QuickBooks Online tutorial, titled “Mastering QuickBooks Online Made Easy.”
Overview:
To change a custom form’s design settings in the form customization window of QuickBooks Online, click the “Design” tab at the top of the window. This is also the default page that appears after creating a new form style. The “Design” settings let you name the custom form style, choose a layout template, add a logo, and select colors, fonts, and print settings. To name the custom form style, type its name into the field in the upper-left corner of the “Design” settings.
Set the Custom Form’s Template and Select a Logo:
To set the form template, click the “Dive in with a template” or “Change up the template” link to show the available templates. Then click the template you prefer to show it in the preview at the right side of the page. If needed, to change the logo, click the “Add your unique logo” or “Make logo edits” link. If needed, then click the “Add a logo” button that appears. Then click the “plus sign” button in the “Logos” window that opens to select a new logo to upload and click the “Save” button to close the window.
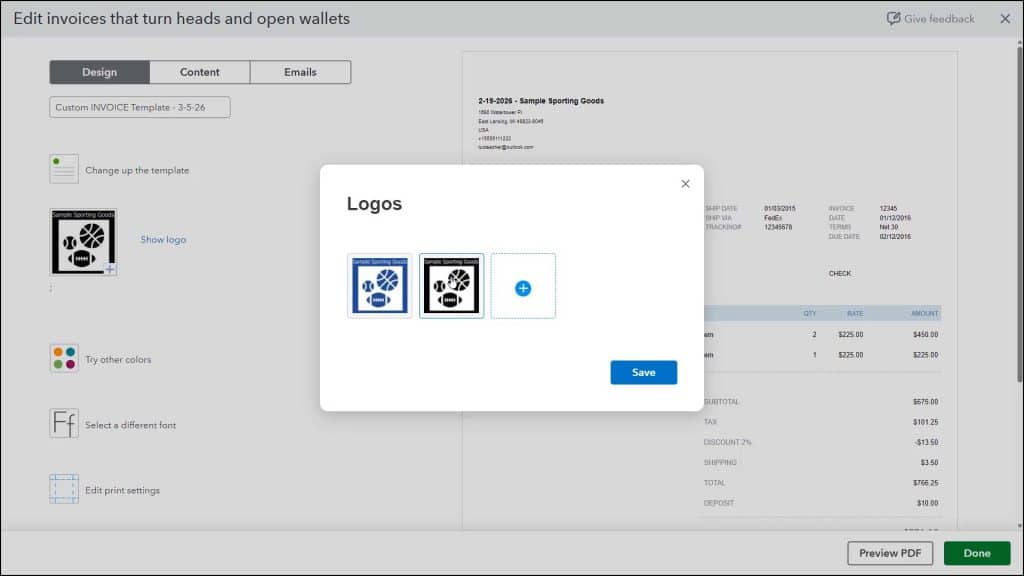
Note that this copy of the logo is only changed within this form and doesn’t change the version selected within the “Settings” window. Also, the color of the form automatically changes to best complement the selected logo, though you can change it, as needed.
After selecting a logo, to set the size of the selected logo, click a button under the “Size” setting in the “Design” section. To set the logo’s position, click an alignment option under the “Placement” setting. Alternatively, to hide the logo instead of showing it, click the “Hide logo” link.
Set the Custom Form’s Color and Font:
To change the form’s color, click the “Splash on some color” or “Try other colors” link. Then click a color shown or enter your own hexadecimal color code into the field shown. To change the form’s fonts, click the “Get choosy with your font” or “Select a different font” link. Then use the left drop down to select the desired font face and the right drop down to set the desired font size.
Set the Custom Form’s Margins and Printing Settings:
To edit the print settings, click the “When in doubt, print it out” or “Edit print settings” link. Enter the margin space you want, in inches, into the “Top,” “Left,” “Bottom,” and “Right” fields under the “Page margins” setting. To reset the margins after making changes, click the “Reset” link to the right of the fields. To use window envelopes with invoices or estimates, check the “Fit to window envelope” checkbox. To include a payment stub, check the “Include payment stub” checkbox. To hide your company information and logo from the form if using letterhead paper, check the “Use letterhead paper” checkbox.


