 MY CART
How to Change the Advanced Settings in Windows 11: Video Lesson
This video lesson, titled “Windows 11 Advanced System Settings Explained: A Windows 11 Training Tutorial,” shows you how to change the Advanced settings in Windows 11. This video lesson is from our complete Windows tutorial, titled “Mastering Windows Made Easy.”
Overview:
How to Open the Advanced Settings in Windows 11:
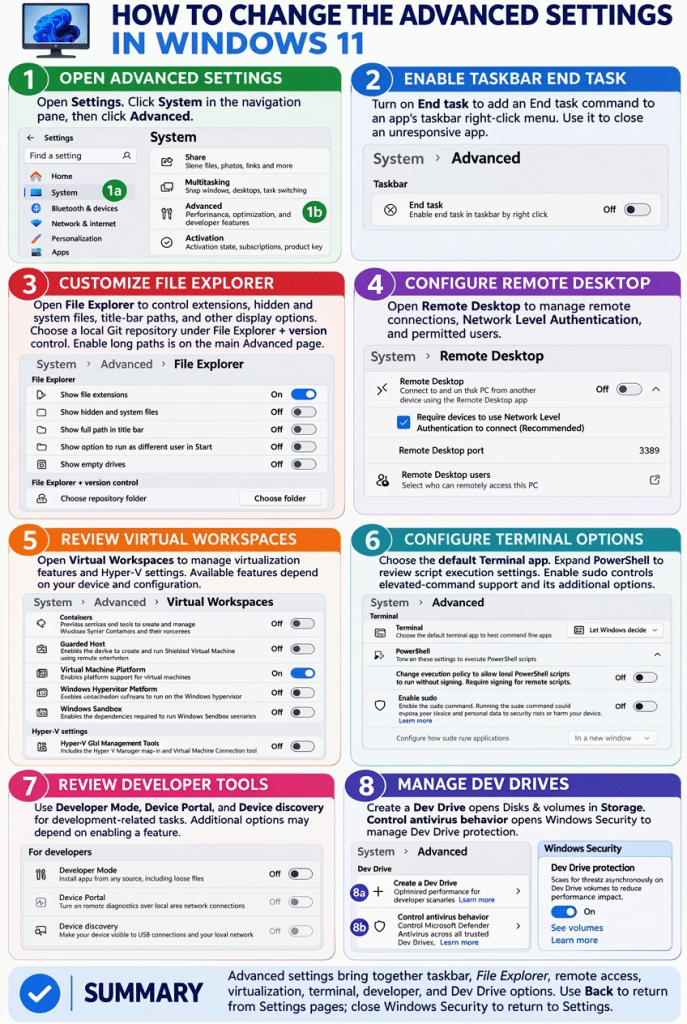
To change the advanced system settings in Windows 11, open the “Settings” app and then click the “System” category in the navigation pane. Then click the “Advanced” setting to view the advanced settings for your device. The advanced settings page contains settings sections for “Taskbar,” “File Explorer,” “Virtual Workspaces,” “Terminal,” “For developers,” and “Dev Drive.”
How to Enable the End Task Command from the Taskbar:
The “End task” setting lets you quickly end unresponsive applications directly from the taskbar. When this setting is enabled, you can right-click an app’s taskbar button and select the “End task” command to close the application. To enable or disable this feature, use the “End task” toggle switch. This setting can be useful when an application stops responding and cannot be closed normally.
How to Show or Hide Advanced Content in File Explorer, Use a Local Git Repository, or Enable Long Paths:
The “File Explorer” settings let you control File Explorer behavior. Click the “File Explorer” setting to open its in-depth settings page. The available toggle switch settings in this page let you enable or disable features such as showing file extensions, hidden and system files, full paths in title bars, the option to run as a different user in Start, and empty drives.
This page also contains options under the “File Explorer + version control” section for using Git repositories locally if you click the “Update now” button to get the latest Windows Advanced Settings app, if needed, and then select your local repository folder. To return to the “Advanced” settings page, click the “Back” button in the upper-left corner of the window. Also note that the “File Explorer” settings in the “Advanced” page also contain a “Long paths” setting that lets compatible applications access file and folder paths that exceed the traditional Windows path-length limit.
How to Configure Remote Desktop:
In the “Virtual Workspace” section, click the “Remote Desktop” setting to show its in-depth settings page. The “Remote Desktop” toggle switch lets you enable or disable Remote Desktop connections to your device. If Remote Desktop is enabled, click the setting to enable or disable Network Level Authentication to connect and show the Remote Desktop port number. To access the “Remote Desktop Users” dialog box, if desired, click the “Remote Desktop users” setting in this page. To return to the “Advanced” settings page, click the “Back” button in the upper-left corner of the window.
How to Configure Virtualization Settings:
Click the “Virtual Workspaces” setting to open its settings page, which contains settings used by virtualization software and developer tools. The available settings can vary depending on your device and configuration but may include toggle switch setting options to enable or disable Containers, Guarded Host, virtual machine platform, Windows Hypervisor Platform, and Windows Sandbox. There may also be several Hyper-V toggle switch settings that let you turn the associated features on or off. To return to the “Advanced” settings page, click the “Back” button in the upper-left corner of the window.
How to Select a Default Terminal App and Configure PowerShell:
The “Terminal” section lets you use the “Terminal” setting drop-down to select which terminal application Windows uses by default. Depending on the applications installed on your device, available choices may include Windows Terminal, Windows Console Host, and other supported terminal applications.
Click to expand the “PowerShell” setting to toggle whether unsigned PowerShell scripts can run on or off. The “Enable sudo” setting toggle switch enables or disables support for the sudo command, which lets authorized users run commands with elevated permissions. To view additional sudo settings, click the “Enable sudo” setting to expand it. Then choose the desired sudo behavior from the available options.
How to Enable Developer Tools:
The “For developers” section contains settings that are primarily intended for software developers and advanced users. These settings include options such as “Developer Mode,” “Device Portal,” and “Device discovery.” To enable or disable any of these features, use the associated toggle switch. Some settings contain additional options that appear when the setting is enabled.
How to Access Dev Drives and Configure Antivirus with Dev Drives:
The “Dev Drive” section contains settings related to Dev Drives, which are specialized storage volumes designed for development workloads. Click the “Create a Dev Drive” setting to open the “Disks & volumes” settings page, where you can create and manage Dev Drives. Because this setting opens a page within the “Storage” settings category, you must click the “Back” button to return to the “Advanced” settings page, if you open it.
The “Control antivirus behavior” setting opens Windows Security and displays the “Virus & threat protection” settings page. These settings let you manage how antivirus protection interacts with Dev Drives. To return to the “Advanced” settings page after viewing these settings, close the Windows Security window and return to the “Settings” app. When finished, close the “Settings” window by clicking the “Close” button in its upper-right corner.