 MY CART
How to Change the Sound Settings in Windows 11: Video Lesson
This video lesson, titled “How to Change the Sound Settings in Windows 11: A Windows 11 Training Tutorial,” shows you how to change the Sound settings in Windows 11. This video lesson is from our complete Windows tutorial, titled “Mastering Windows Made Easy.”
Overview:
How to Open the Sound Settings in Windows 11:
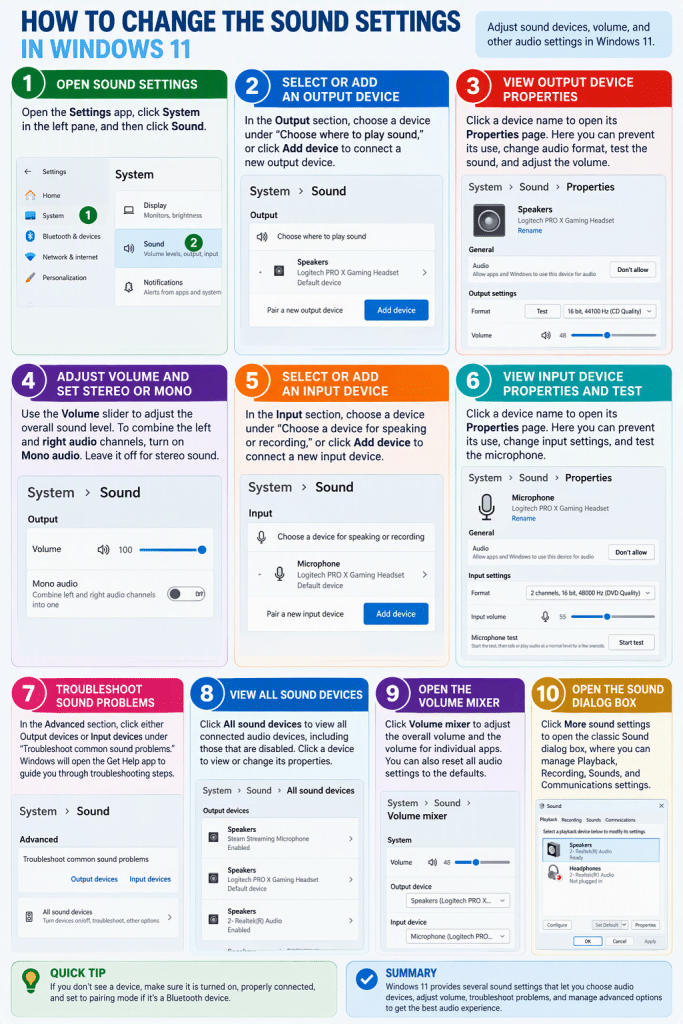
To change the sound settings in Windows 11, open the “Settings” app and then click the “System” category in the navigation pane. Then click the “Sound” setting to show the sound settings for your device.
How to Select a Sound Output Device or Add a New One:
The settings for sound output appear in the “Output” section. To select which device Windows uses for sound output, such as speakers or headphones, select a device under the “Choose where to play sound” setting. The available devices depend on the sound hardware connected to your computer. To connect a new output device, click the “Add device” button and then follow the instructions to pair the device with Windows.
How to Change the Properties of a Sound Output Device:
To view and change the properties of an output device, click its name in the list of available output devices. The device’s “Properties” page then opens. If you want to prevent Windows from using the device for audio output, click the “Don’t allow” button in the “Audio” setting under the “General” section.
To adjust output settings for the device, select the desired audio format, click the “Test” button to play a test sound, and adjust the device volume by using the “Volume” slider. The “Advanced settings” section may also contain options for audio enhancements and spatial sound, depending on the capabilities of the selected device. To return to the “Sound” settings page, click the “Sound” breadcrumb at the top of the window or click the “Back” button.
How to Adjust the Sound Output Volume and Set Stereo or Mono Sound Output:
You can also adjust the overall sound volume from the main “Sound” settings page by using the “Volume” slider. To combine the left and right audio channels into a single channel, turn on the “Mono audio” setting. To use standard stereo output, ensure this setting is turned off.
How to Select a Sound Input Device or Add a New One:
The settings for sound input appear in the “Input” section. To select which device Windows uses for sound input, such as a microphone, select a device under the “Choose a device for speaking or recording” setting. The available devices depend on the sound input hardware connected to your computer. To connect a new input device, click the “Add device” button and follow the instructions that appear.
How to Change the Properties of a Sound Input Device or Test a Microphone:
To view and change the properties of an input device, click its name in the list of available input devices. The device’s “Properties” page then opens. If you want to prevent Windows from using the device for audio input, click the “Don’t allow” button in the “Audio” setting under the “General” section. To adjust input settings for the device, select the desired input format and use the “Input volume” slider to adjust the microphone volume.
To test the microphone, click the “Start test” button, speak normally for a few seconds, and then stop the test to review the results. Depending on the selected device, additional options for microphone processing and audio enhancements may also be available. To return to the “Sound” settings page, click the “Sound” breadcrumb at the top of the window or click the “Back” button.
How to Troubleshoot Sound Problems in Windows 11:
The “Advanced” section contains additional sound-management tools. To troubleshoot common audio problems, click either the “Output devices” or “Input devices” option in the “Troubleshoot common sound problems” setting. Windows then opens the “Get Help” app and guides you through troubleshooting steps for common audio issues.
How to Manage All Connected Sound Devices in Windows 11:
To view all audio devices connected to the computer, click the “All sound devices” setting. The resulting page displays all output and input devices, including devices that are currently disabled. To view or change the properties of a device, click its name in the list. If a device has been disabled, you can open its properties and click the “Allow” button to enable it again. When finished, return to the “Sound” settings page.
How to Open the Volume Mixer in Windows 11:
To access the volume mixer, click the “Volume mixer” setting. The “Volume mixer” page lets you adjust the overall system volume and select the default output and input devices used by Windows. It also lets you adjust the volume level for individual apps that are currently running.
To restore the recommended sound devices and volume levels for all apps, click the “Reset” button in the “Reset sound devices and volumes for all apps to the recommended defaults” section. To return to the “Sound” settings page, click the “Sound” breadcrumb at the top of the window.
How to Open the Sound Dialog Box in Windows 11:
To access additional sound settings, click the “More sound settings” option. Windows then opens the classic “Sound” dialog box. The tabs within this dialog box, including “Playback,” “Recording,” “Sounds,” and “Communications,” provide additional options for managing audio devices and sound settings. After making any desired changes, click the “OK” button to apply them or click the “Cancel” button to close the dialog box without saving changes.
How to Close the Settings App Window:
To close the “Settings” window when finished, click the “Close” button in the upper-right corner of the window.