How to Create and Apply Customer Types in QuickBooks Online
How to Create and Apply Customer Types in QuickBooks Online: Video
This video lesson, titled “How to Create and Apply Customer Types in QuickBooks Online,” shows you how to create customer types and apply customer types to customers in QuickBooks Online. This video lesson is from our complete QuickBooks Online tutorial, titled “Mastering QuickBooks Online Made Easy.”
Overview:
Customer types in QuickBooks Online Plus let you classify customers for reporting purposes. Note that each customer can only be categorized to one customer type.
How to Create Customer Types:
To create customer types, first open the “Customers” page by clicking the “Customers” link under the “Customer Hub” app in the “My apps” bar. Then click the “Customer types” button towards the upper-right corner of the page, which appears after you have added at least one customer record to your Customers list, to open a “Customer types” page.
To add a new customer type, click the “New customer type” button in the upper-right corner of the “Customer types” page. Type the name for the new customer type into the field in the “New customer type” window that opens and then click the “Save” button within it to save it or the “Cancel” button to cancel, if needed.
Then repeat these steps until you have added all your desired customer types to the “Customer types” list. The actions available from the “Action” column in the “Customer type” list include “Edit,” to change a customer type’s name, and “Make inactive,” to inactivate it.
How to Apply a Customer Type to a Customer:
To apply a customer type to a single customer in QuickBooks Online, add a new customer record or edit an existing customer’s record in the “Customer” pane, as usual. Then select the customer type for the customer’s record from the “Customer type” drop-down in the “Additional Info” section of the “Customer” pane. Then click the “Save” button in the lower-right corner of the pane.
How to Apply a Customer Type to Many Customers at Once:
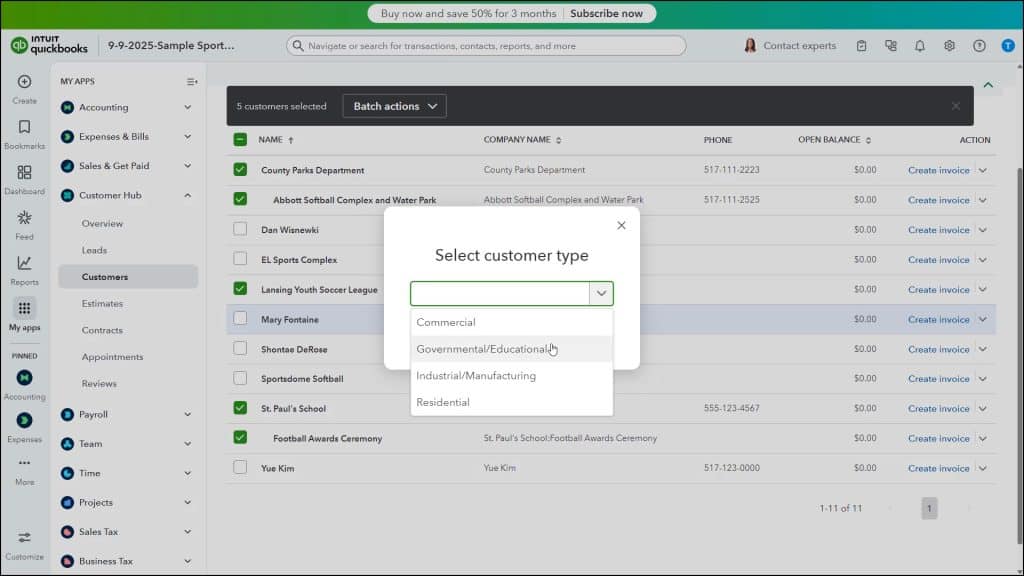
Alternatively, to apply customer types to multiple existing customers at once as a batch action in QuickBooks Online, open the Customers page. Then check the checkbox to the left of the customers in the Customers list to whom to apply the same customer type.
Then click the “Batch actions” drop-down button above the Customers list and select the “Select customer type” command. Then select the desired customer type to apply to the selected customer records in the “Select customer type” window that opens and click the “Apply” button in the window to apply it to those selected customers.