How to Insert Online Pictures in Word 2013
How to Insert Online Pictures in Word 2013: Video Lesson
This video lesson, titled “Inserting Online Pictures,” shows how to insert online pictures in Word 2013. This video is from our complete Word 2013 tutorial, titled “Mastering Word Made Easy v.2013-2007.”
How to Insert Online Pictures in Word 2013: Overview
In light of yesterday’s blog post on the imminent demise of Clip Art in Office products, we thought we would provide instructions on how to insert online pictures in Word 2013 from Office.com or Bing Image Search. This blog post will show you how to insert online pictures in Word 2013. One of the most useful and fundamental functions of Word is the ability to add pictures into your documents to enhance their appearance. In Word 2013, you can now insert pictures from various online resources, including Office.com, your OneDrive, and other online resources.
First, click into the document to place your insertion point at the location where you want to insert the image. Then click the “Insert” tab in the Ribbon and click the “Online Pictures” button in the “Illustrations” group in order to display the “Insert Pictures” window. Within this window, you can see the various types of online resources that you can use to browse for pictures to insert.
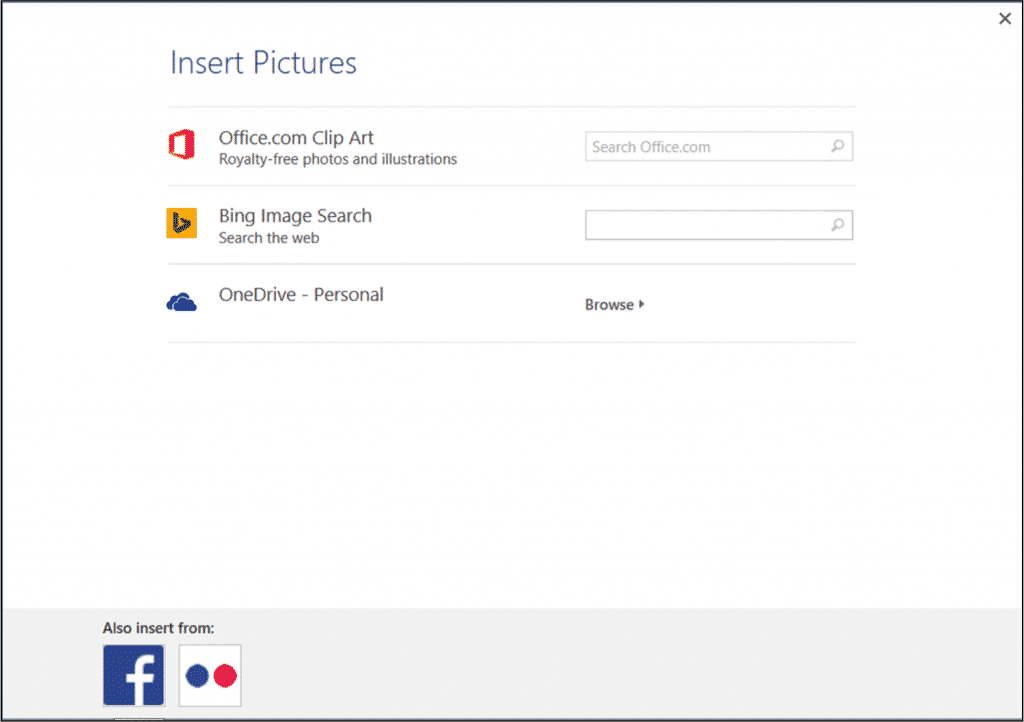
How to Insert Online Pictures in Word 2013: A picture of the “Insert Pictures” window in Word 2013.
You can type a keyword for which you want to search for associated pictures into the “Search” text box. Then click the “Search” button at the right end of the text box to display pictures that match the keyword that you entered. You can scroll through the listing of matching pictures until you find one that you want to insert. You can then click on the picture that you want to insert, and then click the “Insert” button at the bottom of the window to insert the selected picture into your document.
By default, when you add any type of graphics file into a Word document, its default text wrapping set to “In line with text.” This means that the picture has been inserted into the document as if it were simply another character in a sentence. You can only place the picture into areas within the document where text characters exist when using this type of text wrapping setting. You will not be able to click and drag the image to move it freely within the document area unless you pick a different type of text wrapping. You can click the “Layout Options” tag that appears at the right side of the inserted image, and then choose a type of text wrapping from the drop-down menu of choices to set the text wrapping option you prefer. Once you do that, then you may move the image by simply clicking and dragging the image to a different part of the document.
To resize a selected image with your mouse, place your mouse pointer over any one of the eight resizing squares that are located at the perimeter of the image. Once your mouse pointer turns into a double-pointed arrow, you can click and drag in either direction displayed by the arrow to increase or decrease the size of the image.
How to Insert Online Pictures in Word 2013: Instructions
- Click into the document to place your insertion point at the location where you want to insert the image.
- Click the “Insert” tab in the Ribbon and click the “Online Pictures” button in the “Illustrations” group in order to display the “Insert Pictures” window. Within this window, you can see the various types of online resources that you can use to browse for pictures to insert.
- Type a keyword for which you want to search for associated pictures into the “Search” text box.
- Click the “Search” button at the right end of the text box to display matching pictures.
- Scroll through the listing of matching pictures until you find one that you want to insert.
- Click on the picture that you want to insert.
- Click the “Insert” button at the bottom of the window to insert the selected picture into your document.
- You can click the “Layout Options” tag that appears at the right side of the inserted image, and choose a type of text wrapping from the drop-down menu of choices to set the text wrapping option you prefer.
- Once you do that, then you can move the image by simply clicking and dragging the image to a different part of the document.
- To resize a selected image with your mouse, place your mouse pointer over any one of the eight resizing squares that are located at the perimeter of the image.
- Once your mouse pointer turns into a double-pointed arrow, you can click and drag in either direction displayed by the arrow to increase or decrease the size of the image.
