Print Views in Project 2013: Video
This video lesson, titled “Printing Views,” shows you how to print views in Project 2013. This video is from our complete Microsoft Project 2013 tutorial, titled “Mastering Microsoft Project Made Easy v.2013-2010.”
Printing Views in Project 2013: Overview
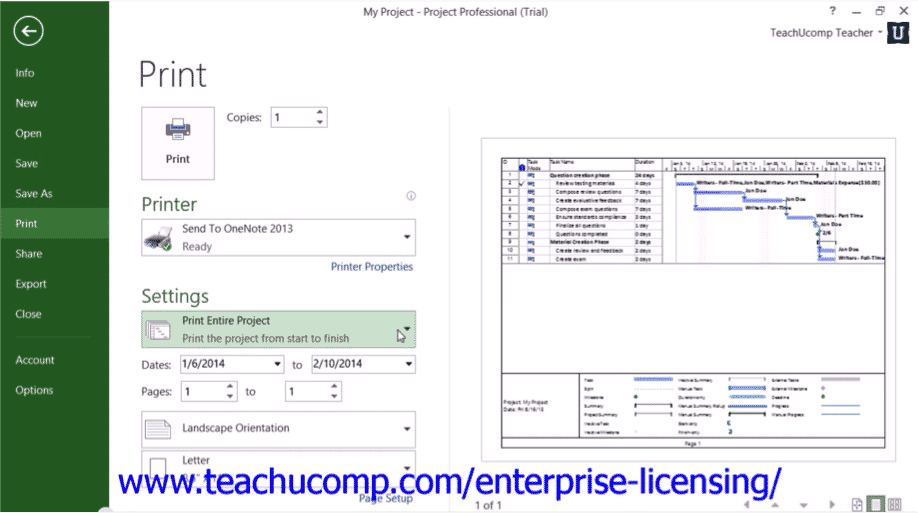
To print views in Project 2013, first ensure you are viewing the project file in the desired view to print. Then click the “File” tab within the Ribbon and select the “Print” command at the left of the backstage view. To the right, you will see the printing options that are currently set, followed by a large print preview of the content of the selected view of the project file.
You can select the printer use for the print job from the “Printer” drop-down. Under the “Settings” section you can choose what to print from the first drop-down. Note that if you select to print only specific pages or only a specific date range, then you must enter the pages or date range to print into the next fields that follow in this section. You can then choose the page orientation and page size from the final two drop-down menus.
To the right you can see a large print preview of the view displayed. In the far lower-right corner of the window, you can click the arrows that point left, up, down, and right to scroll through the pages shown. You can click the “Actual Size” button to display the preview pages at actual print size. You can click the “One Page” button to display one page at a time within the print preview. You can click the “Multiple Pages” button to display all of the pages within a multi-page view at once within the print preview window.
To apply advanced page setup settings, click the “Page Setup” hyperlink at the bottom of the “Print” section to open the “Page Setup” dialog box where you can apply advanced page setup features, such as a legend for your view and a header and footer.
Within the “Page Setup” dialog box, you can click the “Page” tab to display the page settings. In the “Orientation” section, you can select the desired page orientation. Below that, in the “Scaling” section, you can select the desired scaling to use when printing the view. You can adjust the page to a percentage of its normal size by choosing the “Adjust to” option button and then entering the desired percentage into the adjacent spinner box. You could also select the “Fit to” option button and then enter the number of pages wide by the number of pages tall into the adjacent spinner boxes. In the “Other” section, you can select the paper size from the “Paper Size” drop-down. You can manually enter the first page number, if desired, into the “First page number” field.
On the “Margins” tab, you can enter the desired margin increments into the “Top,” “Left,” “Right,” and “Bottom” spinner boxes. You can choose to apply the border around every page, only the outer pages, or around no pages by making a selection in the “Borders around” section.
You can create a header for your view by clicking the “Header” tab. Headers allow you to insert additional information at the top of printed pages, such as the number of pages in total, for example. At the top of this tab is a “Preview” section that displays the type of content that will print in the header, based on the selections you make. Below that, select whether the information you want to enter into the header should appear at the “Left,” “Center,” or “Right” sides of the page by selecting the tab that corresponds to the name of the section into which you want to enter the header information. You can enter information into each section, if desired.
Within the selected section, click into the large white text box and type the information to display. You can also insert commonly-used fields of information by clicking the buttons shown below the text box. At the far left, you can click the “Format Text Font” button to open a “Font” dialog box where you can set the font used for the header information. The next buttons, from left to right, will insert fields for the page number, the number of pages, the date, the time, and the file name. The far right button is the “Insert Picture” button and will open the “Insert Picture” dialog box when clicked, which allows you to insert a picture from your computer into the selected header section. Below that, you can choose a field name from the “General” drop-down and then click the “Add” button to the right to add the selected field to the header. You can also select the name of a field within the project file from the “Project fields” drop-down and then click the “Add” button to the right to add the data from that field to the header.
You can also add information to the footer of a printed view by clicking the “Footer” tab. You create a footer in the exact same way that you create a header. However, the information is simply shown at the bottom of the printed pages, versus at the top.
To add a legend to a view so readers of the view can interpret the colors and shapes shown in the view, click the “Legend” tab. You can then decide on which pages to display a legend by making a choice from the “Legend on” options shown at the right side of the dialog box. They can appear on “Every page,” a separate “Legend page,” or you can have “None.” You can then enter the width of the legend, in inches, into the “Width” spinner box. If you want to set the font used to display the legend labels, you can click the “Legend Labels…” button to open a “Font” dialog box where you can choose a font to use. Then click the “OK” button within the “Font” dialog box when finished to apply it.
You can then click the “View” tab to set any special settings for the specific type of view that you have selected. For example, if you are printing the “Calendar” view, you will see options for printing the months and weeks in the view. If printing a Gantt Chart, you will see options regarding the printing of columns. Note that the options that are displayed here will vary depending upon the view selected, so you should always check the options available here when printing your view to be sure it prints exactly the way that you want.
When you are finished setting your advanced page setup options for your view within the “Page Setup” dialog box, click the “OK” button to apply them.
When you are ready to print the view, enter the number of copies to print into the “Copies” spinner in the “Print” section, and then click the large “Print” button to print the selected view.