TeachUcomp, Inc.

 MY CART
  • VIDEO COURSES
    • All-Access Subscriptions
    • Business Licensing
    • Course List
      • Accounting
      • Adobe
        • Acrobat
        • Lightroom Classic
        • Photoshop
        • Photoshop Elements
      • Crystal Reports
      • Employment Skills
        • Interview Skills
        • Resume Skills
      • For Lawyers
        • Excel for Lawyers
        • Outlook for Lawyers
        • QuickBooks for Lawyers
        • Word for Lawyers
      • HTML
      • JavaScript
      • Microsoft Office
        • Access
        • Excel
        • Microsoft Office Suite
        • OneNote
        • Outlook
        • Outlook on the Web
        • PowerPoint
        • Publisher
        • Word
      • Microsoft Project
      • Microsoft Teams
      • QuickBooks Online
      • QuickBooks Pro
      • Sage
        • Peachtree
        • Sage 50
      • SQL
      • Windows
    • My Courses
    • Video Course Options
  • SUBSCRIPTIONS
  • MANUALS
    • Adobe
      • Acrobat
      • Lightroom Classic
      • Photoshop
      • Photoshop Elements
    • Crystal Reports
    • For Lawyers
      • Excel for Lawyers
      • Outlook for Lawyers
      • QuickBooks for Lawyers
      • Word for Lawyers
    • HTML
    • JavaScript
    • Microsoft Office
      • Access
      • Excel
      • OneNote
      • Outlook
      • Outlook on the Web
      • PowerPoint
      • Publisher
      • Word
    • Microsoft Project
    • Microsoft Teams
    • QuickBooks Online
    • QuickBooks Pro
    • Sage
      • Peachtree
      • Sage 50
    • SQL
    • Windows
  • BOOKS
    • QuickBooks Online
  • REFERENCE CARDS
    • Adobe
      • Acrobat
      • Lightroom Classic
      • Photoshop
      • Photoshop Elements 2026
      • Photoshop Elements 2025
      • Photoshop Elements 2024
      • Photoshop Elements 2023
      • Photoshop Elements 2022
      • Photoshop Elements 2021
      • Photoshop Elements 2020
      • Photoshop Elements 2019
      • Photoshop Elements 2018
      • Photoshop Elements 15
    • Chrome OS
      • Chrome OS Keyboard Shortcuts
    • FreshBooks
    • Google
      • Google Classroom for Teachers
      • Google Docs
      • Google Drive
      • Google Forms
      • Google Sheets
      • Google Slides
    • macOS
      • macOS Keyboard Shortcuts
      • macOS Tahoe
    • Microsoft Office
      • Excel Formulas and Functions
      • Excel Keyboard Shortcuts
      • Excel Tables PivotTables and Charts
      • Microsoft 365
        • Access for Microsoft 365
        • Excel for Microsoft 365
        • Microsoft Office 365
        • Outlook for Microsoft 365 Classic Edition
        • Outlook for Microsoft 365 (New Outlook)
        • PowerPoint for Microsoft 365
        • Publisher for Microsoft 365
        • Word for Microsoft 365
      • Microsoft Office 2021
        • Access 2021
        • Excel 2021
        • Microsoft Office 2021
        • OneNote for Windows 10
        • Outlook 2021
        • PowerPoint 2021
        • Publisher 2021
        • Word 2021
      • Microsoft Office 2019
        • Access 2019
        • Excel 2019
        • Microsoft Office 2019
        • Outlook 2019
        • PowerPoint 2019
        • Publisher 2019
        • Word 2019
      • Microsoft Office 2016
        • Access 2016
        • Excel 2016
        • Microsoft Office 2016
        • OneNote 2016
        • Outlook 2016
        • PowerPoint 2016
        • Publisher 2016
        • Word 2016
      • Microsoft Office 2013
        • Excel 2013
        • Microsoft Office 2013
        • OneNote 2013
        • Outlook 2013
        • PowerPoint 2013
        • Word 2013
      • Microsoft Office for iPad
        • Microsoft Office for iPad
      • Word Keyboard Shortcuts
    • Microsoft Teams
    • QuickBooks Online
    • QuickBooks Pro
      • QuickBooks Pro 2024
      • QuickBooks Pro 2023
      • QuickBooks Pro 2022
      • QuickBooks Pro 2021
      • QuickBooks Pro 2020
      • QuickBooks Pro 2019
      • QuickBooks Pro 2018
      • QuickBooks Pro 2017
      • QuickBooks Pro 2016
      • QuickBooks Pro 2015
      • QuickBooks Pro 2014
    • Sage 50 Accounting
    • SQL
    • Windows
      • Windows 11
      • Windows 11 and 10 Keyboard Shortcuts
      • Windows 10
  • STICKERS
    • Chrome OS
    • macOS
    • Microsoft Office
      • Word and Excel (Mac)
      • Word and Excel (PC/Windows)
    • QuickBooks Desktop
      • QuickBooks Desktop (PC/Windows) 2024
      • QuickBooks Desktop (PC/Windows) 2023
      • QuickBooks Desktop (PC/Windows) 2022-2015
    • QuickBooks Online
    • Windows
  • SUPPORT
    • Company
      • About Us
      • Blog
      • Contact Us
      • Our History
      • Our Philosophy
        • Customer Service
        • Mission
      • Policies
      • Testimonials
    • FAQ
      • Contact Us
    • Help
    • Lost Password
    • Register a Product
  • LOGIN
    • Manage My Account
    • Member Login
    • My Courses
Shop Now

The QuickBooks Online Interface

by Joseph Brownell / Tuesday, September 02 2025 / Published in Latest, Quickbooks Online

The QuickBooks Online Interface: Video Lesson

This video lesson, titled “The QuickBooks Online Interface,” shows you how to use the new QuickBooks Online interface.

Overview of the User Interface for QuickBooks Online

The QuickBooks Online Toolbar:

After you open a company file in QuickBooks Online, the QuickBooks Online interface then appears. The top of the interface shows the QuickBooks Online toolbar, which contains buttons you can access from almost every page in QuickBooks Online. The left end of the toolbar shows the company name. Moving to the right, the search bar then appears in the center of the toolbar. The right end of the QuickBooks Online toolbar shows the “Contact experts” button, the “Tasks” button, the “My integrations” button (which shows connected apps), the “Notifications” button, the “Settings” button, the “Help” button, and the user account button.

A picture showing the QuickBooks Online Interface.

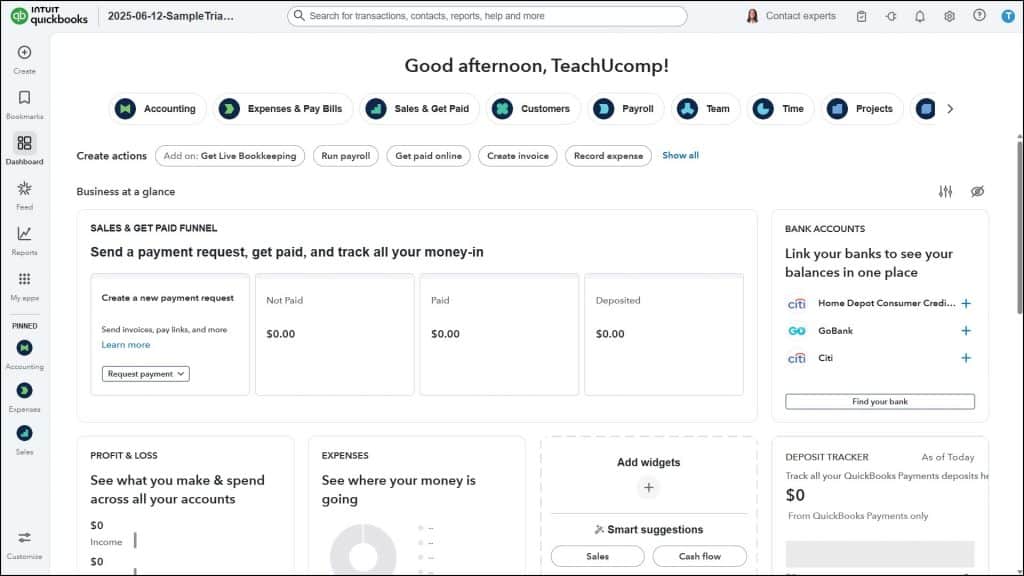
The Navigation Bar and Its Buttons:

The + Create Button and the Bookmarks Button

At the left side of the QuickBooks Online interface is the Navigation Bar. The Navigation Bar also appears at the left side of almost every page in QuickBooks Online. At the top of the Navigation Bar is the “+ Create” button that lets you create new transactions, customers, vendors, contractors, employees, and products and services. This is followed by the “Bookmarks” button, which you use to bookmark frequently accessed pages in QuickBooks Online for easy access.

The Dashboard Button and the Feed Button

The next button in the Navigation Bar is the “Dashboard,” which you can click to then show an overview of your company in the page content area to the right. This is followed by the “Feed” button, which you can click to then show tasks you may want to complete and which provides access to the new AI agents in QuickBooks Online in the page content area to the right.

The Reports Button

The next button in the Navigation Bar is the “Reports” button. To access reports in QuickBooks Online, either click the “Reports” button in the Navigation Bar or hover over the “Reports” button and then click to select a specific report category from the side menu that appears. Either way, a new “Reports & Analytics” bar then appears to the right of the Navigation Bar, showing the different report categories, like “Standard reports,” “Custom reports,” and so on.

A picture showing the Reports & Analytics bar in the QuickBooks Online interface.

The Reports & Analytics Bar

To select a different report category, click a report category in the “Reports & Analytics” bar. The reports in that category then appear in the page content window to the right, where you can run them. To hide or show the “Reports & Analytics” bar, click the “Show/Hide” button in its upper-right corner. When hidden, this button appears to the right of the “+ Create” button.

The My Apps Button

The next button in the Navigation Bar is the “My apps” button. To access the different pages in QuickBooks Online, hover over the “My apps” button in the Navigation Bar to show different categories of “apps” in a side menu. Then either click an app or hover over an app to see its links in another side menu and then click the desired link.

A picture showing the My apps bar in the QuickBooks Online interface.

The My Apps Bar

At that point, a new “My apps” bar appears to the right of the Navigation Bar, and the selected category or link’s page appears in the page content window. To continue to open different pages in QuickBooks Online, click an “app” category in the “My apps” bar to expand it and show its links. Then click the desired link to show its content in the page content area to the right.

After you open the “My apps” bar for the first time in a QuickBooks Online session, it then appears to the right of the Navigation Bar unless you return to the “Dashboard” or “Feed” page or open the “Reports & Analytics” bar. To hide or show the “My apps” bar in the QuickBooks Online interface, click the “Show/Hide” button in its upper-right corner. When hidden, this button appears to the right of the “+ Create” button.

Pinned Apps

The bottom section of the Navigation Bar in QuickBooks Online shows any “Pinned” apps from the “My apps” bar. These are the apps you access the most frequently and want to make easily available. It shows up to 3 apps in this section, although you may need to click a “More” button that may appear here to see them, depending on your screen resolution.

To customize the apps shown in the “Pinned” section, click the “Customize” button to open a new “Customize your app menu” window. To reorder the apps in the list, click and drag them up or down by the 6-dot handles to their lefts and release them into the desired order. If you want to pin or unpin an app, click its “Pin” button to its left. You can only pin up to 3 apps. Finally, click “Save” to save your changes.

The Page Content Area:

Most of the pages you access by clicking buttons in the Navigation Bar of QuickBooks Online appear to the right in the page content area. You simply navigate to a new page to change the currently displayed page’s content.

However, many of the transaction windows you open by clicking a choice after hovering over the “+ Create” button instead appear within their own full screen windows, like the “Invoice” window, for example. In these windows, you no longer see the QuickBooks Online toolbar, the Navigation Bar, or the page content.

However, when you later close one of these full screen transaction windows, you then return to the last page content shown and all the toolbars reappear. Now that you have an overview of the tools in the QuickBooks Online interface, the following lessons in this tutorial will cover using these different tools in the QuickBooks Online interface in more detail.

Tagged under: accounting, bookkeeping, change, changes, course, different, guide, help, how, how to use quickbooks, how-to, instructions, interface, intuit, learn, Learn QuickBooks, lesson, navigate in quickbooks online, online, options, overview, qbo, quickbooks, quickbooks for beginners, QuickBooks Online, quickbooks online tools, quickbooks tips and tricks, QuickBooks training, QuickBooks tutorial, reference, software, teach, training, tutorial, user interface, video

About Joseph Brownell

Joseph Brownell is founder and Vice President of TeachUcomp, Inc. He is the author of dozens of titles across the TeachUcomp, Inc. product line.
Sale! One Year Online Entire Library $29. Click here to see the deals.


QuickBooks Online Book. Buy Now.
 
QuickBooks Online Quick Reference Guide. Buy Now.
 

Categories

  • GET SOCIAL

© 2001-2026 Copyright TeachUcomp, Inc. All rights reserved.

TOP
SALE! $29 All-Access 7 Days 12 Hours 17 Minutes 26 Seconds      $199 $29 Entire Library!
See Deal