 MY CART
How to Change the Display Settings in Windows 11: Video Lesson
This video lesson, titled “Windows 11 Display Settings Tutorial: Resolution, Scaling, and Multiple Monitors,” shows you how to change the Display settings in Windows 11. This video lesson is from our complete Windows tutorial, titled “Mastering Windows Made Easy.”
Overview:
How to Change the Display Settings in Windows 11:
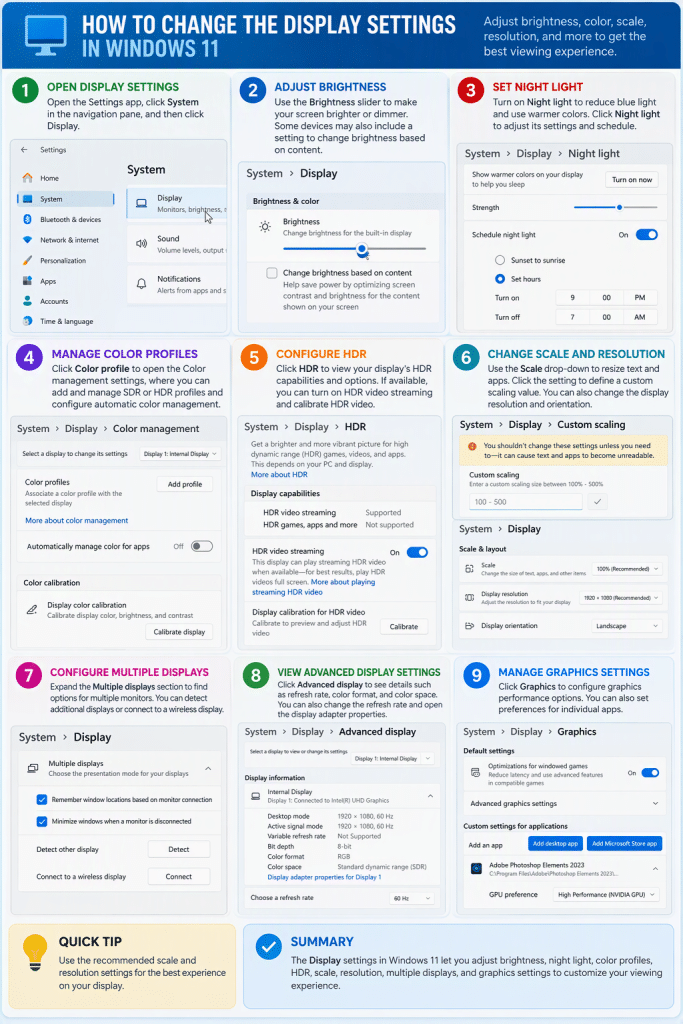
To change the display settings in Windows 11, open the “Settings” app and then click the “System” category in the navigation pane. Then click the “Display” setting to show the display settings for your device.
How to Change the Screen Brightness:
The settings in the “Brightness & color” section let you adjust the appearance of your display. If available, use the “Brightness” slider to increase or decrease the screen brightness. Some devices may also provide a “Change brightness based on content” setting, which automatically adjusts brightness and contrast based on the content displayed on the screen to help reduce power consumption.
How to Set the Night Light Color Settings:
To reduce blue light and display warmer colors, turn on the “Night light” setting. To adjust the night light settings, click the “Night light” setting. In the settings page that appears, click the “Turn on now” button to immediately enable night light, adjust the “Strength” slider to change the amount of warming applied to the display, and turn on the “Schedule night light” setting if you want Windows to automatically enable and disable night light at specified times. To return to the “Display” settings page, click the “Display” breadcrumb at the top of the window or click the “Back” button.
How to Manage Color Profiles:
The “Color profile” setting lets you manage color profiles for your display. Click the “Color profile” setting to open the “Color management” settings page. If you use multiple displays, select the display to manage from the available drop-down list. You can then add and manage SDR or HDR color profiles and configure automatic color management settings.
How to Color Calibrate the Display:
If desired, to calibrate display colors, click the “Calibrate display” button to open the “Display Color Calibration” wizard. Follow the instructions in the wizard and click the “Next” button in each screen to complete the calibration process. When finished, return to the “Display” settings page by using the breadcrumb navigation or the “Back” button.
How to Change HDR Settings:
The “HDR” setting lets you configure High Dynamic Range video and display settings, if supported by your display hardware. Click the “HDR” setting to view the available HDR options. If multiple displays are connected, select the display to configure from the available drop-down list. The page displays information about your display’s HDR capabilities and provides options for HDR video streaming and HDR calibration.
If available, turn on the HDR video streaming setting to improve supported HDR video playback. To adjust HDR video calibration, click the “Display calibration for HDR video” setting, then click the “Calibrate” button, and then follow the instructions that appear. When finished, return to the “Display” settings page.
How to Change the Scale of the Display:
The settings in the “Scale & layout” section let you control how Windows displays text, apps, and other screen content. To change the display scaling, select the desired percentage from the “Scale” drop-down. In most cases, you should use the recommended setting.
To define a custom scaling value, click the “Scale” setting to open the “Custom scaling” page and then enter a percentage between 100 and 500. Because custom scaling can make text and apps difficult to read, Windows displays a warning before applying the change. If you apply custom scaling, you must sign out and then sign back in for the change to take effect.
How to Change the Display Resolution and Orientation:
You can also change the display resolution and orientation within the “Scale & layout” section. To adjust the display resolution, select the desired resolution from the “Display resolution” drop-down. To keep the new resolution, click the “Keep changes” button when prompted. To restore the previous resolution, click the “Revert” button or wait for the confirmation timer to expire. To change the display orientation, select the desired option from the “Display orientation” drop-down and then confirm the change in the same manner.
How to Configure Multiple Displays:
To configure multiple displays in Windows 11, expand the “Multiple displays” section. The available options let Windows remember window locations when displays are reconnected and minimize windows when a display is disconnected. To search for another connected display, click the “Detect” button in the “Detect other display” setting. To connect to a compatible wireless display, click the “Connect” button in the “Connect to a wireless display” setting and then select the display from the connection pane that appears.
How to Change the Display Adapter Properties or Screen Refresh Rate:
The “Advanced display” setting provides additional information and settings for connected displays. Click the “Advanced display” setting in the “Related settings” section to open its page. If multiple displays are connected, select the display to view from the available drop-down list. The “Display information” section shows details such as the current resolution, refresh rate, color format, and color space. To view the display adapter properties, click the “Display adapter properties” link.
To change the refresh rate, select the desired value from the “Choose a refresh rate” drop-down. Some devices may also support dynamic refresh rate settings. When finished, return to the “Display” settings page.
How to Enable Hardware-accelerated GPC Scheduling:
To configure graphics settings, click the “Graphics” setting in the “Related settings” section. The “Graphics” page contains options for managing graphics performance and hardware acceleration. To set advanced graphics settings, if available, click “Advanced graphics settings” to expand it. If supported by your hardware, you can turn on the “Hardware-accelerated GPU scheduling” setting to improve graphics performance. Depending on your hardware, additional graphics optimization settings may also be available.
How to Set Graphics Preferences for Individual Apps:
The “Custom settings for applications” section lets you configure graphics preferences for specific apps. To add an app, click either the “Add desktop app” button or the “Add Microsoft Store app” button and then select the desired app. After adding an app, expand its listing and configure its available graphics preferences. When finished, close the “Settings” window by clicking the “Close” button in its upper-right corner.