 MY CART
How to Change the Notifications Settings in Windows 11: Video Lesson
This video lesson, titled “How to Change the Notifications Settings in Windows 11: A Windows 11 Training Tutorial,” shows you how to change the Notifications settings in Windows 11. This video lesson is from our complete Windows tutorial, titled “Mastering Windows Made Easy.”
Overview:
How to Open the Notifications Settings in Windows 11:
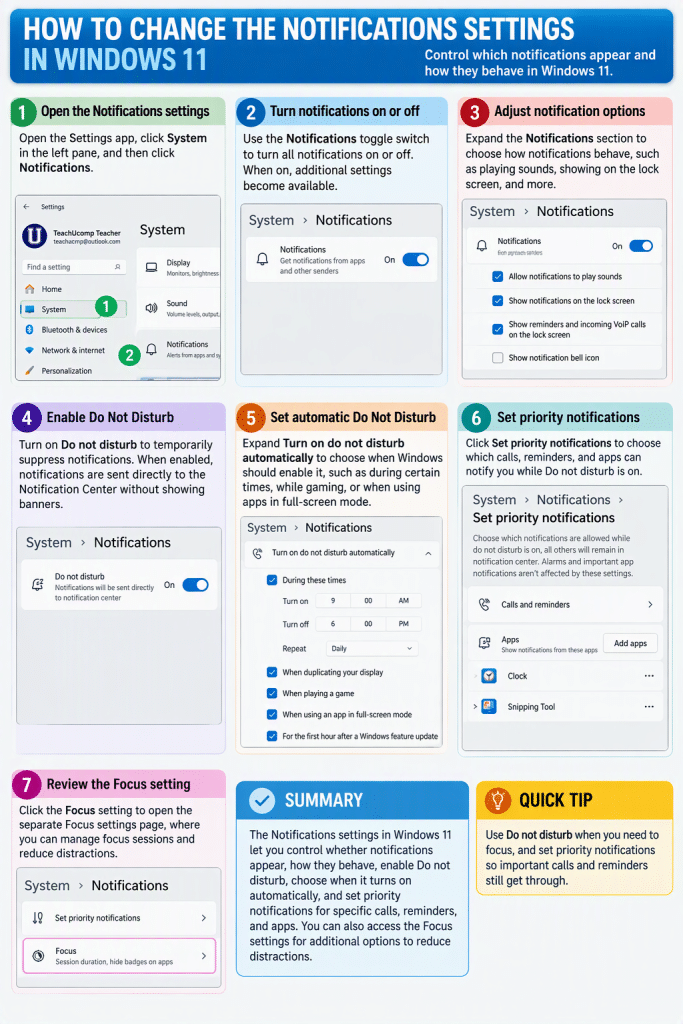
To change the notifications settings in Windows 11, open the “Settings” app and then click the “System” category in the navigation pane. Then click the “Notifications” setting to view the notification settings for your device.
How to Turn Notifications On or Off:
The “Notifications” setting controls whether Windows displays notifications from apps and other senders. To turn off all notifications, turn off the “Notifications” setting. To allow notifications to appear, ensure this setting is turned on. When notifications are enabled, additional notification settings become available.
How to Change Notification Options:
The expanded “Notifications” section contains options that control how notifications behave. You can choose whether notifications play sounds, appear on the lock screen, display reminders and incoming VoIP calls on the lock screen, and show a notification bell icon in the notification area. To enable or disable any of these features, check or uncheck the associated setting.
How to Enable Do Not Disturb in Windows 11 to Suppress Notifications:
The “Do not disturb” setting lets you temporarily suppress notification alerts. When “Do not disturb” is enabled, notifications are sent directly to the Notification Center without displaying notification banners on the screen. Turn the setting on when you want to reduce interruptions while working.
How to Choose When to Automatically Enter Do Not Disturb:
The “Turn on do not disturb automatically” section contains options that let Windows automatically enable “Do not disturb” in selected situations. For example, you can schedule times when “Do not disturb” is active, enable it while duplicating your display, while playing a game, while using apps in full-screen mode, or during the first hour after a Windows feature update. To enable or disable any of these automatic behaviors, select or clear the associated checkboxes.
How to Allow Priority Notifications to Appear When in Do Not Disturb:
To specify which notifications are allowed to appear while “Do not disturb” is enabled, click the “Set priority notifications” setting. The “Set priority notifications” page contains separate sections for “Calls and reminders” and “Apps.” You can choose whether incoming calls and reminders are permitted during “Do not disturb” sessions and add apps that are allowed to display priority notifications. To add an app, click the “Add apps” button and then select the desired app. To remove an app from the priority list, click its “More options” button and choose the available removal option.
Optionally, How to Access the Related Focus Settings:
The “Focus” setting appears at the bottom of the “Notifications” settings page. While it appears alongside the notification settings, “Focus” is actually its own separate settings category within the “System” settings and is discussed in the next lesson. Clicking the “Focus” setting opens the separate “Focus” settings page, which contains settings for managing focus sessions and reducing distractions. To return to the “Notifications” settings after viewing the “Focus” settings, click the “Back” button in the upper-left corner of the window. To close the “Settings” window when finished, click the “Close” button in its upper-right corner.