Advanced Settings in QuickBooks Online
How to Customize the Advanced Settings in QuickBooks Online: Video
This video lesson, titled “How to Customize the Advanced Settings in QuickBooks Online,” shows you how to customize the Advanced settings for a company file in QuickBooks Online. This video lesson is from our complete QuickBooks Online tutorial, titled “Mastering QuickBooks Online Made Easy.”
Overview:
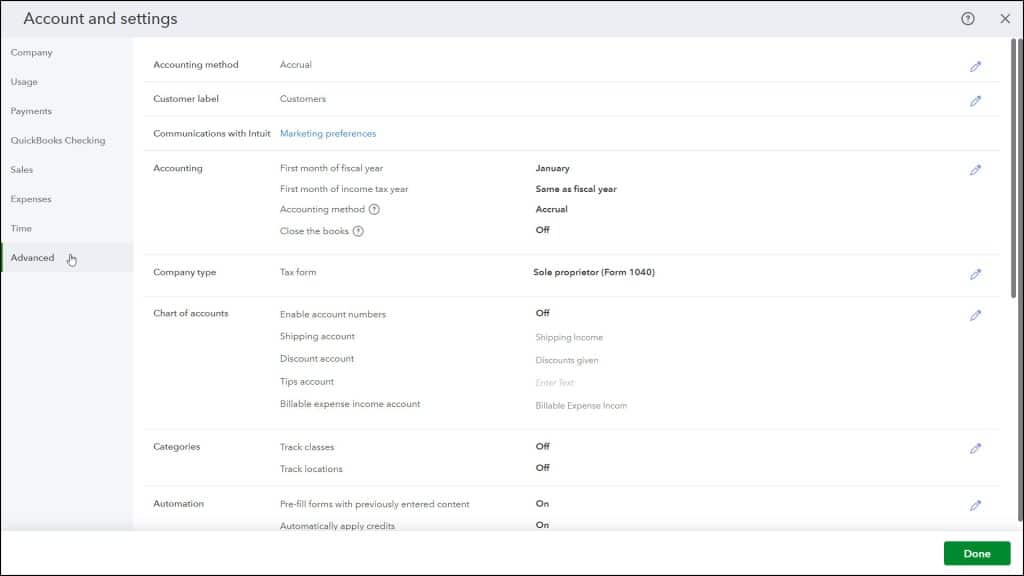
To customize your company’s advanced settings in QuickBooks Online, click the “Settings” button in the QuickBooks Online toolbar. Then click the “Account and settings” link under the “Your Company” heading in the menu to open the “Account and Settings” window. Then click the “Advanced” company settings category link in the menu at the left side of the window to show the individual settings in that category to the right.
The “Advanced” settings category contains the “Accounting method,” “Customer label,” “Communications with Intuit,” “Accounting,” “Company type,” “Chart of accounts,” “Categories,” “Automation,” “Projects,” “Currency,” “Business Network,” and “Other preferences” sections. To edit the individual settings in a section, click into the section to activate its settings.
The Accounting Method Setting:
To select your company’s accounting method, click into the “Accounting method” section to activate its setting. Then select either “Cash” or “Accrual” from the drop-down, as needed. To save the change, click the “Save” button in this section. To cancel the change, click the “Cancel” button, instead.
The Customer Label Setting:
If needed, to change the term “customers” to some other term in your company file, click into the “Customer label” section to activate its setting. Then select the term used for customers by your company from the drop-down. To save the change, click the “Save” button in this section. To cancel the change, click the “Cancel” button, instead.
Communications with Intuit Settings:
To set your Intuit product marketing preferences, click the “Marketing preferences” link in the “Communications with Intuit” section to open a new web page. In this web page, navigate to the desired section to set your preferred Intuit product marketing preferences. You can then close the page, when finished.
Accounting Settings:
To customize your accounting settings, click the “Accounting” section. To select the first month of your company’s fiscal year, use the “First month of fiscal year” drop-down. To select the first month of your company’s income tax year, use the “First month of income tax year” drop-down. To select your company’s accounting method, choose either “Cash” or “Accrual” from the “Accounting method” drop-down, as appropriate. If you are not sure which method you use, check with your accountant or bookkeeper. Also note that this is the same setting that appears in the “Accounting method” section.
To prevent changes to transactions before a specified closing date, click the “Close the books” toggle switch to set it to the “On” position. Then enter the closing date into the “Closing date” field that appears. Then use the drop-down below that to either allow changes to transactions before the closing date after being warned or allow them only after being warned and entering a password.
If you choose to use a password to prevent changes to closed transactions, enter it into the “Password” and “Confirm Password” fields that appear. Be sure to save the password in a secure location, too, if needed later. To save your changes, click the “Save” button in this section. To cancel the changes, click the “Cancel” button, instead.
The Company Type Setting:
To select the tax form your company uses for filing taxes, click the “Company type” section to activate its setting and then select your company type and tax form from the “Tax form” drop-down. If you are unsure which tax form you file, ask your accountant. To save your change, click the “Save” button in this section. To cancel the change, click the “Cancel” button, instead.
Chart of Accounts Settings:
To enable account numbering and set some default accounts in the chart of accounts, click the “Chart of accounts” section to activate its settings. To enable account numbering, click the “Enable account numbers” toggle switch to set it to the “On” position. If enabled, to then show the account numbers on reports and within your view of transactions, check the “Show account numbers” checkbox.
If shipping is enabled in sales forms, to choose the default account to use for customer shipping, select it from the “Shipping account” drop-down. If discounts are enabled in sales forms, to choose the account to use for customer discounts, select it from the “Discount account” drop-down. If you selected the “In a single account” option in the “Bills and expenses” section of the “Expenses” company settings category, then you can use the “Billable expense income account” drop-down to select the account to use for the related “Track billable expenses and items as income” setting.
If tips are enabled in sales forms, to choose the account to use for recording tips, select it from the “Tips account” drop-down. Your choice is tied to your responses made when you enabled the “Accept tips” setting in the “Sales form content” section of the “Sales” company settings category.
Note that in all the account drop-downs, you can select an existing account from the Chart of accounts or click the “+ Add new” choice at the top of the drop-down menu to create a new account, if needed. If you chose to markup billable expenses in the “Expenses” settings category, select the account to track the markup income from the “Markup income account” drop-down. To save your changes, click the “Save” button in this section. To cancel the changes, click the “Cancel” button, instead.
Categories Settings:
To configure class and location tracking in QuickBooks Online, click the “Categories” section to enable its settings. To enable class tracking, which adds a “Class” field to forms you can use to classify transactions, click the “Track classes” toggle switch to set it to the “On” position. If enabled, to show a warning if a transaction is not classified when saved, check the “Warn me when a transaction isn’t assigned a class” checkbox. Also, if enabled, to choose whether to assign classes to entire transactions or each row within a transaction, select your desired choice from the “Assign classes” drop-down that appears.
To enable location tracking, which adds a “Location” field to forms you can use to assign locations to transactions, click the “Track locations” toggle switch to set it to the “On” position. If enabled, then use the “Location label” drop-down that appears to choose a label for the “Location” field. To save your changes, click the “Save” button in this section. To cancel the changes, click the “Cancel” button, instead.
Automation Settings:
To speed up data entry in QuickBooks Online by changing settings for automatically filling out and processing transactions, click the “Automation” section to enable its settings. To automatically fill other form fields, based on the last saved transaction for a selected customer, employee, or vendor, ensure the “Pre-fill forms with previously entered content” toggle switch is set to the “On” position. To automatically apply any existing credits to the next invoice you create for a selected customer, ensure the “Automatically apply credits” toggle switch is set to the “On” position.
To automatically create invoices for customers with unbilled activity, click the “Automatically invoice unbilled activity” toggle switch to set it to the “On” position. If enabled, then use the drop-down that appears to select the automatic invoice creation option you prefer or if you only want to automatically be reminded to manually create the invoices. Next, use the drop-down fields for the “Schedule” setting to choose when to create the invoices or be reminded to create the invoices.
To automatically apply bill payments entered in the register to the oldest existing bill, ensure the “Automatically apply bill payments” toggle switch is set to the “On” position. To save your changes, click the “Save” button in this section. To cancel the changes, click the “Cancel” button, instead.
The Projects Setting:
To enable projects for your company file in QuickBooks Online, click the “Projects” section to enable its setting and then ensure the “Organize all job-related activity in one place” toggle switch is set to the “On” position. To save your change, if needed, click the “Save” button in this section. To cancel the change, click the “Cancel” button, instead.
Currency Settings:
To set the default currency settings in QuickBooks Online, click the “Currency” section to activate its settings. To select the default currency used by your QuickBooks company file, select it from the “Home Currency” drop-down. To enable transaction tracking for foreign currencies, click the “Multicurrency” toggle switch to set it to the “On” position. Only enable this if you have bank accounts, customers, or vendors who do not use your “Home Currency.” Once “Multicurrency” is enabled in QuickBooks, it CANNOT be disabled or hidden. Also, you will NOT be able to change your home currency.
If you start to enable this setting, a “Need help deciding about multicurrency” link appears, as well as a “Once you turn on Multicurrency” list. To finish enabling multicurrency, you must then check the “I understand I can’t undo Multicurrency” checkbox and then click the “Save” button. QuickBooks then updates the exchange rates every 4 hours and adds new fields and columns to your QuickBooks Online Plus account. To save your changes if you did not enable multicurrency, but only changed your “Home Currency,” click the “Save” button. To cancel any changes, click the “Cancel” button.
The Business Network Setting:
To opt out from search visibility within the QuickBooks Business Network, click the “Business Network” section to activate its settings and then click the “Allow members to find me” toggle switch to set it to the “Off” position. To save your change, then click the “Save” button in this section. Alternatively, to cancel the change, click the “Cancel” button.
Other Preferences Settings:
To set miscellaneous settings in QuickBooks Online, click the “Other preferences” section to activate its settings. To select the date format used by your company file, select it from the “Date format” drop-down. To set the currency format used by your company file, select it from the “Currency format” drop-down. To choose what to call your customers within forms, select a choice from the “Customer label” drop-down.
To make QuickBooks warn you if you enter a duplicate check number, ensure the “Warn if duplicate check number is used” toggle switch is set to the “On” position. To make QuickBooks warn you if you enter a duplicate bill number, click the “Warn me when I enter a bill number that’s already been used for that vendor” toggle switch to set it to the “On” position. To make QuickBooks warn you about duplicate journal entry numbers, click the “Warn me if duplicate journal number is used” toggle switch to turn it “On.”
To set the amount of inactive time allowed to elapse before QuickBooks automatically signs you out, select it from the “Sign me out if inactive for” drop-down. To save your changes, click the “Save” button in this section. To cancel the changes, click the “Cancel” button. To close the “Account and Settings” window, click the “Done” button in the lower-right corner or click the “X” button in the upper-right corner.


