Create Relationships in Access – Instructions
How to Create Relationships in Access: Video
This video lesson, titled “The Relationships Window,” shows how to create relationships in Access. This video lesson is from our complete Access tutorial, titled “Mastering Access Made Easy v.2019 and 365.”
Overview of Creating Relationships in Access
Opening the Relationships Windows in Access
You create relationships in Access between database tables in the Relationships window. As you create tables in Access, you want to relate the tables to access information from them through the “shared” or “common” fields by which they are joined. Relationships in Access are also called table joins.
To open the Relationships window in Access, click the “Database Tools” tab in the Ribbon. Then click the “Relationships” button in the “Relationships” button group to open the Relationships window.
Adding Tables to the Relationships Window in Access
You add the tables from your database to the Relationships window in Access to relate to each other. Remember that to join two tables together, they must have shared fields. To help you add tables to the Relationships window, the “Add Tables” pane appears at the right side of the window, with its “Tables” tab selected, by default. Here, select the names of the table or tables to add. To select multiple tables at once, hold down the “Ctrl” key on your keyboard while you click the table names to select them.
After selecting the table or tables, then click the “Add Selected Tables” button at the bottom of the “Add Tables” pane to add the selected tables to the Relationships window. To close the “Add Tables” pane, when finished, click the “X” button in its upper-right corner. To reopen the “Add Tables” pane, click the “Add Tables” button in the “Relationships” button group on the “Design” tab of the “Relationship Tools” contextual tab in the Ribbon. After adding the necessary tables to the Relationships window, you can then create joins between the common fields in the tables, as needed.
Creating Relationships in the Relationships Window in Access
To create a relationship between two common table fields in the Relationships window in Access, click and drag the shared field from one table and drop it on top of the common field in the related table to establish a join between them based on the values in the common field. You can click and drag from either one of the fields onto the other.
Make sure, however, that you pay attention to which two fields you are joining. It is possible to join any two fields that have the same data type, so make sure you don’t accidentally join two fields you don’t mean to join. If you do this, you can delete the join between the table fields in this window, too.
After you drag and drop a field from one table onto another, the “Edit Relationship” dialog box opens and shows the relationship you are creating between the two table fields. Double-check you have selected the correct fields in both tables, labeled as “Table/Query” and “Related Table/Query,” and use the drop-downs to select the correct fields to relate if you made a mistake when dragging and dropping them, if needed.
To enforce referential integrity between the fields, which is recommended for most “permanent” joins between tables in Access databases, check the “Enforce Referential Integrity” checkbox. If checked, you can also optionally check the “Cascade Update Related Fields” and/or “Cascade Delete Related Records” checkboxes, as needed.
To then create the relationship, click the “Create” button in the “Edit Relationships” dialog box. If referential integrity is enforced, then when you create a join, Access will then assign it one of the relationship types, based on the primary key assignments of the fields you are relating.
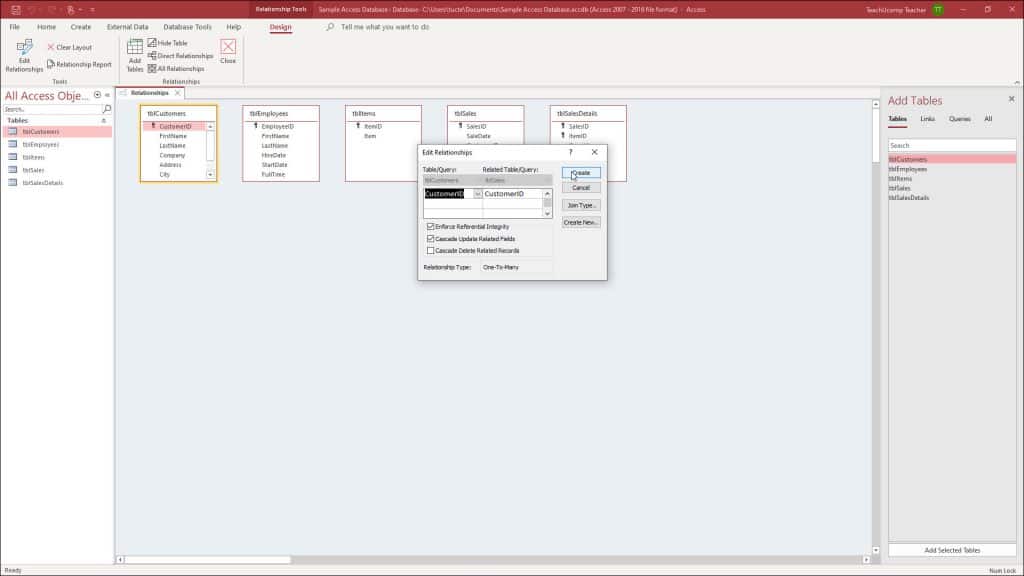
A picture of a user creating a relationship, or table join, between two database tables in the Relationships window in Access.
The join will be either a “one-to-many” relationship, in which one record from the “parent” table has multiple related records in the “child” table; a “one-to-one” relationship, in which every record in the “parent” table has a single related entry in the “child” table; or the “Indeterminate” join, which usually means you made an error when joining the fields, as this type of join is very rarely used. Access will determine the relationship type automatically when you create the join.
In the Relationships window, primary key fields appear with a “key” icon next to their names in the table diagrams. Joined fields also share a little black join line or black join arrow, depending on the join type and whether referential integrity is enforced, between the common fields in the two tables. This indicates the join type.
Saving Changes to Relationships in Access
To save your changes in the Relationships window in Access, click the “Save” button in the Quick Access toolbar, when finished. To close the Relationships window, click the “Close” button in the “Relationships” button group on the “Design” tab of the “Relationship Tools” contextual tab in the Ribbon.
Instructions on How to Create Relationships in Access
How to Open the Relationships Window in Access
- To open the Relationships window in Access, click the “Database Tools” tab in the Ribbon.
- Then click the “Relationships” button in the “Relationships” button group to open the Relationships window.
How to Add Tables to the Relationships Window in Access
- To add tables to the Relationships window in Access, select the names of the table or tables to add from the “Tables” tab in the “Add Tables” pane, which appears at the right side of the window, by default.
- To select multiple tables at once, hold down the “Ctrl” key on your keyboard while you click the table names to select them.
- After selecting the table or tables, then click the “Add Selected Tables” button at the bottom of the “Add Tables” pane.
- To close the “Add Tables” pane, when finished, click the “X” button in its upper-right corner.
- To reopen the “Add Tables” pane, click the “Add Tables” button in the “Relationships” button group on the “Design” tab of the “Relationship Tools” contextual tab in the Ribbon.
- After adding the necessary tables to the Relationships window, you can then create joins between the common fields in the tables, as needed.
How to Create Relationships in the Relationships Window in Access
- To create a relationship between two common table fields in the Relationships window in Access, click and drag the shared field from one table and drop it on top of the common field in the related table.
- After you drag and drop a field from one table onto another, the “Edit Relationship” dialog box opens and shows the relationship you are creating between the two table fields.
- Double-check you have selected the correct fields in both tables, labeled as “Table/Query” and “Related Table/Query,” and use the drop-downs to select the correct fields to relate if you made a mistake when dragging and dropping them, if needed.
- To enforce referential integrity between the fields, which is recommended for most “permanent” joins between tables in Access databases, check the “Enforce Referential Integrity” checkbox.
- If checked, you can also optionally check the “Cascade Update Related Fields” and/or “Cascade Delete Related Records” checkboxes, as needed.
- To then create the relationship, click the “Create” button in the “Edit Relationships” dialog box.
How to Save Changes in the Relationships Window in Access
- To save your changes in the Relationships window in Access, click the “Save” button in the Quick Access toolbar, when finished.
- To close the Relationships window, click the “Close” button in the “Relationships” button group on the “Design” tab of the “Relationship Tools” contextual tab in the Ribbon.