Expenses Settings in QuickBooks Online
How to Customize the Expenses Settings in QuickBooks Online: Video
This video lesson, titled “How to Customize the Expenses Settings in QuickBooks Online,” shows you how to customize the Expenses settings for a company file in QuickBooks Online. This video lesson is from our complete QuickBooks Online tutorial, titled “Mastering QuickBooks Online Made Easy.”
Overview:
To customize your company’s expenses settings in QuickBooks Online, click the “Settings” button in the QuickBooks Online toolbar. Then click the “Account and settings” link under the “Your Company” heading in the menu to open the “Account and Settings” window. Then click the “Expenses” company settings category link in the menu at the left side of the window to show the individual settings in that category to the right.
Expenses Settings:
The “Expenses” settings category contains the “Expenses” and “Bill Pay” sections. The “Expenses” section contains the “Bills and expenses,” “Purchase orders,” and “Messages” settings groups. To edit the individual settings in the “Expenses” section, click anywhere in it to activate its settings.
Bills and Expenses Settings:
In the “Bills and expenses” settings group, to add an Items table to purchase orders and expense forms from which you can select your existing products and services, ensure the “Show Items table on expense and purchase forms” toggle switch is set to the “On” position. If you see a “Show Tags…” setting, you can ignore it, as tags are now deprecated in QuickBooks Online.
To add a customer column to expense forms and purchase orders to track expenses by customer, ensure the “Track expenses and items by customer” toggle switch is set to the “On” position. To add a “Billable” column to purchase orders and expense forms to note billable expenses you can later add to sales forms, click the “Make expenses and items billable” toggle switch to set it to the “On” position.
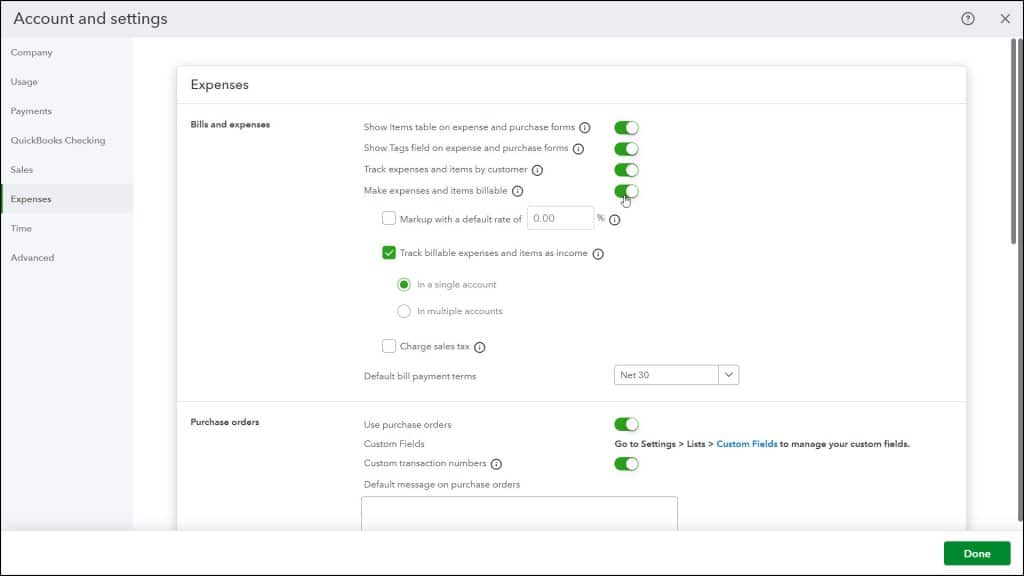
If enabled, you can then set several related settings for billable expenses that then appear. To markup billable expenses with a default rate, if desired, check the “Markup with a default rate of” checkbox. Then enter the markup percentage into the adjacent field.
To track billable expenses as income, make sure the “Track billable expenses and items as income” checkbox is checked. To choose whether to track billable expense income in one account or multiple accounts, select either the “In a single account” option or the “In multiple accounts” option.
If you select “In a single account,” you can set that account within the related setting in the “Advanced” settings. Alternatively, selecting “In multiple accounts” adds a “Use for billable expenses” checkbox to the account edit screen in the chart of accounts. To charge sales tax on billable expenses, which enables the “Tax” checkbox by default for billable expenses and items and which requires sales tax to first be enabled, check the “Charge sales tax” checkbox.
To set the default due date for bills you receive, select a choice from the “Default bill payment terms” drop-down or select the “Add new” choice in the drop-down menu to open a “Terms” window that lets you name new terms, select a due date option, enter the number of days or specific day, and then click the “Save” button to create and save the new due date terms.
Purchase Orders Settings:
The “Purchase orders” settings group contains your default purchase order settings. To enable purchase orders and show more purchase order settings, click the “Use purchase orders” toggle switch to set it to the “On” position. To quickly open the “Custom Fields” list to add them to purchase forms, click the “Custom Fields” link. We’ll discuss using custom fields in QuickBooks Online in a separate lesson. However, if you add custom fields this way, you’ll need to return to the “Purchase orders” section of the “Expenses” category in the “Account and Settings” window again to continue reviewing these settings.
To enable custom PO numbers, click the “Custom transaction numbers” toggle switch to set it to the “On” position. If set to the “Off” position, QuickBooks Online uses sequential PO numbers, instead. To add a default message to purchase orders, type it into the “Default message on purchase orders” field.
Messages Settings:
The “Messages” settings group lets you create a default email message to send with purchase orders. To add a greeting, check the “Use greeting” checkbox. To format the greeting, if enabled, then use the two adjacent drop-downs to select its content. To add a standard message to the “Email subject line” and “Email message” field, click the “Use standard message” button. To customize the email’s subject or message, type new content or edit the content within the “Email subject line” and “Email message” fields.
To send copies of purchase order emails to your email, check the “Email me a copy at…” checkbox. To send “Cc” or “Bcc” copies of new purchase orders you create to email addresses you specify, type the email addresses into the “Cc email address (separated by commas)” or “Bcc email address (separated by commas)” fields, as needed. To save your changes in the “Expenses” section, click the “Save” button in this section. To cancel the changes, click the “Cancel” button, instead.
Bill Pay Settings:
To enable the bill pay settings in QuickBooks Online and select a bill pay plan for your company, click the “See plans” button in the “Bill Pay” section. Then select the desired plan in the window that opens and continue to verify your company information and set up your bill pay settings. To close the “Account and Settings” window, when finished, click the “Done” button in the lower-right corner or click the “X” button in the upper-right corner.


