Select Files in Windows 10 – Instructions and Video Lesson
Select Files in Windows: Video Lesson
This video lesson, titled “Selecting Files,” shows you how to select files in Windows 10. This video lesson is from our complete Windows tutorial, titled “Mastering Windows Made Easy v.10.”
Select Files in Windows: Overview
To perform many file management activities in the File Explorer in Windows, you must first learn how to select files in Windows. You can easily open File Explorer in Windows from the Desktop by clicking the “File Explorer” button in the Taskbar at the bottom of the desktop.
There are many ways to select files in Windows. You can select a single file in File Explorer by clicking it once to highlight it. The highlight shows you have selected the file. Selected files have the focus of the Windows application. Any commands you then perform apply only to the selected file. To deselect the current selection, click into the blank or empty area within the right pane in File Explorer.
You can also select multiple files in Windows simultaneously. How you do this depends on how the files are arranged within the right pane of the File Explorer window. If the files are non-adjacent, meaning not next to each other, then select the first file within the window. Then press and hold down the “Ctrl” key on your keyboard while clicking any other files to select. Doing this selects them and also keeps the selection of the initially selected file. You can then release the “Ctrl” key after selecting all of the necessary files.
If the files are adjacent, meaning they are next to each other, then you can click the first file to select it. Then press and hold down the “Shift” key on your keyboard. Then click the last file to select. All of the files including and between the first and last files you clicked are also selected. You can then release the “Shift” key when finished.
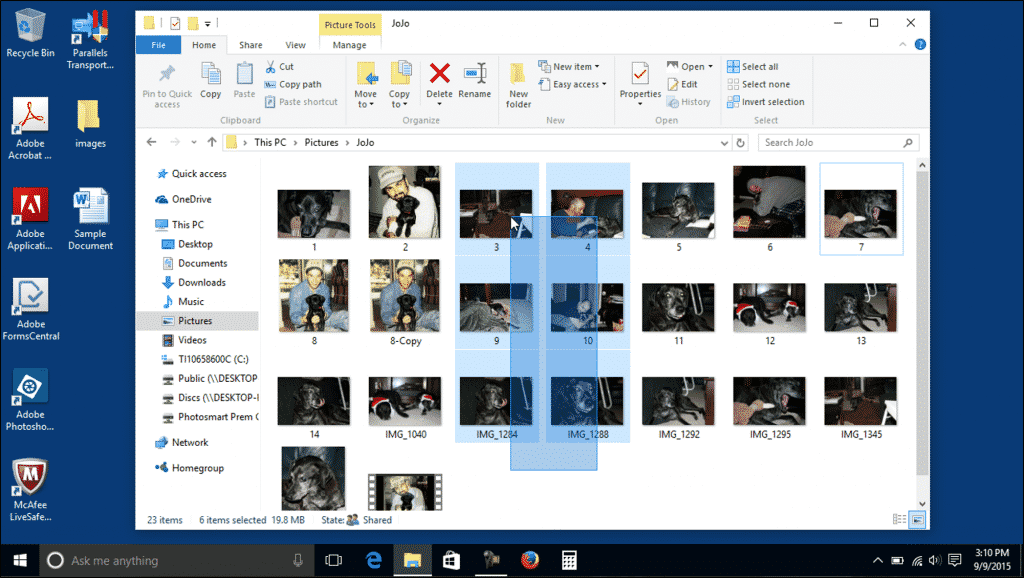
Select Files in Windows 10 – Instructions and Video Lesson: A picture of a user selecting files in Windows using a selection marquee.
Another way to select adjacent files in Windows is to use a selection marquee. To do this, click and drag starting in the blank area adjacent to the file or files to select. As you click and drag with the mouse pointer, a light blue selection marquee appears. Continue to click and drag the selection marquee over the files to select. Any file touched by the selection marquee becomes selected in the window. Release the mouse pointer after selecting the files you want.
You can also use the selection tools within the “Home” tab of the Ribbon in File Explorer to make file and folder selections in Windows. You can click the “Select all” button in the “Select” button group on the “Home” tab in the Ribbon to select all items shown in the right pane of the File Explorer window. The keyboard shortcut to perform this same action is pressing “Ctrl” + “A” on your keyboard.
You can click the “Select none” button in the “Select” button group on the “Home” tab in the Ribbon to cancel any selections made within File Explorer. This corresponds to clicking into the empty or blank area within a window.
Finally, you can click the “Invert selection” button in the “Select” button group on the “Home” tab in the Ribbon to invert your current selection. This selects all non-selected files and de-selects all selected files within a window.
Select Files in Windows: Instructions
- To select a single file in File Explorer within Windows, click it once.
- The file then appears highlighted. The highlight shows you have selected the file. When a file is selected, it has the focus of the Windows application and any commands you then perform apply only to the selected file.
- To deselect the current selection, click into the blank or empty area in the right pane of the File Explorer.
- To select non-adjacent files, click to select the first file in the window.
- Then press and hold down the “Ctrl” key on your keyboard while you then click any other files to select.
- Then release the “Ctrl” key after selecting all the necessary files.
- To select adjacent files, click the first file to select in the window.
- Then press and hold down the “Shift” key on your keyboard.
- Then click the last file to select. All of the files including and between the first and last files you clicked are then selected.
- Release the “Shift” key when finished.
- To select adjacent files using a selection marquee, click and drag starting in the blank area next to the file or files to select. As you click and drag with the mouse pointer, a light blue selection marquee appears.
- Continue to click and drag the selection marquee over the files to select. Any file touched by the selection marquee is then selected in the window.
- Release the mouse pointer after files you want are selected.
- You can also use the selection tools in the “Home” tab of the Ribbon in File Explorer in Windows 10 to make file and folder selections.
- To select all items in the right pane of the File Explorer window, click the “Select all” button in the “Select” button group on the “Home” tab in the Ribbon.
- Alternatively, press the keyboard shortcut of “Ctrl” + “A” on your keyboard.
- To cancel the current selection in File Explorer, click the “Select none” button in the “Select” button group on the “Home” tab in the Ribbon. This corresponds to clicking into the empty or blank area within a window.
- To invert your current selection, click the “Invert selection” button in the “Select” button group on the “Home” tab in the Ribbon. This selects all non-selected files and de-selects all selected files.