 MY CART
How to Manage Devices in Windows 11: Video Lesson
This video lesson, titled “How to Manage Devices in Windows 11: A Windows 11 Training Tutorial,” shows you how to manage your connected devices in Windows 11. This video lesson is from our complete Windows tutorial, titled “Mastering Windows Made Easy.”
Overview:
How to Manage Connected Devices in Windows 11:
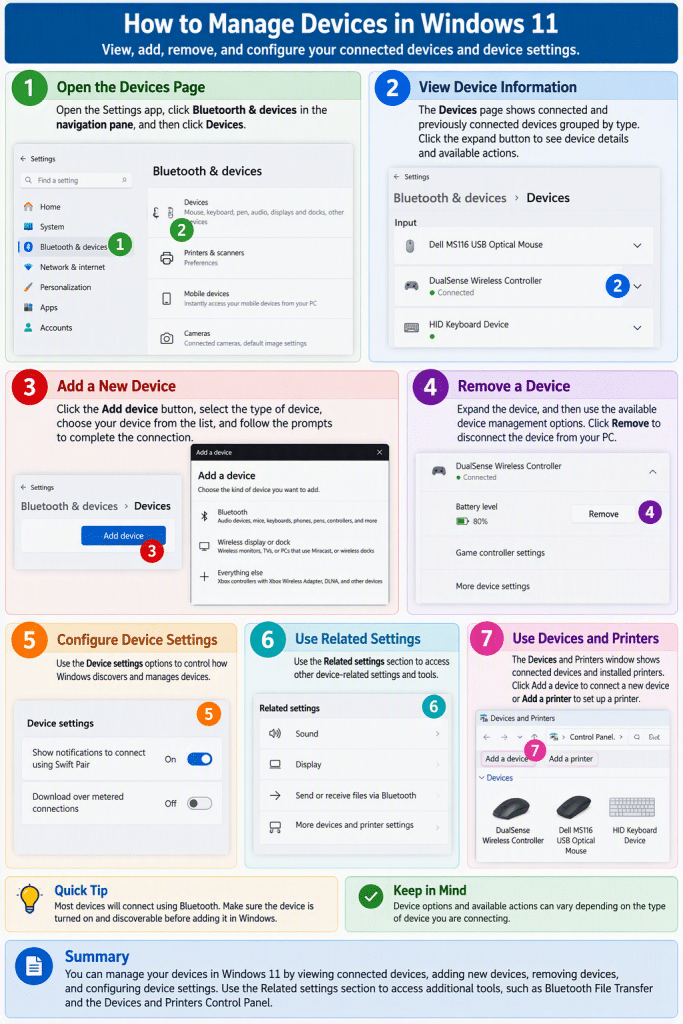
To manage devices in Windows 11, open the “Settings” app and then click the “Bluetooth & devices” category in the navigation pane. Then click the “Devices” setting to view the devices connected to your computer.
How to Show Device Information and Device Management Actions:
The “Devices” page displays connected and previously connected devices grouped into categories such as “Input,” “Audio,” and “Other devices.” Information about each device appears within its category. Depending on the device type, you may be able to view additional information or perform device-specific actions by clicking the expand button that appears at the right end of the device listing.
How to Add a New Device:
To add a new device from this page, click the “Add device” button. Windows then opens the “Add a device” window, which lets you search for and connect supported devices.
How to Remove Connected Devices:
To remove a connected device, expand the device information, if available, and then use the available device management options. Depending on the device type, Windows may display additional commands for managing or removing the device.
How to Change Windows 11’s Device Settings:
The “Device settings” section contains options that affect how Windows discovers and manages devices. To receive notifications when supported Bluetooth devices are nearby and available for pairing, turn on the “Show notifications to connect using Swift Pair” setting. To allow Windows to download device software when using a metered internet connection, turn on the “Download over metered connections” setting. If this setting is enabled, data charges may apply depending on your internet service plan.
How to Access the Related Settings for the Device Settings:
The “Related settings” section contains links to additional device-related settings and tools. Clicking the “Sound” or “Display” settings opens the corresponding settings pages within the “Settings” app. To return to the “Devices” page afterward, click the “Back” button in the upper-left corner of the “Settings” window.
How to Send or Receive Files Using Bluetooth:
To send or receive files using Bluetooth, click the “Send or receive files via Bluetooth” setting. Windows then opens the “Bluetooth File Transfer” wizard. Follow the instructions in the wizard to send files to or receive files from another Bluetooth-enabled device.
How to Access the Legacy Devices and Printers Control Panel Window:
To access the legacy “Devices and Printers” Control Panel window, click the “More devices and printer settings” link. The “Devices and Printers” window displays connected devices and installed printers and provides links for adding additional devices or printers.
How to Add a Device Using the Legacy Devices and Printers Control Panel Window:
To add a device from the “Devices and Printers” window, click the “Add a device” link in the toolbar. Windows then opens the “Add a device” wizard and searches for available devices. If the device appears in the list, select it and follow the prompts to complete the connection.
The “Devices and Printers” window also contains an “Add a printer” link that opens tools for connecting printers. Additional printer-management features are available in the “Printers & scanners” settings, which are discussed in the next lesson.