Burn a CD or DVD in Windows 11 – Instructions
How to Burn a CD or DVD in Windows 11: Video
This video lesson, titled “Burning a CD or DVD,” shows how to burn a CD or DVD in Windows 11. To learn more about Windows 11, check out our complete Windows 11 tutorial, titled “Mastering Windows Made Easy v.11.”
Overview of How to Burn a CD or DVD in Windows 11:
You can easily burn a DC or DVD in Windows 11. Many computers have a CD or DVD drive that can create recordable CDs or DVDs. This drive lets you save content from your computer onto removable media for transfer. To burn a CD or DVD in Windows 11, you must first insert a blank, recordable CD or DVD into the corresponding drive in your computer.
After doing that, if AutoPlay is enabled on your computer, a small notification box appears in the lower-right corner of the screen. It tells you to select the notification box to determine what Windows 11 should do when a blank CD or DVD is inserted. Once you tap or click the notification box, another message box appears. This one shows the actions your computer can take, using the software programs that are available.
Alternatively, if AutoPlay is not enabled, then open a “File Explorer” window. Then click the “This PC” icon in the Navigation Pane. Then right-click your CD/DVD drive in the right pane to display a pop-up menu. Select the “Show more options” command in the pop-up menu to replace the smaller pop-up contextual menu with a larger pop-up contextual menu that shows more choices.
In this larger menu, click the “Open AutoPlay…” command to open the same message box in the upper-right corner of the screen which shows the actions your computer can take using the software programs available. Depending on the software and apps available on your computer, you may have several choices appear. This lesson shows what happens if you select the “Burn files to disc (using File Explorer)” command.
After selecting the “Burn files to disc (using File Explorer)” command, the “Burn a disc” window then appears. Type a name for the disc into the “Disc title:” field. Next, select the type of recordable CD or DVD to create by selecting the desired option button. You can select the “Like a USB flash drive” option button to format the disc to behave like a removable drive to which you can add and erase files, like a USB drive. However, this disc may not work on computers using versions of Windows prior to Windows XP.
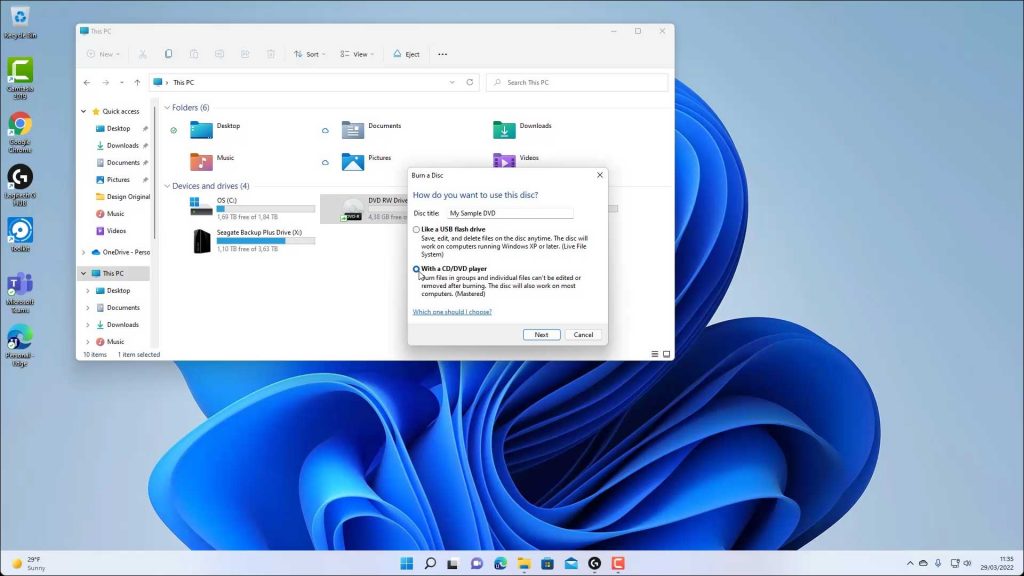
A picture of the “Burn a disc” window that appears when you burn a CD or DVD in Windows 11.
Alternatively, you can select the “With a CD/DVD player” option button to create a standard, recordable disc that will play on most computers and CD players. After making your selection, click the “Next” button to continue.
If you selected the “Like a USB flash drive” choice, then Windows formats the disc. You can then display the CD or DVD within a File Explorer window after Windows finishes formatting it. You can then use the disc as if it were any other folder on your system. You can copy files to the disc and delete them when you are finished.
Alternatively, if you selected the “With a CD/DVD player” option, you then view an empty File Explorer window into which you will need to copy the files and folders to burn to the CD or DVD. To finish burning the selected files to the disc, click the See more” button in the Ribbon at the top of the File Explorer window, which looks like an ellipsis mark. Then select the “Finish burning” command in the button’s drop-down menu that appears to open the “Burn to Disc” wizard.
In the “Burn to Disc” wizard, the “Disc title” field should show the name of the CD or DVD you already entered. Select the desired burn speed from the “Recording speed” drop-down. Optionally, to close the wizard after you finish burning the disc, check the “Close the wizard after the files have been burned” checkbox. Then click the “Next” button to continue.
Windows will then burn the selected files to the disc. If you checked the checkbox, the wizard closes after burning the files to disc. If not, then click the “Finish” button in the final screen of the wizard to close it.
Instructions on How to Burn a CD or DVD in Windows 11:
- To burn a CD or DVD in Windows 11, first insert a blank, recordable CD or DVD into the corresponding drive in your computer.
- If AutoPlay is enabled on your computer, a small notification box appears in the lower-right corner of the screen telling you to select the notification box to determine what Windows 11 should do when a blank CD or DVD is inserted.
- Once you tap or click the notification box, another message box appears in the upper-right corner of the screen and shows the actions your computer can take using the software programs available.
- Alternatively, if AutoPlay is NOT enabled, then open a File Explorer window.
- Then click the “This PC” icon in the Navigation pane.
- Then right-click your CD/DVD drive in the right pane to display a pop-up menu.
- Select the “Show more options” command in the pop-up menu to replace the smaller pop-up contextual menu with a larger pop-up contextual menu that shows more choices.
- In this larger menu, click the “Open AutoPlay…” command to open the same message box in the upper-right corner of the screen which shows the actions your computer can take using the software programs available.
- Regardless of the AutoPlay setting, to then burn a CD or DVD using File Explorer in Windows 11, select the “Burn files to disc (using File Explorer)” command in the menu of software choices that appears to open the “Burn a disc” window.
- Then type a name for the disc into the “Disc title:” field.
- Next, select the type of recordable CD or DVD to create by selecting the desired option button.
- To format the disc to behave like a removable drive, select the “Like a USB flash drive” option button.
- Alternatively, to create a standard, recordable disc that plays on most computers and CD players, select the “With a CD/DVD player” option button.
- After making your selection, click the “Next” button to continue.
- If you selected the “Like a USB flash drive” choice, then Windows formats the disc.
- You can then display the CD or DVD within a File Explorer window after Windows finishes formatting it.
- You can then use the disc as if it were any other folder on your system. You can copy files to the disc and delete them when you are finished.
- Alternatively, if you selected the “With a CD/DVD player” option, you then view an empty File Explorer window into which you must copy the files and folders to burn to the CD or DVD.
- To finish burning the selected files to the disc, click the See more” button in the Ribbon at the top of the File Explorer window, which looks like an ellipsis mark.
- Then select the “Finish burning” command in the button’s drop-down menu that appears to open the “Burn to Disc” wizard.
- In the “Burn to Disc” wizard, the “Disc title” field should show the name of the CD or DVD you already entered.
- Select the desired burn speed from the “Recording speed” drop-down.
- Optionally, to close the wizard after you finish burning the disc, check the “Close the wizard after the files have been burned” checkbox.
- Then click the “Next” button to continue. Windows will then burn the selected files to the disc.
- If you checked the checkbox, the wizard closes after burning the files to disc.
- If not, then click the “Finish” button in the final screen of the wizard to close it.