Enter Project Information in Microsoft Project – Tutorial
Enter Project Information in Microsoft Project: Video Lesson
This video lesson, titled “Planning a Project,” shows you how to enter project information in Microsoft Project. This video lesson is from our complete Microsoft Project training, titled “Mastering Project Made Easy v.2013-2010.”
Enter Project Information in Microsoft Project: Overview
You can enter project information in Microsoft Project by clicking the “Project” tab in the Ribbon, and then clicking the “Project Information” button in the “Properties” button group after creating a new, blank project file. You can then set the basic parameters for the project file.
In the “Project Information” dialog box, enter the “Start date:,” the “Current date:,” and then select the “Project Start Date” from the “Schedule from:” drop-down menu. This lets Microsoft Project track tasks from the given start date. Note that you can set a “Finish date:” and then schedule tasks from the finish date back to the current date, if desired, but that is typically much more complicated. This is also typically only useful when you have a standard project that contains standard, easily measured and controlled tasks that you know must end by a specified date, and simply wish to know when the project should begin. Otherwise, you will probably want to pick the start date, and calculate tasks from the start date to find the projected end date. Note that you only need to give Microsoft Project either the start date or the end date- it will calculate the other date based on the task workload that you then enter. Scheduling from a specified start date causes Project to schedule all tasks to begin as soon as possible. This also gives you the most scheduling flexibility when entering tasks for the project.
Next, use the “Calendar:” drop-down to select the default working calendar to use. You can select either “24 Hours” to allow for 24-hour scheduling of project-related work; “Night Shift,” to allow for the scheduling of project-related tasks from 11PM to 8AM Monday through Saturday with a one-hour break each day; or “Standard,” to select scheduling of project-related tasks from 8AM to 5PM Monday through Friday with a one-hour lunch break each day.
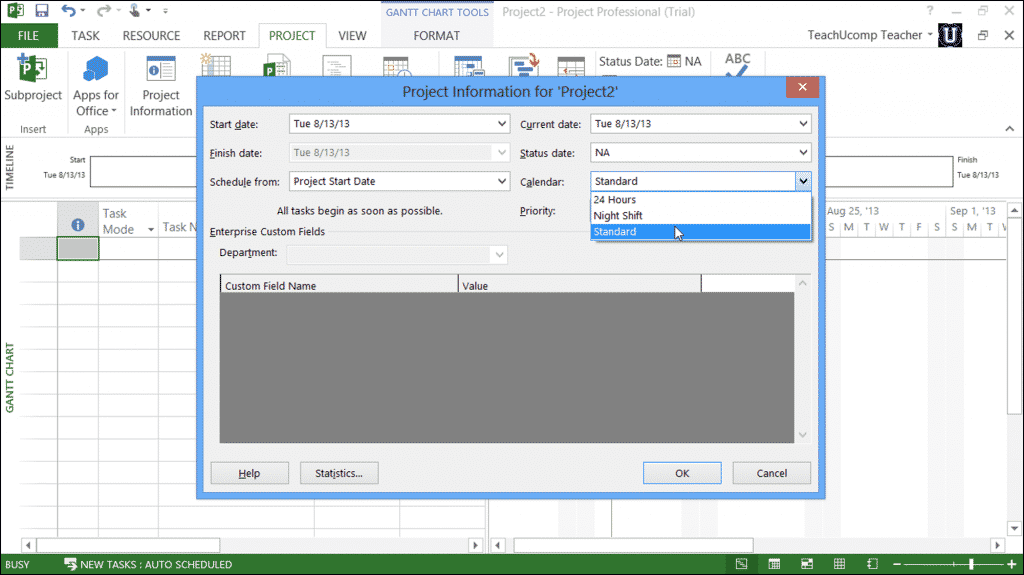
Enter Project Information in Microsoft Project – Tutorial: A picture of a user entering project information into the “Project Information” dialog box in Project 2013.
Finally, if using Microsoft Project Professional, you may have special custom fields and field values that need to be entered for your project. If these are needed they will be shown in the “Enterprise Custom Fields” area, where you can enter any custom field values, as necessary.
After you enter project information in Microsoft Project into the “Project Information” dialog box, you can then click the “OK” button to set the basic project plan.
Enter Project Information in Microsoft Project: Instructions
- To enter project information in Microsoft Project, click the “Project” tab in the Ribbon and then click the “Project Information” button in the “Properties” group.
- In the “Project Information” dialog box, enter the “Start date:” and the “Current date.”
- To let Microsoft Project track tasks from the given start date, select “Project Start Date” from the “Schedule from:” drop-down menu. Scheduling from a specified start date causes Project to schedule all tasks to begin as soon as possible. This also gives you the most scheduling flexibility when entering tasks for the project.
- Alternatively, if desired, you can set a “Finish date:” and then schedule tasks from the finish date back to the current date, but that is typically more complicated and only useful when you have a standard project that contains standard, easily measured and controlled tasks that must end by a specified date, and you simply want to know when the project should begin. Otherwise, pick the start date and calculate tasks from the start date to find the projected end date.
- Note that you only need to give Microsoft Project either the start date or the end date- it will calculate the other date based on the task workload that you then enter.
- To select the default working calendar to use, select one from the “Calendar:” drop-down. Select either “24 Hours” to allow for 24 hour scheduling of project-related work; “Night Shift,” to allow for the scheduling of project-related tasks from 11PM to 8AM Monday through Saturday with a one-hour break each day; or “Standard,” to select scheduling of project-related tasks from 8AM to 5PM Monday through Friday with a one-hour lunch break each day.
- If using Microsoft Project Professional, you may have special custom fields and field values that need to be entered for your project. If these are needed, they will be shown in the “Enterprise Custom Fields” area, where you can enter any custom field values, as necessary.
- To set the basic project information after you enter project information in Microsoft Project into the “Project Information” dialog box, click the “OK” button.
