How to Use the Customers List in QuickBooks Online
How to Use the Customers List in QuickBooks Online: Video
This video lesson, titled “How to Use the Customers Page and Customers List in QuickBooks Online,” shows you how to use the Customers list in QuickBooks Online. This video lesson is from our complete QuickBooks Online tutorial, titled “Mastering QuickBooks Online Made Easy.”
Overview:
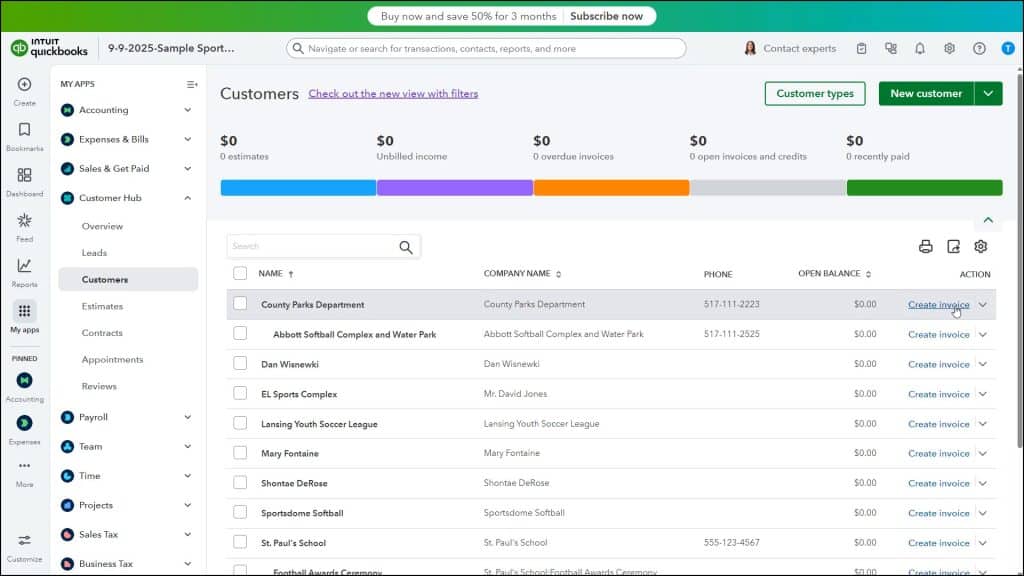
To open the “Customers” page in QuickBooks Online, click the “Customers” link under the “Customer Hub” app in the “My apps” bar. The Money Bar at the top of the “Customers” page shows breakdowns of customer estimates, billing, and invoicing activity and amounts by billing status.
Clicking any section of the Money Bar filters the list below to show those customers. To remove the filter, click the “Clear Filter/View All” link below the Money Bar. To collapse the Money Bar, click the small upward-facing arrow (^) in its lower-right corner. When collapsed, a small downward-facing arrow (v) you can click to expand the Money Bar then appears in its place.
How to Add or Import New Customers:
To manually add a new customer in the “Customers” page, click the “New customer” button in the upper-right corner of the page. To instead import customers, click the drop-down arrow on the “New customer” button and then select the “Import customers” command. To instead add multiple customers by hand or by copying data from Excel, click the drop-down arrow on the “New customer” button and select the “Multiple customers” command, instead.
How to Perform Batch Actions on Customers:
Below the Money Bar is the Customers list. To perform batch actions on selected customers, check the checkboxes next to the customers in the Customers list and then click the “Batch actions” button that then appears above the list to see the batch actions you can perform for them, which include “Create statements,” “Email,” “Make inactive,” and “Select customer type.”
How to Sort and Find Customers:
To sort the Customers list, click the sort button in either the “Name,” “Company Name,” “Attachments,” or “Open Balance” column heading to sort by the data in the column. After sorting the Customers list, an upward-pointing or downward-pointing arrow appears next to the column title that contains the values by which the list is currently sorted. The upward-pointing arrow means the list is sorted in ascending order. The downward-pointing arrow means the list is sorted in descending order. To switch the sort order of the column’s values, click the arrow in the same column heading which the list is currently sorted again.
To find a specific customer or company, enter a search term into the “Search” field at the top of the Customers list and press the “Enter” key on your keyboard. If needed, to show all the customers again, delete the entry you typed into the “Search” field and then press the “Enter” key on your keyboard.
How to Print, Export, and Change the Display of the Customers List:
In the upper-right corner of the Customers list are three buttons for “Print,” “Export to Excel,” and “Settings.” To open a printer-friendly Customers list page and also open your web browser’s “Print” dialog box, click the “Print” button. To download the Customers list as an Excel workbook, click the “Export to Excel” button.
To show the display options for the Customers list in a drop-down menu, click the “Settings” button. To show or hide columns in the Customers list, then check or uncheck the names of the columns under the “Columns” heading in the button’s drop-down menu.
To show any inactive customers in the list, check the “Include inactive” checkbox under the “Other” heading in the drop-down menu. To show customer projects in the Customers list, check the “Include projects” checkbox under the “Other” heading.
To select the number of customer rows to show per page in the list, select the desired number’s option button under the “Page size” section in the drop-down menu. To close the drop-down menu, click the “Settings” button again.
How to Perform Actions on Customers:
To perform an action on a customer, click or select an action from the “Action” column’s drop-down in the desired customer’s row. The available choices change, depending on which actions are currently available for the customer. Actions can include: “Create invoice,” “Create estimate,” “Send payment link,” “Create sales receipt,” “Create charge,” “Create time activity,” “Receive payment,” “Send reminder,” “Create statement,” “Create video meeting,” “Schedule video meeting,” “Make inactive,” “Request feedback,” “Create contract,” and “Schedule appointment.”
Other than “Make inactive,” clicking any link in the “Action” drop-down opens a window or page for you to perform the selected action. To navigate through multiple pages of the Customers list, if needed, click the “First,” “Previous,” “Next” and “Last” links in the lower-right corner of the Customers list.
How to Edit and View Customer Information:
To edit an existing customer’s information, click the customer’s name in the Customers list to open a customer detail page. This page contains tabs you can click to show the selected customer’s “Transaction List,” “Activity Feed,” “Statements,” “Recurring Transactions,” “Projects,” if enabled, “Customer Details,” “Late Fees,” if enabled, “Notes,” “Tasks,” and “Opportunities.” To return to the Customers list from a customer’s detail page, click the “< Customers” link in the upper-left corner of the detail page.
To open the “Customer” pane to edit customer information, click the “Edit” button at the top, right-hand side of the customer detail page. Change any customer information in this pane and then click the “Save” button at the bottom of the pane. Also, note that clicking the “Transaction List” tab in the customer detail page shows the transactions for that specific customer. You can then click a transaction to see more information about the transaction and edit it or perform other transaction-related actions, if possible.
How to Inactivate a Customer:
While you cannot delete a customer, QuickBooks Online Plus lets you inactivate customers. One way to inactivate a customer is to click the customer in the Customers list to open their customer detail page. Then click the drop-down arrow on the “Edit” button in the upper-right corner of the page and select the “Make inactive” command in the menu that appears.
If the customer has a zero (0) balance, a window then opens, asking you to confirm you want to make this customer inactive. Click the “Yes, make inactive” button to make the customer inactive. If the customer has an open balance, a warning window instead appears, asking you to confirm “Making this customer inactive will cause an adjusting transaction to be created. Is this OK?” If so, click “Yes, make inactive” to make the customer inactive and also create the adjusting transaction. Alternatively, to inactivate a customer from the “Customers” page, select the “Make inactive” choice from the “Action” column for the customer’s record in the Customers list.
How to Show Inactive Customers and Reactivate a Customer:
To show inactive customers in the Customers list in QuickBooks Online, click the “Settings” button above the Customers list in the “Customers” page. Then check the “Include inactive” checkbox to show any inactive customers in the Customers list. To reactivate an inactive customer, click the “Make active” link in the “Action” column of the customer record to reactivate.


