Share Documents in Word – Instructions and Video Lesson
Share Documents in Word: Video Lesson
This video lesson, titled “Word for Microsoft 365 Tutorial: How to Share Documents in Word Using Co-authoring,” shows you how to share documents in Word for Microsoft 365. This video lesson is from our complete Word tutorial, titled Mastering Word Made Easy™.
Overview:
Co-authoring a Word document in Word for Microsoft 365 lets you quickly share and collaborate simultaneously on a document with others. To share a document in Word for Microsoft 365, open the document to share. Then click the “Share” button in the upper-right corner of the Ribbon to show a drop-down menu of sharing choices. Then select your desired sharing choice from the drop-down menu.
Direct Sharing in Microsoft Word:
To share with people you select, choose the “Share…” command to open a “Share” pane. If you haven’t yet saved the document online, then this pane lists the connected online OneDrive and SharePoint sites to which you can save the file. Click the desired choice to upload a copy of the document to that site. If needed, then type a name for the file into the “Document name” pane that appears and then click “OK.”
After saving the document to an online location, use the “Share” pane to choose the users to invite to co-author the document. The sharing settings for the document default to the sharing settings for the selected save location configured by your Microsoft 365 administrator.
How to Change the Sharing Settings:
To change the sharing settings, if available, click the “Link settings” button in the “Share” pane to show the “Link settings” pane. Then click the option button for the users with whom to share the link, if available. Possible choices include “Anyone,” “People in (Your Organization’s Name),” “People with existing access,” or “People you choose.”
To choose whether to allow editing access for most choices, click the “Can edit” drop-down in the “More settings” section of the pane and select “Can edit,” “Can review,” “Can view,” or “Can’t download.” You must allow editing access to let users co-author the document with you. Otherwise, they can only view and/or suggest changes to the file. After changing your link settings, click the “Apply” button to continue and return to the main “Share” pane again.
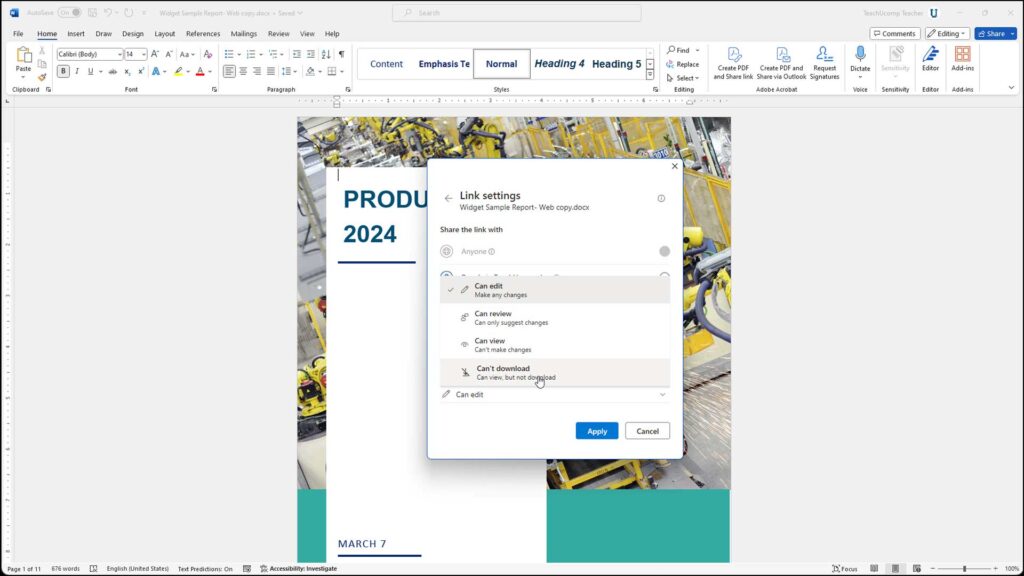
A picture showing how to change the sharing settings before you share documents in Word for Microsoft 365.
Selecting Shared Document Recipients and Sending the Email Invitation:
Then start typing the users’ or groups’ names or email addresses with whom to share the document into the “Add a name, group, or email” field. Then select the names from the drop-down that appears to add them to the list. Continue doing this until you have added all the users with whom to share the document.
To enter an optional message within the email, type it into the “Add a message” field. To then email the invitations, click the “Invite” button in the “Share” pane. Then click the “x” button in the upper-right corner of the confirmation message box that appears to tell you the email is sent.
Copying a Sharing Link in the Share Pane:
Alternatively, to instead copy a sharing link to send to other users in emails or other kinds of messaging apps instead of sending an email, click the “Copy link” button at the bottom of the “Share” pane. Then send the link to the recipients using whichever application you want.
Sending a Sharing Link in Outlook:
Alternatively, to send the link via your desktop Outlook application, if available, click the “Choose another app to share the link in” button in the “Share” pane and select “Send link in Outlook.” Your desktop version of Outlook then opens and creates an email with the link you can send to the recipients.
How to Send a Non-collaborative Copy in Word:
Alternatively, to share a non-collaborative copy of the document as a Word document or PDF attachment via Outlook, click the “Choose another app to share the link in” button in the “Share” pane, roll over the “Send a copy” command, and then select either “Word document” or “PDF” from the side menu that appears.
Your desktop version of Outlook then opens and attaches a copy of the shared document to an email, using the file type you selected. You can then send this to the recipients, as usual. Note that this is not a shared document, however, and they are simply being sent a copy of the document. To close the “Share” pane, when finished, click the “x” button in its upper-right corner.
Copying a Sharing Link Using the Share Button in Word:
After saving a document to a shared location, you can also click the “Share” button and choose one of the other commands that appears to copy a shared document link or manage sharing access, too. To copy a document link, select the “Copy Link…” command.
How to Stop Sharing a Document or Change Document Sharing Access in Word:
To stop sharing a document or change its sharing settings, click the “Share” button at the right end of the Ribbon and select the “Manage Access…” command to open the “Manage Access” pane. To stop all sharing of the document, click the “Stop sharing” link and then click the “Stop sharing” button in the confirmation dialog box that opens. To instead share with more users, click the “Share” link and then repeat the sharing process again in the “Share” pane that opens.
To view the people, groups, and sharing links for the document, click the “People,” “Groups,” or “Links” tab in the “Manage Access” pane, as needed. To remove individual sharing links or remove individuals from using a sharing link if you granted access to specific people, click the “Links” tab. To delete a sharing link, click the “Remove link” button to the right of the link to remove and then click the “Remove” button in the confirmation dialog box to delete it.
How to Change Sharing Access in Word:
Alternatively, to change the sharing access for or delete a specific user or group to whom you gave direct sharing access in Word, click the “People” tab or “Groups” tab, respectively. The names of the people or groups with direct sharing access to the document appear in a list on the tab. Click the name of the person or group whose sharing access you want to change or remove to then show their sharing settings in this pane.
To change their direct sharing settings, click the “Direct Access” section to expand it and show a sharing settings drop-down. To change their sharing setting, use this drop-down to select a new setting and then click the “Apply” button that appears. To instead remove their direct access, select the “Remove direct access” choice from the drop-down menu. Then confirm their removal by clicking the “Remove” button in the confirmation dialog box.
How to Save a Local Copy of a Shared Document in Word:
Optionally, to save a local copy of a shared document to your computer after you finish co-authoring it, click the “File” tab in the Ribbon. Then select the “Save a copy” command from the left side of the backstage view to save a local copy in the area to the right. After confirming you saved the copy, you can then safely delete the shared file from its online location, if needed.

