Start a Group Conversation in Outlook – Instructions
Start a Group Conversation in Outlook: Video Lesson
This video lesson, titled “Contributing to Groups,” shows you how to start a group conversation in Outlook. This video lesson is from our complete Outlook tutorial, titled “Mastering Outlook Made Easy v.2019 and 365.”
Start a Group Conversation in Outlook: Overview
How to Start a Group Conversation in Outlook
To start a group conversation in Outlook of which you are a member, click the name of the group under the “Groups” folder in the Folder Pane. The group’s inbox then appears in the center of the page and the group’s reading pane appears to the right of that. The basic layout is like the “Inbox” of your Mail folder. The first time you visit the group, a “Welcome to the group name group” email (where group name is the name of your Group) appears in the group’s inbox and reading pane. The email contains links for common group tasks, like “Start a conversation,” “Add to the team site,” “Share files,” and “Connect your apps.”
One way to start a group conversation in Outlook is to click the “Start a conversation” link in the welcome message to open a pop-up window in which you to create a new conversation email for the group. Create a new group conversation just like an email. When creating a group conversation email, the group’s email address automatically appears in the “To” line of the message. Whenever you create a group, a group email address is created that sends the same email/conversation to all group members. The entire history of group conversations is kept until they are manually deleted. This is helpful if a new member joins the group, as they can access all the prior conversations and easily catch up.
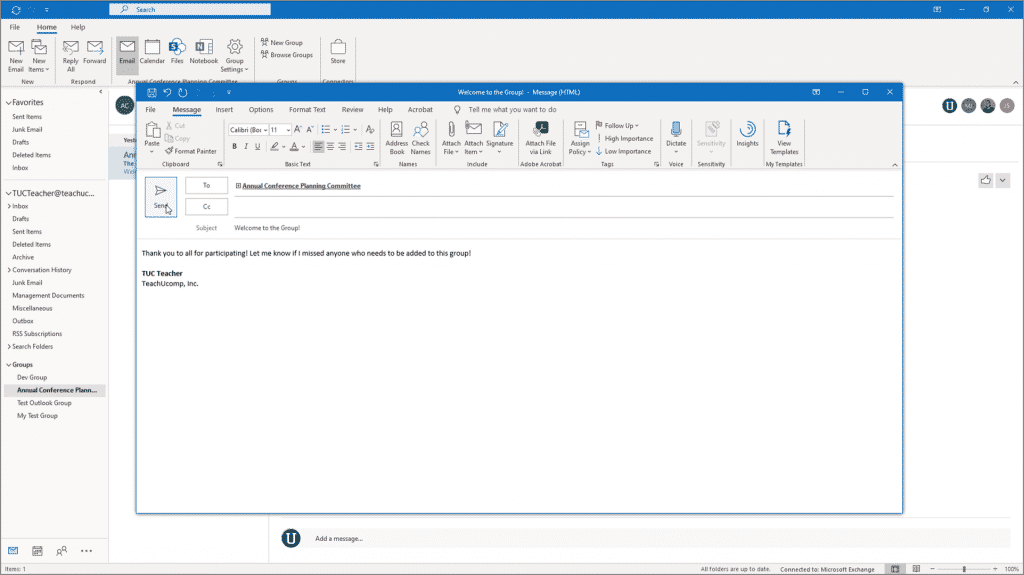
Start a Group Conversation in Outlook – Instructions: A picture of a user starting a group conversation in Outlook.
Alternatively, to start a group conversation in Outlook, click the “New Email” button in the “New” button group on the “Home” tab of the Ribbon when the group is selected in the Folder Pane. Doing this also creates a new group email message. After creating the group email, click the “Send” button to send it to everyone in the group. It then appears in the group’s inbox, too.
How to Reply to a Group Conversation in Outlook
To reply to an email conversation in the group, click the email conversation to which to reply in the group’s Inbox folder. Then click into the “Add a message…” field at the bottom of the mail message in the Reading Pane or click the “Reply All” button in the “New” button group on the “Home” tab of the Ribbon to do the same thing. Then type your reply to the message and click the “Send” button that appears below it. Alternatively, you can click the “Discard” button to cancel your message.
How to Attach Files to a Group Conversation in Outlook
Note that you can insert attachments or Outlook Items to the group conversation emails by clicking the “Attach File” or “Attach Item” buttons in the “Include” button group on the “Home” tab of the Ribbon in the group email window or on the “Message” contextual tab in the Ribbon if creating a reply in the Reading Pane, if needed.
For attachments in conversation replies in the group Reading Pane, you can then choose if you want to upload the attachments as shared group files in SharePoint in a dialog box that then appears. For attachments in new email conversations you create, you can choose to upload the file to the SharePoint site for the group after attaching the file and sending it to the group by clicking the new conversation with the attachment and then clicking the drop-down to the right of the attachment. Then roll over the “Upload’ command in the side menu that appears and choose the name of the group to which to upload the attached file.
Start a Group Conversation in Outlook: Instructions
Instructions on How to Start a Group Conversation in Outlook
- To start a group conversation in Outlook of which you are a member, click the name of the group under the “Groups” folder in the Folder Pane.
- The group’s inbox then appears in the center of the page and the group’s reading pane appears to the right of that. The basic layout is like the “Inbox” of your Mail folder.
- The first time you visit the group, a “Welcome to the group name group” email (where group name is the name of your Group) appears in the group’s inbox and reading pane.
- The email contains links for common group tasks, like “Start a conversation,” “Add to the team site,” “Share files,” and “Connect your apps.”
- To start a group conversation in Outlook, click the “Start a conversation” link in the welcome message.
- Alternatively, to start a group conversation in Outlook, click the “New Email” button in the “New” button group on the “Home” tab of the Ribbon when the group is selected in the Folder Pane.
- Create a new group conversation just like an email. When creating a group conversation email, the group’s email address automatically appears in the “To” line of the message.
- After creating the group email, click the “Send” button to send it to everyone in the group. It then appears in the group’s inbox, too.
Instructions on How to Reply to a Group Conversation in Outlook
- To reply to an email conversation in the group, click the email conversation to which to reply in the group’s Inbox folder.
- Then click into the “Add a message…” field at the bottom of the mail message in the Reading Pane or click the “Reply All” button in the “New” button group on the “Home” tab of the Ribbon to do the same thing.
- Then type your reply to the message and click the “Send” button that appears below it.
- Alternatively, you can click the “Discard” button to cancel your message.
Instructions on How to Attach Files to a Group Conversation in Outlook
- Note that you can insert attachments or Outlook Items to the group conversation emails by clicking the “Attach File” or “Attach Item” buttons in the “Include” button group on the “Home” tab of the Ribbon in the group email window or on the “Message” contextual tab in the Ribbon if creating a reply in the Reading Pane, if needed.
- For attachments in conversation replies in the group Reading Pane, you can then choose if you want to upload the attachments as shared group files in SharePoint in a dialog box that then appears.
- For attachments in new email conversations you create, you can choose to upload the file to the SharePoint site for the group after attaching the file and sending it to the group by clicking the new conversation with the attachment and then clicking the drop-down to the right of the attachment.
- Then roll over the “Upload’ command in the side menu that appears and choose the name of the group to which to upload the attached file.