The Navigation Pane in Word – Instructions
The Navigation Pane in Word: Video Lesson
This video lesson, titled “Using the Navigation Pane,” shows how to use the Navigation Pane in Word. This video lesson is from our complete Word tutorial, titled “Mastering Word Made Easy v.2019 and 365.”
The Navigation Pane in Word: Overview
How to Show the Navigation Pane in Word
The Navigation pane in Word lets you quickly search or navigate through your document. To show the Navigation pane in Word, click the “View” tab in the Ribbon. For all document views other than “Read Mode,” then check the “Navigation Pane” checkbox in the “Show” button group. If using “Read Mode,” then select the “Navigation Pane” choice from the “View” tab’s drop-down menu, instead. By default, the Navigation pane appears at the left side of the application window.
How to Move, Resize, and Close the Navigation Pane in Word
To move, resize or close the Navigation pane in Word, click the small downward facing arrow in the upper-right corner of the pane. A drop-down menu of choices then appears. To move the Navigation Pane in Word, choose “Move” from the drop-down menu or hold your mouse over the title area of the pane until it turns into a four-pointed arrow. Then simply click and drag the pane with your mouse to move it. If you release the mouse button when it is over the document area, it then appears floating over the document area. You can leave the pane floating or you can dock it to either the right or left side of the application window by dragging it to the right or left sides of the application window until it docks itself to that side of the window.
To resize the Navigation Pane in Word, choose the “Size” command from the drop-down menu or hover your mouse pointer over the separator between the pane and the main work area of the application window until the mouse pointer then turns into a horizontal, two-pointed arrow. Then adjust the width of the pane by clicking and dragging with your mouse.
To close the Navigation Pane in Word, choose the “Close” command from the drop-down menu or click the “X” in the upper-right corner to close the Navigation pane.
How to Find Text Using the Navigation Pane in Word
To search for text in your document using the Navigation Pane in Word, type a search term or phrase into the search bar in the Navigation Pane. As you type the term, Word then automatically searches your document for matching text entries. Matching results appear highlighted in your document. You can also click the “Results” section below the search bar in the Navigation pane to list the matching results in the Navigation Pane. If there are too many matching results, they may not all appear in the “Results” section of the Navigation pane. However, a “# results” line always appears under the search bar with upward and downward facing arrow buttons to its right that you can click to individually navigate through the matching results. To stop searching and stay at a selected result, click the “X” button at the right end of the search bar.
How to Navigate through a Document Using the Navigation Pane in Word
Also, to navigate through your document by using any headings or pages in your document, click either the “Headings” or “Pages” sections under the search bar in the Navigation Pane in Word. You can then click on a heading or a page to navigate to that heading or page in your document.
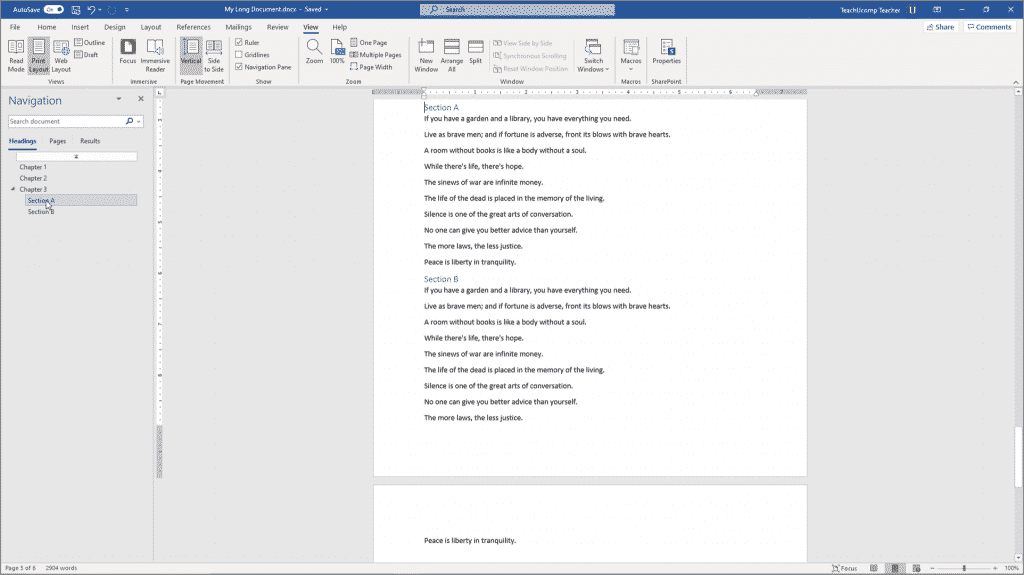
The Navigation Pane in Word – Instructions: A picture of the “Headings” section within the Navigation Pane in Word.
The Navigation Pane in Word: Instructions
Instructions on How to Show the Navigation Pane in Word
- To enable the display of the Navigation pane, click the “View” tab in the Ribbon.
- For all document views other than “Read Mode,” then check the “Navigation Pane” checkbox in the “Show” button group.
- Alternatively, if using “Read Mode,” then select the “Navigation Pane” choice from the “View” tab’s drop-down menu, instead.
- By default, the Navigation pane appears at the left side of the application window.
Instructions on How to Move, Resize, and Close the Navigation Pane in Word
- To move, resize or close the Navigation pane in Word, click the small downward facing arrow in the upper-right corner of the pane to reveal a drop-down menu of choices.
- To move the Navigation Pane in Word, choose “Move” from the drop-down menu or hold your mouse over the title area of the pane until it turns into a four-pointed arrow.
- Then simply click and drag the pane with your mouse to move it.
- If you release the mouse button when it is over the document area, it then appears floating over the document area.
- You can leave the pane floating or you can dock it to either the right or left side of the application window by dragging it to the right or left sides of the application window until it docks itself to that side of the window.
- To resize the Navigation Pane in Word, choose the “Size” command from the drop-down menu or hover your mouse pointer over the separator between the pane and the main work area of the application window until the mouse pointer then turns into a horizontal, two-pointed arrow.
- Then adjust the width of the pane by clicking and dragging with your mouse.
- To close the Navigation Pane in Word, choose the “Close” command from the drop-down menu or click the “X” in the upper-right corner to close the Navigation pane.
Instructions on How to Find Text Using the Navigation Pane in Word
- To search for text in your document using the Navigation Pane in Word, type a search term or phrase into the search bar in the Navigation Pane.
- As you type the term, Word then automatically searches your document for matching text entries.
- Matching results appear highlighted in your document.
- To list the matching results in the Navigation Pane in Word, click the “Results” section below the search bar in the Navigation pane.
- If there are too many matching results, they may not all appear in the “Results” section of the Navigation pane.
- However, a “# results” line always appears under the search bar with upward and downward facing arrow buttons to its right that you can click to individually navigate through the matching results.
- To stop searching and stay at a selected result, click the “X” button at the right end of the search bar.
Instructions on How to Navigate through a Document Using the Navigation Pane in Word
- To navigate through your document by using any headings or pages in your document, click either the “Headings” or “Pages” sections under the search bar in the Navigation Pane in Word.
- You can then click on a heading or a page to navigate to that heading or page in your document.

