Layout Guides in Publisher – Instructions
Layout Guides in Publisher: Video Lesson
This video, titled “Using Layout Guides,” shows how to apply layout guides in Publisher. This lesson is taken from our complete Publisher tutorial, titled “Mastering Publisher Made Easy v. 2019 and 365.”
Layout Guides in Publisher: Overview
Types of Layout Guides
You use layout guides in Publisher to help with the layout of page content. There are many different types of layout guides in Publisher. For example, margin guides appear onscreen to help you stay within the printable page area. Margin guides are one of the layout guides in Publisher that you can use when designing publications.
In this lesson, you will learn how to use the different types of layout guides in Publisher, like ruler guides, baseline guides, and grid guides. You can add layout guides in Publisher by using the buttons in the “Layout” button group on the “Page Design” tab in the Ribbon.
Using Ruler Guides
The first of the layout guides in Publisher to discuss is the ruler guide. To add a ruler guide to your page for object alignment, click the “Page Design” tab in the Ribbon. Then click the “Guides” button in the “Layout” button group. Then choose a set of ruler guides to add from the drop-down menu.
Alternatively, you could also select the “Add Horizontal Ruler Guide” or “Add Vertical Ruler Guide” command from the button’s drop-down menu to add a single horizontal or vertical ruler guide to the center of the page. Alternatively, you can also add ruler guides to your page by clicking directly into the ruler and then dragging your mouse into the page to place a ruler guide at the location at which you release your mouse.
To adjust the position of ruler guides onscreen, click and drag them to a new location with your mouse. To do this, place your mouse pointer over the ruler guide until your mouse pointer turns into a double-pointed line intersected by an arrow. Then click and drag the guide to the desired location in the publication. To remove a ruler guide, click and drag it off the publication page into the scratch area.
Using Grid Guides
To view the grid and baseline guides, click the “Page Design” tab in the Ribbon. Then click the “Guides” button in the “Layout” button group. Then select the “Grid and Baseline Guides…” command from the button’s drop-down menu.
In the “Layout Guides” dialog box, the “Grid Guides” tab then appears. You can create additional columns and rows within a page using the settings on this tab. Enter the number of columns to show on the page into the “Columns:” spinner box in the “Column Guides” section. Then enter the desired column spacing to allocate by using the “Spacing:” spinner buttons in the “Column guides” section. Enter the number of rows to add to the page into the “Rows:” spinner box in the “Row Guides” section. Then enter the spacing to allocate between the rows in the “Spacing:” spinner box.
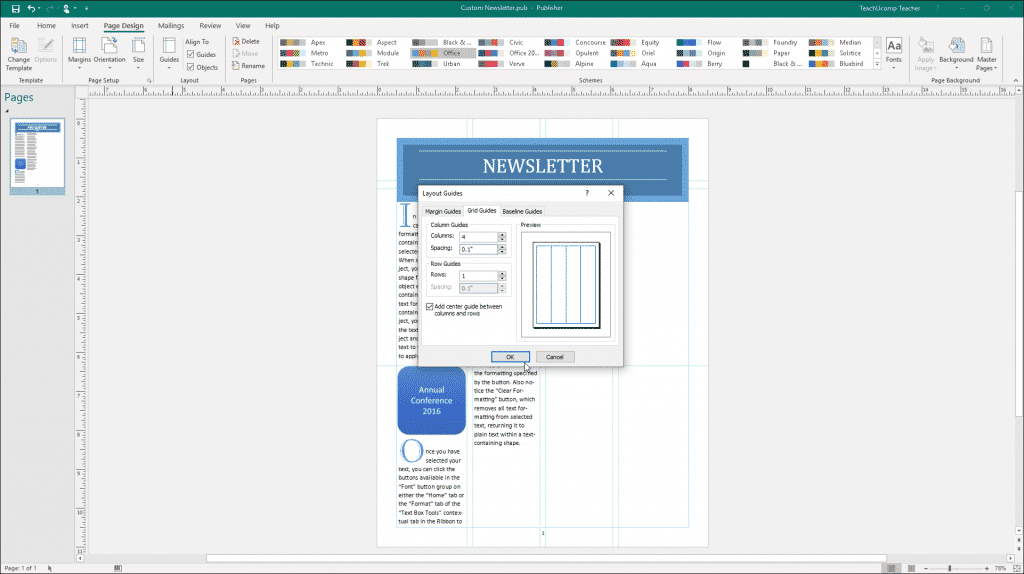
Layout Guides in Publisher – Instructions: A picture of the “Grid Guides” tab in the “Layout Guides” dialog box in Publisher.
If you wish to indicate the center between the columns and the rows you added, check the “Add center guide between columns and rows” checkbox. Doing this adds a pink guide that shows the center between the columns and rows to your page. After adding columns and rows, click the “OK” button to apply them to the page.
Using Baseline Guides
To add baseline guides, which let you align text lines across multiple columns, click the “Page Design” tab in the Ribbon. Then click the “Guides” button in the “Layout” button group. Then select the “Grid and Baseline Guides…” command from the drop-down menu.
Next, click the “Baseline Guides” tab within the “Layout Guides” dialog box. Then enter the desired point values for the “Spacing:” and “Offset:” of the baseline guides into the spinner boxes of the same names. After entering the desired values, click the “OK” button to apply them. To view the baseline guides in your publication, click the “View” tab in the Ribbon. Then check the “Baselines” checkbox in the “Show” button group.
Aligning Text to Baseline Guides
To align selected text to the baselines you set, which may override existing paragraph line spacing, select the text to align to the baselines. Then click the “Home” tab in the Ribbon. Then click the “Paragraph Settings” button in the lower-right corner of the “Paragraph” button group.
Next, check the “Align text to baseline guides” checkbox in the “Line Spacing” section of the “Paragraph” dialog box that appears. Then click the “OK” button to continue. If the line spacing for the selected paragraphs is greater than the baseline guides spacing, a warning message box then appears to tell you that fact and ask if you want to save the paragraph settings. To continue and discard the paragraph settings, click the “Yes” button. To return to adjust the height of the paragraph line spacing or to go back to adjust the height of the baseline guides spacing, click the “No” button, instead. Then adjust whichever setting you prefer to get your desired alignment.
Enabling Object Alignment to Layout Guides
To ensure objects added to your page “snap to” the nearest baseline or page object for alignment purposes, click the “Page Design” tab in the Ribbon. Then check either or both the “Guides” and/or “Objects” checkboxes in the “Align To” section of the “Layout” button group. Then when you add objects to the page, you will see small lines appear next to objects to show you when an object is aligned with a nearby guide or another page object as you drag it around onscreen.
Layout Guides in Publisher: Instructions
Instructions on How to Use Ruler Guides
- To add a ruler guide to your page for object alignment, click the “Page Design” tab in the Ribbon.
- Then click the “Guides” button in the “Layout” button group.
- Then choose a set of ruler guides to add from the drop-down menu.
- Alternatively, to add a single horizontal or vertical ruler guide to the center of the page, you could also select the “Add Horizontal Ruler Guide” or “Add Vertical Ruler Guide” command from the button’s drop-down menu.
- Alternatively, you can add ruler guides to your page by clicking directly into the ruler and then dragging your mouse into the page to place a ruler guide at the location at which you release your mouse.
- To adjust the position of ruler guides onscreen, place your mouse pointer over the ruler guide until your mouse pointer turns into a double-pointed line intersected by an arrow.
- Then click and drag the guide to the desired location in the publication.
- To remove a ruler guide, click and drag it off the publication page into the scratch area.
Instructions on How to Use Grid Guides
- To view the grid and baseline guides, click the “Page Design” tab in the Ribbon.
- Then click the “Guides” button in the “Layout” button group.
- Then select the “Grid and Baseline Guides…” command from the button’s drop-down menu.
- In the “Layout Guides” dialog box, the “Grid Guides” tab then appears.
- Enter the number of columns to show in the page into the “Columns:” spinner box in the “Column Guides” section.
- Then enter the desired column spacing to allocate by using the “Spacing:” spinner buttons in the “Column guides” section.
- Enter the number of rows to show in the page into the “Rows:” spinner box in the “Row Guides” section.
- Then enter the spacing to allocate between the rows into the “Spacing:” spinner box.
- To indicate the center between the columns and the rows you have added, check the “Add center guide between columns and rows” checkbox to place a pink guide that indicates the center between the columns and rows to your page.
- After adding columns and rows, click the “OK” button to apply them to the page.
Instructions on How to Add Baseline Guides
- To add baseline guides, which let you align text lines across multiple columns, click the “Page Design” tab in the Ribbon.
- Then click the “Guides” button in the “Layout” button group.
- Then select the “Grid and Baseline Guides…” command from the drop-down menu.
- Click the “Baseline Guides” tab within the “Layout Guides” dialog box.
- Enter the desired point values for the “Spacing:” and “Offset:” of the baseline guides into the spinner boxes of the same names.
- After entering the desired values, click the “OK” button to apply them.
- To view the baseline guides in your publication, check the “Baselines” checkbox in the “Show” button group on the “View” tab in the Ribbon.
Instructions on How to Align Text to Baseline Guides
- To align selected text to the baselines you set, which may override existing paragraph line spacing, select the text to align to the baselines.
- Then click the “Home” tab in the Ribbon.
- Then click the “Paragraph Settings” button in the lower-right corner of the “Paragraph” button group.
- Check the “Align text to baseline guides” checkbox in the “Line Spacing” section of the “Paragraph” dialog box that appears.
- Then click the “OK” button to continue.
- If the line spacing for the selected paragraphs is greater than the baseline guides spacing, a warning message box will then appear to tell you that fact and ask if you want to save the paragraph settings.
- To continue and discard the paragraph settings, click the “Yes” button.
- Alternatively, to return to adjust the height of the paragraph line spacing or to go back to adjust the height of the baseline guides spacing, click the “No” button, instead. Then adjust whichever setting you prefer to get your desired alignment.
Instructions on How to Enable Object Alignment to Layout Guides
- To ensure objects added to your page “snap to” the nearest baseline or page object for alignment purposes, click the “Page Design” tab in the Ribbon.
- Then check either or both the “Guides” and/or “Objects” checkboxes in the “Align To” section of the “Layout” button group.
- When you then add objects to the page, you will see small lines appear next to objects that show you when an object is aligned with a nearby guide or another page object as you drag it around onscreen.