Page Setup in Word- Tutorial
Page Setup in Word: Video Lesson
This video lesson, titled “Using Page Setup,” shows you how to use Page Setup in Word. This video lesson on how to use Page Setup in Word is from our complete Microsoft Word training, titled “Mastering Word Made Easy v.2013-2007.”
Page Setup in Word: Overview
Page Setup in Word lets you change the structure and layout of pages in a Microsoft Word document. The “Page Setup” group on the “Page Layout” tab of the Ribbon contains buttons that let you make changes to the page setup of the document. In addition to these buttons, you can also click the “Page Setup” dialog box button in the lower right corner of the “Page Setup” group to open the “Page Setup” dialog box. Here you can change any aspect of the document setup you choose. This dialog box consists of three tabs: “Margins,” “Paper,” and “Layout.” Let’s examine the page setup options you can set in this dialog box.
On the “Margins” tab, you can set the margins for the document. Set the top, bottom, left, and right margins to the length or width you desire by either typing the measurement units into the boxes provided or by using the spinner arrows at the right end of each spinner box. You can also set the “Gutter” margin, which is the amount of wasted space allotted for binding, if you are printing a document that you wish to bind. You can also use the “Gutter position:” drop-down to select the side of the document where you want the gutter margin to appear.
In the “Orientation” section, select either a portrait or landscape page orientation for your document or document section. In the “Pages” section, select the method for printing multiple pages from the “Multiple pages:” drop-down.
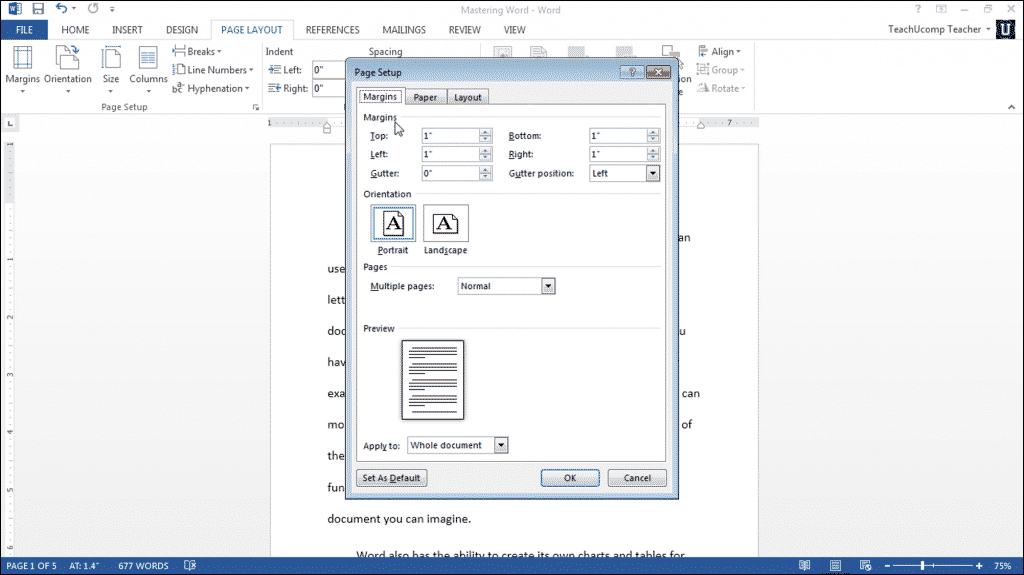
Page Setup in Word- Tutorial: A picture of the “Margins” tab within the “Page Setup” dialog box in Microsoft Word 2013.
On the “Paper” tab in the “Page Setup” dialog box, select the size of the paper onto which you will be printing this document. In the “Paper Source” section, set to which tray of your printer you will print the first page of your document if you have a multi-tray printer, and then make a tray choice for the subsequent pages.
On the “Layout” tab, set section break behavior in the “Section” area, if desired. You can also set some of the options for headers and footers in the “Headers and footers” section. This replicates the functionality shown in the “Headers & Footers” context tab. However, you can set your options here, if you prefer.
In the “Page” section, set the vertical alignment of the page using the drop-down available. This lets you change the vertical alignment of the text on the page to the center, top, or bottom of the page. You can also set line numbers and page borders here, if desired, by clicking either of the two buttons for those options at the bottom of the page and then making the settings you desire.
At the bottom of this dialog box, on all of the tabs, is the “Apply to” drop-down where you can choose which part of the document you want the page properties you just set to affect. You can apply your changes to the entire document, just the section that you are working on (if you used a section break), or everything in the document from this section forward. After you set your options for Page Setup in Word for your document, click “OK.”
Page Setup in Word: Instructions
- To set options for Page Setup in Word using the Ribbon, you can use the buttons within the “Page Setup” group on the “Page Layout” tab of the Ribbon.
- To set options for Page Setup in Word using a dialog box, click the “Page Setup” dialog box button in the lower right corner of the “Page Setup” group to open the “Page Setup” dialog box.
- To set the margins for the document, click the “Margins” tab in the “Page Setup” dialog box.
- Set the top, bottom, left, and right margins to the length or width you desire by either typing the measurement units into the boxes provided or by using the spinner arrows at the right end of each spinner box.
- You can also set the “Gutter” margin, which is the amount of wasted space allotted for binding, if you are printing a document that you wish to bind.
- You can also use the “Gutter position:” drop-down to select the side of the document where you want the gutter margin to appear.
- Select either a portrait or landscape page orientation for your document or document section in the “Orientation” section.
- Select the method for printing multiple pages from the “Multiple pages:” drop-down in the “Pages” section.
- To select the size of the paper onto which you will be printing this document, click the “Paper” tab in the “Page Setup” dialog box.
- Set to which tray of your printer you will print the first page of your document if you have a multi-tray printer, and then make a tray choice for the subsequent pages in the “Paper Source” section.
- To set section break behavior, click the “Layout” tab and make your selections in the “Section” area.
- You can also set some of the options for headers and footers in the “Headers and footers” section. This replicates the functionality shown in the “Headers & Footers” context tab. However, you can set your options here, if you prefer.
- To set the vertical alignment of the page, use the drop-down available in the “Page” section.
- To set line numbers and page borders in this same section, click either of the two buttons for those options at the bottom of the page and then making the settings you desire.
- To choose which part of the document you want the page properties you just set to affect, click the “Apply to” drop-down at the bottom of this dialog box.
- To set your options for Page Setup in Word for your document, click “OK.”
