Insert an Excel Worksheet into a Word Document – Instructions
Insert an Excel Worksheet into a Word Document: Video Lesson
This video lesson, titled “Inserting a Microsoft Excel Worksheet,” shows you how to insert an Excel worksheet into a Word document. This video lesson is from our complete Word tutorial, titled “Mastering Word Made Easy v.2019 and 365.”
Insert an Excel Worksheet into a Word Document: Overview
How to Insert an Excel Worksheet into a Word Document
You can easily insert an Excel worksheet into a Word document to harness the power of Excel within Word. This helps Word users who like creating worksheets and performing calculations in Microsoft Excel. To insert an Excel worksheet into a Word document, you must have both Microsoft Word and Microsoft Excel installed on your computer as part of the same Microsoft Office installation. After you insert an Excel worksheet into a Word document, you can then edit the information in the worksheet using the Excel interface. However, it displays the data in the Word document as if it is a table.
To insert an Excel worksheet into a Word document, place the insertion marker into the document location where you want to show the worksheet data. Then click the “Table” button in the “Tables” button group on the “Insert” tab of the Ribbon. Then click the “Excel Spreadsheet” command in the button’s drop-down menu. Doing this then inserts an Excel worksheet object into that location in the document.
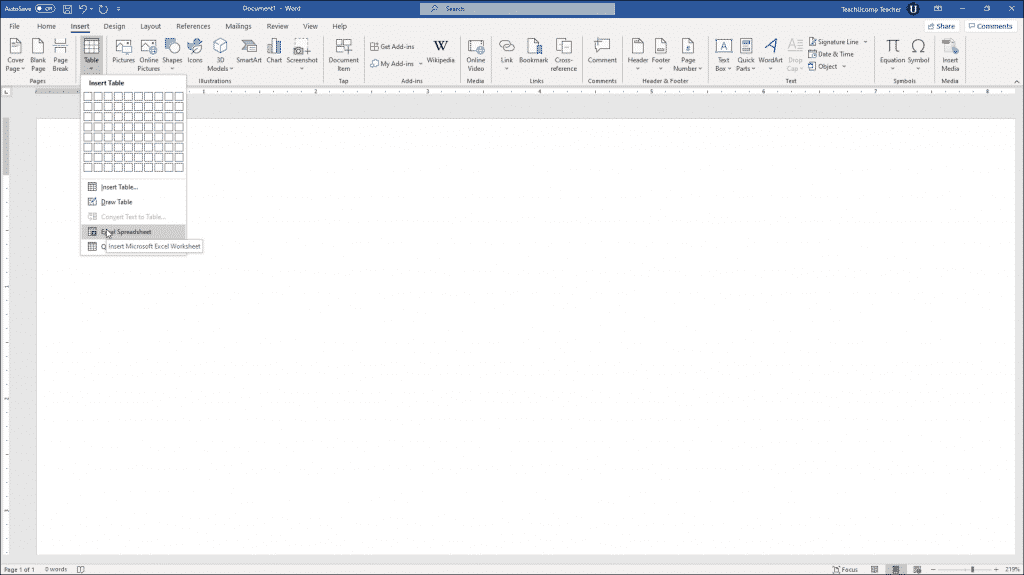
Insert an Excel Worksheet into a Word Document – Instructions: A picture of a user inserting an Excel spreadsheet into a Word document.
At that point, you are working within the Excel interface. Edit the contents of the cells in the Excel worksheet area. Also, apply all formatting to the cells in Excel, as you cannot make any formatting changes in Word.
Note that the embedded Excel worksheet object has a dashed border around it. Only the information shown in this area appears in the document. To resize this display area to increase the data shown or remove extra cells from appearing, place your mouse pointer over the small black resizing squares that appear around the perimeter of the embedded worksheet object until your mouse pointer turns into a double-pointed arrow. Then click and drag to increase or decrease the size of the worksheet area that appears in the document. After entering the worksheet data and resizing its display, then click into the document area. Doing this then changes the display of the worksheet to a table.
How to Edit an Embedded Excel Worksheet in a Word Document
To edit its contents again in the future or to change its display size, you must return to editing mode. To return to editing mode, double-click the embedded Excel worksheet object in the document. It then switches back to Excel so you can make the necessary changes. Then click back into the document after editing it to change it back into an embedded table within Word.
How to Delete an Embedded Excel Worksheet in a Word Document
To delete an embedded Excel worksheet object in your document, simply click it to select it. Then press the “Delete” or “Del” key on your keyboard to delete the Excel worksheet.
Insert an Excel Worksheet into a Word Document: Instructions
Instructions on How to Insert an Excel Worksheet into a Word Document
- To insert an Excel worksheet into a Word document, place the insertion marker into the document location where you want to show the worksheet data.
- Then click the “Table” button in the “Tables” button group on the “Insert” tab of the Ribbon.
- Then click the “Excel Spreadsheet” command in the button’s drop-down menu.
- Enter the information to display into the Excel worksheet area.
- Also, apply all formatting to the cells in Excel, as you cannot make any formatting changes in Word.
- To resize the display area, place your mouse pointer over the small black resizing squares that appear around the perimeter of the embedded worksheet object until your mouse pointer turns into a double-pointed arrow.
- Then click and drag to increase or decrease the size of the worksheet area that appears in the document.
- To change the display of the Excel worksheet into a Word table when finished, click into the blank document area in Word.
Instructions on How to Edit an Embedded Excel Worksheet in a Word Document
- To edit an embedded Excel worksheet’s contents or resize in the future in Word, you must return to editing mode.
- You can do this by double-clicking the embedded Excel worksheet object in the document to switch back to Excel.
- Then make the necessary changes.
- To change it back into an embedded table in Word when finished, click back into the document.
Instructions on How to Delete an Embedded Excel Worksheet in a Word Document
- To delete an embedded Excel worksheet object in your document, click it to select it.
- Then press the “Delete” or “Del” key on your keyboard to delete the Excel worksheet.

