Respond to Meeting Requests in Outlook- Instructions
Respond to Meeting Requests in Outlook: Video Lesson
This video lesson, titled “Responding to Meeting Requests,” shows you how to respond to meeting requests in Outlook. This video lesson is from our complete Outlook tutorial, titled “Mastering Outlook Made Easy v.2019 and 365.”
Respond to Meeting Requests in Outlook: Overview
This lesson shows you how to respond to meeting requests in Outlook. When you are invited to a meeting in Outlook, the invitation, which is called a “Meeting Request,” appears in the “Inbox” of your Mail folder.
To respond to a received meeting request in Outlook, either click it once in the “Inbox” pane to select it and then view it within the “Reading Pane” or double-click the meeting request to open it within its own “Meeting” window. You must then choose how to respond to the meeting.
If you are viewing the meeting response in the Reading Pane, the buttons appear at the top of the message. If viewing them in the “Meeting” window, they also appear at the top of the message but also appear in the “Respond” button group on the “Meeting” tab in the “Meeting” window. Your choices are “Accept,” “Tentative,” “Decline,” or if allowed by the meeting organizer, “Propose New Time.”
Clicking “Accept” informs the organizer you will attend the meeting. It also moves the meeting into your Calendar. Clicking “Tentative” informs the meeting organizer you are tentatively planning to attend the meeting. The meeting is then moved into your Calendar, as if you had accepted it. Clicking “Decline” informs the organizer you cannot attend the meeting. The meeting is not placed into your Calendar when you decline it.
If allowed by the meeting organizer, you can also click “Propose New Time,” which lets you propose an alternative time for the meeting in another dialog box that opens. This is then sent to the organizer as a new “Meeting Request.” They may then change the time to accommodate your availability, or they may not.
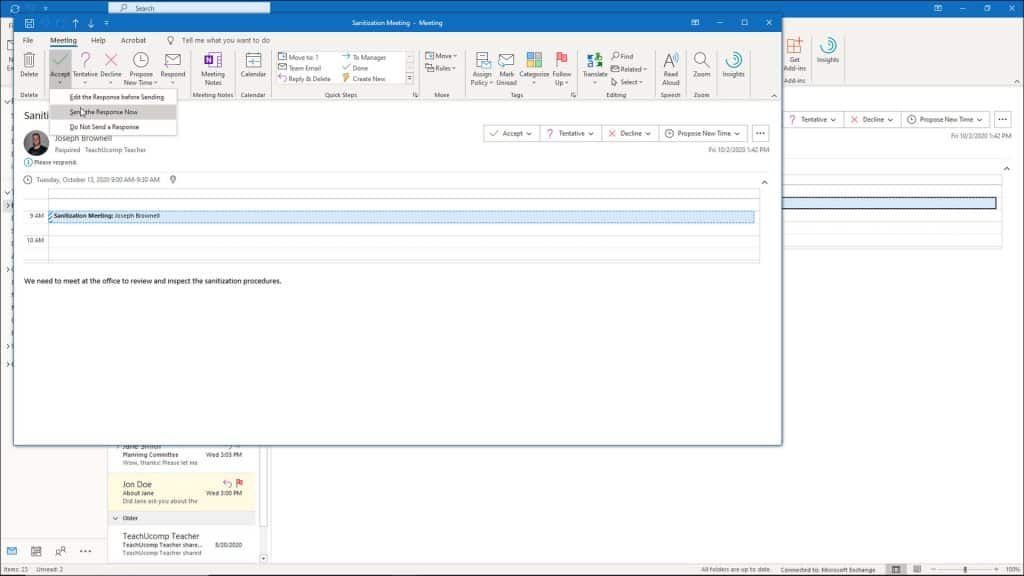
Respond to Meeting Requests in Outlook- Instructions: A picture of a user accepting a meeting request and choosing how to send the response within Outlook.
After clicking the response to send to the meeting organizer, you must then choose a specific option before you can respond to the meeting request. For the “Accept,” “Tentative,” and “Decline” options, there are three choices. For each, you can choose either “Edit the Response before Sending,” which opens a “Meeting Response” dialog box and lets you add comments to your response; “Send the Response Now,” which simply sends your response; or “Do Not Send a Response,” which accepts or declines the meeting but doesn’t inform the meeting organizer. This is not usually recommended.
For the “Propose New Time” choice, the options are either “Tentative and Propose New Time” or “Decline and Propose New Time.” You can choose a new time with either, but the selected response changes your response to the meeting organizer and whether the meeting is added to your Calendar. After you respond to the meeting request, it is automatically deleted from your “Inbox” folder. If you accepted or tentatively accepted the meeting request, then the meeting is also automatically entered into your calendar.
Respond to Meeting Requests in Outlook: Instructions
- When you are invited to a meeting in Outlook, the invitation, which is called a “Meeting Request,” appears in the “Inbox” of your Mail folder.
- To respond to a meeting request in Outlook, either click it once in the “Inbox” pane to select it and then view it within the “Reading Pane” or double-click the meeting request to open it within its own “Meeting” window.
- You must then choose how to respond to the meeting.
- If you are viewing the meeting response in the Reading Pane, the buttons appear at the top of the message.
- If viewing them in the “Meeting” window, they also appear at the top of the message but also appear in the “Respond” button group on the “Meeting” tab in the “Meeting” window.
- Your choices are “Accept,” “Tentative,” “Decline,” or if allowed by the meeting organizer, “Propose New Time.”
- Clicking “Accept” informs the organizer you will attend the meeting. It also moves the meeting into your Calendar.
- Clicking “Tentative” informs the meeting organizer you are tentatively planning to attend the meeting. The meeting is then moved into your Calendar, as if you had accepted it.
- Clicking “Decline” informs the organizer you cannot attend the meeting. The meeting is not placed into your Calendar when you decline it.
- If allowed by the meeting organizer, you can also click “Propose New Time,” which lets you propose an alternative time for the meeting in another dialog box that opens. This is then sent to the organizer as a new “Meeting Request.” They may then change the time to accommodate your availability or not.
- After clicking the response to send to the meeting organizer, you must then choose a specific option before you can respond to the meeting request.
- For the “Accept,” “Tentative,” and “Decline” options, you can choose either “Edit the Response before Sending,” which opens a “Meeting Response” dialog box and lets you add comments to your response; “Send the Response Now,” which simply sends your response; or “Do Not Send a Response,” which accepts or declines the meeting but doesn’t inform the meeting organizer. This is not usually recommended.
- For the “Propose New Time” choice, the options are either “Tentative and Propose New Time” or “Decline and Propose New Time.” You can choose a new time with either, but the selected response changes your response to the meeting organizer and whether the meeting is added to your Calendar.
- After you respond to the meeting request, it is automatically deleted from your “Inbox” folder.
- If you accepted or tentatively accepted the meeting request, then the meeting is also automatically entered into your calendar.