Use Search Folders in Outlook- Instructions and Video
Use Search Folders in Outlook: Video Lesson
This video lesson, titled “Creating Search Folders,” shows how to use search folders in Outlook. This video lesson is from our complete Outlook tutorial, titled “Mastering Outlook Made Easy v.2019 and 365.”
Use Search Folders in Outlook: Overview
You can use search folders in Outlook to help find messages in your Outlook mail folders that match criteria you set. When you create a search folder, the criteria for which you are searching is saved with the folder itself. Therefore, every time you open the folder, it automatically searches for all the Outlook messages that match the folder’s search criteria and then shows those messages. Note that you can only create search folders for Mail folders in Outlook.
To create a new search folder in Outlook, click the “Mail” icon in the Navigation Bar to view your Mail folders. Then click the “Folder” tab of the Ribbon. Then click the “New Search Folder” button in the “New” button group to open the “New Search Folder” dialog box. Click to select one of the search criteria from the listing in the “Select a Search Folder” section of this dialog box. If needed for your selected criteria, then click the “Choose…” button in the “Customize Search Folder” section of this dialog box to open another dialog box where you can set the specific criteria for which to search. Note that the dialog box where you set the criteria changes, depending on which search criteria you initially selected.
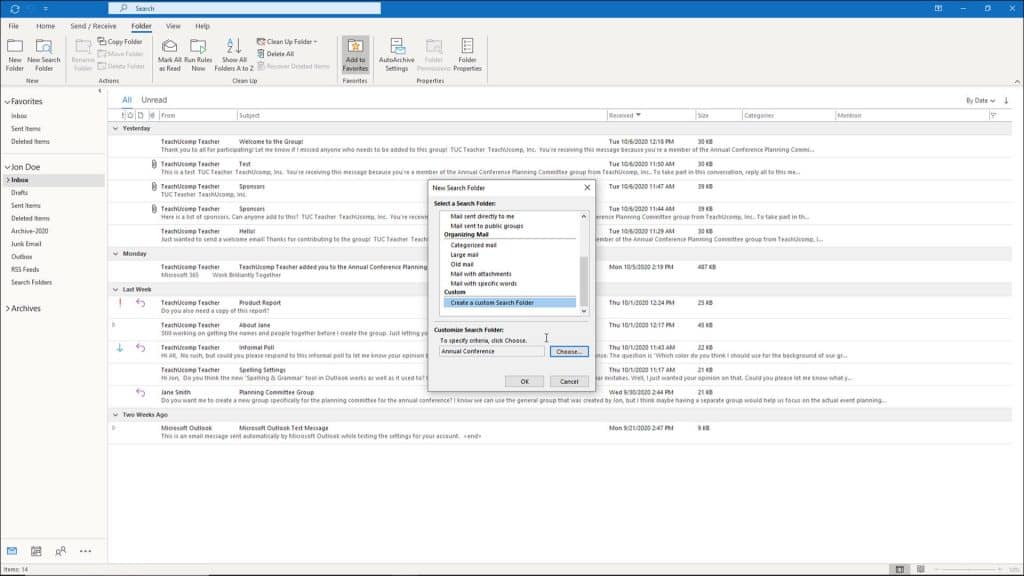
Use Search Folders in Outlook: A picture of a user creating a new search folder in the “New Search Folder” dialog box.
For example, if you select the “Create a custom search folder” choice in the “Select a Search Folder” section of the “New Search Folder” dialog box, then when you click the “Choose…” button at the bottom of the dialog box, you open the “Custom Search Folder” dialog box. Then type a name for the new custom search folder into the “Name” field. Then click the “Criteria” button to open the “Search Folder Criteria” dialog box, where you can specify the criteria for which to search. Then click the “OK” button when you are finished. You can then click the “Browse…” button within the “Custom Search Folder” dialog box to open a “Select Folder(s)” dialog box where you can check the names of the folders within which to search for messages that match the criteria you just set.
After applying your criteria within these dialog box or boxes, if needed for the type of search folder you selected, then click the “OK” buttons in these dialog box or boxes until you return back to the “New Search Folder” dialog box. If needed for your search folder, then select within which email account to search for messages from the “Search mail in” drop-down menu in the “New Search Folder” dialog box. Then click the “OK” button in this dialog box to create the new search folder in the Folder Pane. To use search folders in Outlook, click to select a search folder in the Folder Pane to find the messages in the selected locations that match the criteria you specified.
Use Search Folders in Outlook: Instructions
- To create a new search folder in Outlook, click the “Mail” icon in the Navigation Bar to view your Mail folders.
- Then click the “Folder” tab of the Ribbon.
- Then click the “New Search Folder” button in the “New” button group to open the “New Search Folder” dialog box.
- Click to select one of the search criteria from the listing in the “Select a Search Folder” section of this dialog box.
- If needed for your selected criteria, then click the “Choose…” button in the “Customize Search Folder” section of this dialog box to open another dialog box where you can set the specific criteria for which to search.
- Note that the dialog box where you set the criteria changes, depending on which search criteria you initially selected.
- For example, if you select the “Create a custom search folder” choice in the “Select a Search Folder” section of the “New Search Folder” dialog box, then when you click the “Choose…” button at the bottom of the dialog box, you open the “Custom Search Folder” dialog box.
- Then type a name for the new custom search folder into the “Name” field.
- Then click the “Criteria” button to open the “Search Folder Criteria” dialog box, where you can specify the criteria for which to search.
- Then click the “OK” button when you are finished.
- You can then click the “Browse…” button within the “Custom Search Folder” dialog box to open a “Select Folder(s)” dialog box where you can check the names of the folders within which to search for messages that match the criteria you just set.
- After applying your criteria within these dialog box or boxes, if needed for the type of search folder you selected, then click the “OK” buttons in these dialog box or boxes until you return back to the “New Search Folder” dialog box.
- If needed for your search folder, then select within which email account to search for messages from the “Search mail in” drop-down menu in the “New Search Folder” dialog box.
- Then click the “OK” button in this dialog box to create the new search folder in the Folder Pane.
- To use search folders in Outlook, click to select a search folder in the Folder Pane to find the messages in the selected locations that match the criteria you specified.